
Welcome to the enchanting world of miniature baking! If you are looking to elevate your dessert table, impress guests at a bridal shower, or simply treat yourself to a luxurious afternoon tea, you have found the perfect recipe. These elegant Pink Petit Fours are delicate, visually stunning, and absolutely delicious. In this comprehensive guide, we will walk you through every single step—from baking the perfect sponge to mastering the notoriously tricky poured fondant—so you can create bakery-quality masterpieces right in your own kitchen.
Petit fours (pronounced “petty-fours”) translate directly from French to “small oven.” Historically, these bite-sized treats were baked in the residual heat of large brick ovens after the main bread baking was finished. Today, they are synonymous with elegance, sophistication, and celebration. Let’s dive deep into how you can bring these tiny treasures to life!
🌸 The Enchanting World of French Mini Cakes
Before we start measuring flour and sugar, it is important to understand what makes a petit four so special. Traditional petit fours glacés consist of tiny layers of sponge cake (often almond or vanilla), bound together by a thin layer of jam or buttercream, and enrobed in a sleek, sweet coating called poured fondant. They are then decorated with intricate piping, candied flowers, or delicate edible pearls.
The beauty of the petit four lies in its precision. Every bite must be a perfect balance of fluffy cake, moist filling, and a crisp, sweet exterior. While they look incredibly complex, breaking the process down into manageable steps makes them entirely achievable for home bakers. The key is patience, chilling the cake thoroughly before cutting, and ensuring your icing is at the perfect temperature for pouring.
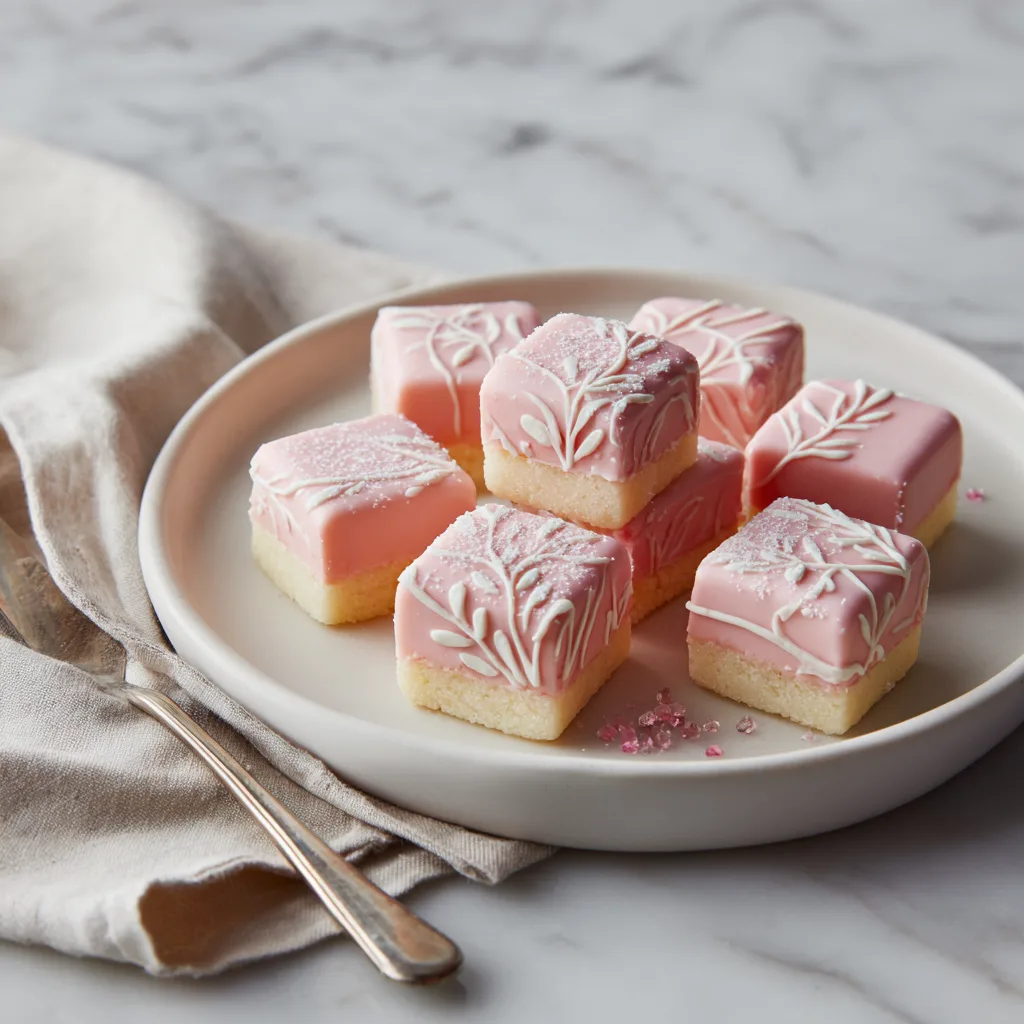
Our recipe today focuses on a stunning pink and white aesthetic. We will be using a dense but tender vanilla pound cake base, which holds up beautifully to being cut into sharp, geometric squares. The pink poured fondant adds a pop of vibrant color, while the delicate white piped vines provide that classic, professional touch.
✨ Why These Pink Delights Will Steal the Show
There are countless desserts you could make for a gathering, but petit fours hold a unique charm. First, they are inherently portion-controlled. In a world of oversized portions, there is something incredibly refined about a dessert that can be consumed in two delicate bites. Second, they are a feast for the eyes. The glossy pink exterior paired with elegant royal icing piped details makes them look like tiny jewels on a dessert platter.
Furthermore, petit fours are highly customizable. While we are using vanilla and a classic pink frosting today, you can easily adapt the flavor profile. Imagine adding a layer of raspberry preserves between the cake layers, or infusing the sponge with lemon zest and pairing it with a lavender-tinted glaze. The possibilities are truly endless once you master the foundational technique.
Whether you are hosting a spring garden party, a baby shower, a wedding reception, or just an upscale brunch with friends, these pink petit fours will undoubtedly be the focal point of your menu. They scream effort, love, and culinary artistry.
🥣 Gather Your Magical Ingredients
To create these wonderful mini cakes, you will need to gather the following ingredients. Precision is key in baking, so be sure to measure carefully.
- – 1 cup (2 sticks) unsalted butter, softened to room temperature
- – 1 cup granulated white sugar
- – 4 large eggs, at room temperature
- – 1 teaspoon high-quality vanilla extract
- – 1/4 teaspoon almond extract (optional, for a traditional flavor)
- – 1 1/2 cups all-purpose flour, sifted
- – 1/4 teaspoon salt
- – 4 cups powdered sugar (for the poured fondant)
- – 1/4 cup light corn syrup
- – 1/4 cup water
- – 1/2 teaspoon vanilla extract (for the fondant)
- – Pink gel food coloring
- – 1/2 cup white royal icing or melted white chocolate (for piping decorations)
👩🍳 Crafting the Magic: Step-by-Step Instructions
Follow these numbered instructions carefully. Take your time, especially during the chilling and glazing stages, to ensure sharp edges and a smooth finish.
- Prepare the Cake Pan: Preheat your oven to 350°F (175°C). Grease an 8×8-inch square baking pan and line it with parchment paper, leaving an overhang on the sides for easy removal later.
- Cream Butter and Sugar: In a large mixing bowl using a hand mixer or a stand mixer fitted with a paddle attachment, cream the softened butter and granulated sugar together until pale, light, and very fluffy. This usually takes about 3 to 5 minutes on medium speed.
- Add Eggs and Flavoring: Add the room-temperature eggs one at a time, beating well after each addition. Scrape down the sides of the bowl as needed. Mix in the vanilla and almond extracts.
- Incorporate Dry Ingredients: In a separate bowl, whisk together the sifted flour and salt. Gradually add the dry ingredients to the wet ingredients, mixing on low speed just until combined. Do not overmix, or the cake will become tough.
- Bake the Sponge: Pour the batter into the prepared pan and smooth the top with a spatula. Bake for 25 to 30 minutes, or until a toothpick inserted into the center comes out clean.
- Cool and Chill: Let the cake cool in the pan for 10 minutes, then use the parchment paper to lift it out onto a wire rack to cool completely. Once entirely cool, wrap the cake tightly in plastic wrap and freeze for at least 1 hour (or up to overnight). Freezing is crucial for cutting sharp, crumb-free squares!
- Cut into Squares: Remove the frozen cake from the freezer. Using a long, sharp, serrated knife, trim the slightly domed top off the cake to create a perfectly flat surface. Trim the edges to make sharp corners. Then, carefully cut the cake into even 1-inch to 1.5-inch squares.
- Prepare the Poured Fondant: In a heatproof bowl set over a saucepan of simmering water (a double boiler), combine the powdered sugar, corn syrup, and water. Stir continuously until the mixture is completely smooth and warm to the touch (about 100°F). Stir in the vanilla extract and a tiny drop of pink gel food coloring until you reach your desired pastel shade. Remove from heat but keep it over the warm water to prevent it from setting.
- Glaze the Petit Fours: Place the frozen cake squares on a wire cooling rack set over a rimmed baking sheet (to catch the drips). Using a spoon or a small ladle, carefully pour the warm pink fondant over each square, ensuring the top and all four sides are completely coated. Allow the excess to drip off. If the fondant gets too thick, gently reheat it over the double boiler.
- Let the Glaze Set: Allow the glazed petit fours to sit undisturbed for about 30 minutes, or until the fondant coating is completely dry and firm to the touch.
- Pipe the Decorations: Place your white royal icing or melted white chocolate into a piping bag fitted with a very small round tip (like a Wilton #1 or #2). Delicately pipe intricate vines, leaves, and small dots onto the top of each set petit four. Let the decorations dry completely before serving.
💡 Pro Tips for the Perfect Poured Fondant
Poured fondant is often the most intimidating part of making petit fours, but it doesn’t have to be. The secret lies in temperature and consistency. If your fondant is too hot, it will run right off the cake and pool at the bottom, leaving your cake visible through a translucent, sticky layer. If it is too cold, it will be gloopy, thick, and won’t create that signature smooth, glass-like finish.
Always use a double boiler to keep the fondant warm gently. If you notice it thickening while you are pouring, simply put it back over the simmering water for 30 seconds. Furthermore, ensure your cake squares are deeply chilled—or even frozen—when you pour the warm fondant over them. The cold cake helps the fondant set almost immediately upon contact, preventing it from soaking into the sponge.
For a truly professional finish, some bakers like to apply a “crumb coat” of thin apricot jam or marzipan before applying the fondant. This seals the cake and provides a perfectly smooth canvas, ensuring no loose crumbs ruin your beautiful pink glaze.
🥂 How to Serve and Store Your Masterpieces
Presentation is everything when it comes to petit fours. Serve them on a tiered cake stand or a beautiful silver platter. Because they are quite sweet, they pair magnificently with slightly bitter or astringent beverages. A pot of Earl Grey tea, a delicate green tea, or even a dry Champagne or Prosecco makes for a heavenly pairing.
If you have leftovers (which is rare!), storing them correctly is vital to preserve their texture. Place them in an airtight container in a single layer. You can keep them at room temperature in a cool, dry place for up to 3 days. Do not refrigerate them if possible, as the moisture and condensation in the fridge can cause the sugar in the poured fondant to weep and ruin your beautiful piped decorations. If you must store them longer, freezing is a better option, though they are always best enjoyed fresh.
💖 A Sweet Farewell to Your Baking Adventure
Creating elegant pink petit fours is truly a labor of love, but the look of delight on your guests’ faces when you serve them makes every single step worthwhile. You have learned the history, mastered the sponge, conquered the poured fondant, and piped delicate designs like a true pastry chef.
Remember that baking is an art form. If your first batch isn’t absolutely perfect, do not be discouraged. The edges might not be perfectly sharp, or the icing might be slightly thick, but they will still taste phenomenal. Keep practicing, experimenting with different colors and flavors, and most importantly, have fun in the process. Happy baking, and enjoy your beautiful, bite-sized creations!
Elegant Pink Petit Fours
Ingredients
Equipment
Method
- Preheat oven to 350°F (175°C). Line an 8×8-inch baking pan with parchment paper.
- Cream the butter and sugar until light and fluffy. Add eggs one at a time, followed by the vanilla extract.
- Gradually mix in the flour and salt until just combined. Pour into the prepared pan.
- Bake for 25-30 minutes until a toothpick comes out clean. Cool completely, then freeze for at least 1 hour.
- Trim the top of the chilled cake to make it perfectly flat, then cut into neat 1-inch squares.
- For the fondant, combine powdered sugar, corn syrup, and water in a double boiler. Heat gently until smooth. Stir in vanilla and pink coloring.
- Place cake squares on a wire rack over a baking sheet. Spoon the warm fondant over each square, ensuring the sides are coated.
- Allow the glaze to set completely (about 30 minutes). Use royal icing to pipe delicate white vines or flowers on top.


