The Irresistible Charm of No-Bake Salted Chocolate Peanut Butter Pucks 🍫🧂✨
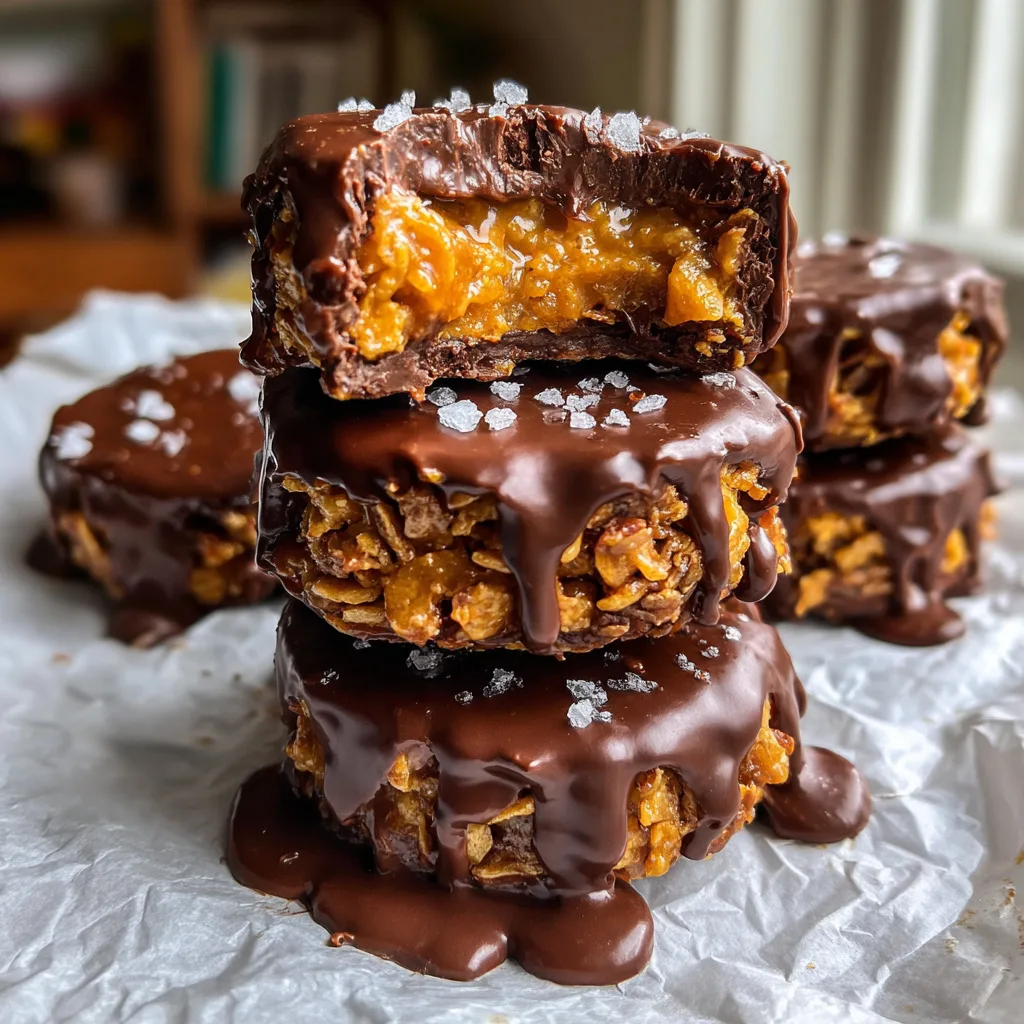
Few flavor combinations can boast the timeless, universally adored status of peanut butter and chocolate. It’s a match made in culinary heaven, a perfect balance of salty, creamy, sweet, and rich. Now, imagine taking that classic duo and elevating it into a substantial, multi-layered confection. A treat that is not just a cookie, not just a truffle, but a *puck* of pure joy. Introducing the No-Bake Salted Chocolate Peanut Butter Puck. Look at that stack! It’s an architecture of indulgence that speaks to the child and the sophisticated dessert lover within all of us.
A Stack of Pure Joy: Re-imagining the Peanut Butter Cup 🥜
What if we could take everything we love about a peanut butter cup and make it better? The typical cup has its place, but sometimes you crave something more substantial. The puck format changes the game. By increasing the volume, you can play with texture in a whole new way. Here, we move beyond just creamy peanut butter and simple chocolate shells. We are adding crunch, a core of unadulterated peanut butter richness, and a finish of coarse sea salt flakes that cuts through the sweetness and unlocks new dimensions of flavor. It’s a more complex, more adult version of the classic that is, surprisingly, just as easy to make.
The beauty is in the structure. We are creating a core that is a satisfying mixture of peanut butter, a little sweetness, and crushed cornflakes. This isn’t a soft, pillowy cookie. It’s a solid disk that has a real bite. When you take that first bite—as shown so temptingly in the photo—you get the snap of the thick chocolate shell, the crunch of the cereal-laden interior, and then a wave of rich peanut butter flavor. It is an experience that a simple cookie cannot replicate. And it all happens without turning on your oven.
The Simple Magic of No-Bake and The Joy of Creation 🍦
One of the single greatest selling points of this recipe is that it is entirely no-bake. For many, the idea of complex baking, measuring, and timing can be daunting. But this? This is purely about construction. There is a primal joy in mixing, pressing, melting, and dipping. It is tactile and satisfying. The hardest part is truly the chilling time. And during that time, you get to anticipate the perfect result. It’s a low-effort, high-reward process that encourages improvisation and fun in the kitchen. It’s perfect for a rainy afternoon, a quick weeknight dessert, or a fun project with kids. The puck shape itself is just more *fun* than a scoop of dough on a sheet.
This simplicity makes it an accessible recipe for anyone, regardless of their baking skill level. If you can stir and press, you can make these pucks. There is no worry about over-baking, spreading, or flat cookies. What you press into the mold is what you get out. The chocolate coating hides any imperfections, and the result is always professional-looking and deeply appetizing. It’s a confidence-building dessert that allows you to feel like a master confectioner with minimal effort.
Texture, Taste, and Triumph: Why This Combination Works So Well 🏆
The success of this treat isn’t a fluke; it’s a triumph of flavor science. We are hitting multiple sensory targets. The contrast between the smooth, dark chocolate and the crunchy interior is the first victory. Your brain loves a good texture contrast. Then comes the flavor. The peanut butter, while creamy, has that inherently salty profile. We lean into this. By adding honey or maple syrup to bind the interior, we create a salted caramel-like effect that doesn’t just taste of peanut butter, but of a rich, complex *toffee* peanut butter. This creates a depth that a simple sweetened peanut butter core lacks.
The dark or semi-sweet chocolate coating provides a necessary bitterness to balance the sweet interior. But the real masterstroke is the sea salt flakes. This is more than a trend; it’s a fundamental flavor enhancer. A pinch of good-quality flake salt doesn’t just make things taste “salty.” It increases our perception of sweetness, balances bitterness, and cleanses the palate. It makes the chocolate taste more like chocolate and the peanut butter taste richer. When you get a flake of salt on your tongue along with the rich puck, your taste buds have to work harder, and the result is a flavor explosion that lingers. This is what makes the Salted Chocolate Peanut Butter Puck a sophisticated, irresistible masterpiece.
Ingredients – The Building Blocks of a Masterpiece 🧱
Gather these essentials to build your own towering stack. Quality of ingredients will translate directly to quality of flavor!
- 1 cup creamy peanut butter
- 1/2 cup honey or maple syrup
- 2 cups crushed cornflakes or crisp rice cereal
- 1/4 cup optional: shredded coconut or flax seeds
- 1.5 cups semi-sweet chocolate chips or dark chocolate chunks
- 1 tablespoon coconut oil or butter
- 1/2 teaspoon coarse sea salt flakes (for topping)
Instructions – Step-by-Step to Confectionery Success 👩🍳
Follow these precise steps to construct your flawless, towering pucks.
- Mix the Base: In a medium bowl, stir together the creamy peanut butter and your chosen sweetener (honey or maple syrup) until a smooth, thick paste forms.
- Add the Crunch: Fold in the crushed cornflakes (and other optional add-ins like coconut or flax) until the cereal is evenly coated. The mixture should be thick and clump together easily.
- Form the Pucks: Press the mixture firmly into a muffin tin or silicone puck molds, creating solid, thick disks. Make sure to pack it in tightly to prevent crumbling later.
- First Chill: Place the molded pucks in the refrigerator for at least 1 hour, or until they are set and firm to the touch. This step is critical.
- Remove from Molds: Carefully remove the set pucks from the molds. Place them on a piece of parchment paper.
- Prepare the Coating: Melt the chocolate chips along with the coconut oil (or butter) in a microwave-safe bowl. Heat in 20-30 second bursts, stirring in between, until the chocolate is smooth and glossy.
- Dip and Set: Dip each puck completely into the melted chocolate, allowing any excess to drip back into the bowl. Return the coated pucks to the parchment-lined sheet.
- Add the Flakes: Immediately sprinkle a pinch of the coarse sea salt flakes on the top of each newly dipped puck before the chocolate sets.
- Final Chill: Chill the completed pucks for 10-15 minutes or until the chocolate is fully hardened.
- Serve and Enjoy!: Stack them high and get ready for a pure flavor experience! They are rich, so one is a perfect serving.
The Ultimate Indulgence: Endless Possibilities for Customization 🎨
The beauty of this recipe lies in its adaptability. While the classic combination is perfect, you can customize these pucks to your heart’s content. Think of the puck as a platform for your creativity. Want a different nut flavor? Almond butter or cashew butter works beautifully. Seeking even more texture? Add crushed pretzel pieces or chopped peanuts to the base. The type of cereal can be varied too; crushed pretzels or granola can create a different kind of crunch. And for a more adventurous twist, add a drizzle of white chocolate or a sprinkle of cayenne pepper for a little heat. The possibilities are truly endless, and this customizability makes the No-Bake Salted Chocolate Peanut Butter Puck a versatile treat that can be tailored to any taste.
This endless customization is one of the ways this recipe stays exciting. You can make it for a specific person or a specific event. Make a white chocolate and cranberry version for the holidays, or a pretzel and dark chocolate one for a game day snack. Each variation offers a new adventure, a new triumph, and a new reason to love this simple, sophisticated confection.
Conclusion: Your New Go-To Indulgence 🏆
The No-Bake Salted Chocolate Peanut Butter Puck is more than just a recipe; it’s a revelation. In a world of complex and demanding desserts, it stands as a shining example of how simple ingredients and a few simple steps can create a masterpiece of flavor and texture. With its no-bake convenience, its irresistible combination of flavors, and its endless possibilities for customization, it is poised to become your new go-To indulgence. So gather your ingredients, fire up your microwave, and prepare to be amazed. A stack of pure joy awaits you!
No-Bake Salted Chocolate Peanut Butter Pucks
Ingredients
Equipment
Method
- In a medium bowl, stir together the peanut butter and honey (or maple syrup) until combined.
- Fold in the crushed cornflakes (and optional add-ins) until evenly coated.
- Press the mixture firmly into a muffin tin or puck molds, creating solid, thick disks. Chill for at least 1 hour to set completely.
- Carefully remove the set pucks from the molds.
- Melt the chocolate chips with the coconut oil (or butter) in the microwave in short bursts, stirring frequently, until smooth.
- Dip each puck completely into the melted chocolate, allowing excess to drip off, and place on a parchment-lined sheet.
- Immediately sprinkle the top of each puck with sea salt flakes.
- Chill for 10-15 minutes or until the chocolate is fully set.