The Ultimate Salted Dark Chocolate Peanut Butter Rice Crispy Bars: A Grown-Up Twist on a Childhood Classic
Nostalgia is a powerful ingredient. It takes us back to school bake sales, sticky fingers, and the simple joy of a marshmallow-laden treat wrapped in blue foil. But as we grow older, our palates evolve. We crave depth, complexity, and that irresistible interplay between salty and sweet. Enter the **Salted Dark Chocolate Peanut Butter Rice Crispy Bar**. This is not the cloyingly sweet, white-sugar snack of your childhood. This is a sophisticated, decadent, and texture-rich dessert that commands attention.
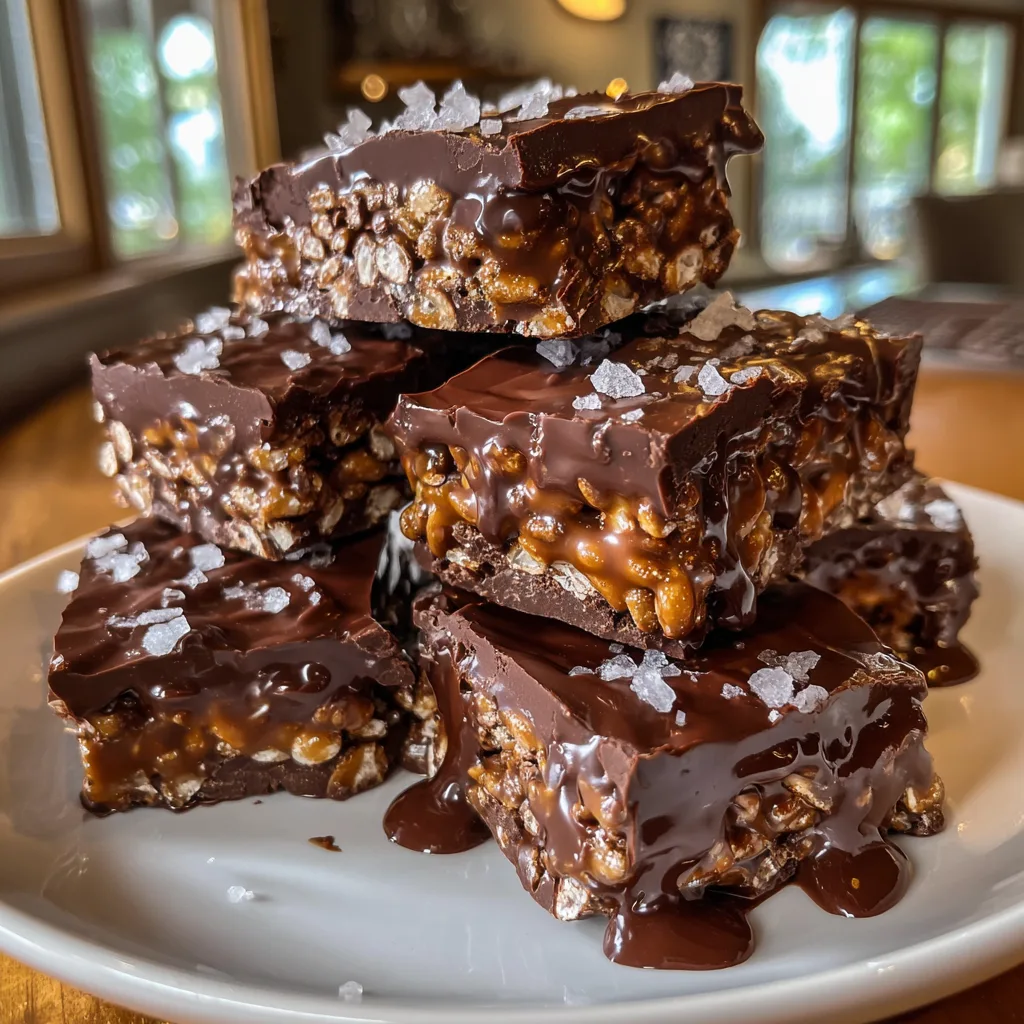
Imagine a base that is dense yet crispy, held together not just by marshmallow, but by a rich, caramel-like fusion of creamy peanut butter and honey (or syrup). This savory-sweet foundation is then crowned with a thick, luxurious layer of dark chocolate ganache, which provides a snap when you bite into it. Finally, the masterpiece is finished with a generous sprinkling of flaky sea salt. The salt doesn’t just sit there; it pops, cutting through the richness of the chocolate and elevating the nutty flavors of the base. It is, quite simply, the perfect bite.
In this comprehensive guide, we are going to deconstruct this no-bake wonder. We will explore why the specific type of peanut butter matters, how to achieve a chocolate layer that doesn’t crack when sliced, and the science behind keeping your cereal crispy for days. Whether you are bringing these to a dinner party or keeping them all to yourself (we won’t judge), this recipe is about to become your new signature treat.
🥜 Why This Recipe Works: The Flavor Trinity
The success of this bar relies on the “Flavor Trinity”: Sweet, Salty, and Fatty (in the best way possible). Standard rice crispy treats are often one-dimensional—just sweet. By introducing peanut butter and dark chocolate, we create a more complex profile.
The Binder: Unlike traditional treats that rely solely on melted marshmallows, this recipe leans towards the “Scotcheroo” style of binding. We use a mixture of sugar (or honey) and peanut butter melted together. When this mixture cools, it firms up, creating a bar that is chewier and denser than the airy marshmallow version. This density makes it feel more like a candy bar and less like a snack cake.
The Chocolate Cap: A thin drizzle won’t do here. We want a distinct layer. However, solid chocolate can be too hard to bite through comfortably alongside the chewy base. The secret is adding a touch of peanut butter or butter to the melting chocolate. This lowers the melting point slightly and keeps the chocolate layer “soft-bite,” meaning it yields with the base rather than shattering into shards.
The Salt Factor: Salt is a flavor enhancer. It suppresses bitterness (in the dark chocolate) and enhances sweetness. By using flaky sea salt (like Maldon or fleur de sel) instead of table salt, we get concentrated bursts of salinity that provide a textural crunch and a visual sparkle that makes the bars look professionally made.
🥣 Ingredient Deep Dive: Quality Counts
With a recipe this simple, there is nowhere for low-quality ingredients to hide. Here is exactly what you need to look for.
The Cereal
Crisp Rice Cereal: You need a fresh box. Cereal that has been sitting in the pantry for six months will be stale and chewy (the bad kind of chewy). Stick to the classic toasted rice cereal. Avoid the “puffed” rice varieties that look like bags of grain; they don’t have the structural integrity to hold up to the heavy peanut butter binder.
The Peanut Butter
Creamy Commercial vs. Natural: For the best texture, use a standard creamy peanut butter (like Jif or Skippy). Natural peanut butters that require stirring often separate, which can lead to a greasy bar that doesn’t set properly. If you must use natural, ensure it is extremely well-emulsified before measuring.
The Sweetener
Honey vs. Corn Syrup: Traditional Scotcheroos use corn syrup. For a slightly more nuanced flavor (and a bit less processed profile), honey or brown rice syrup works beautifully. Honey adds a floral note that pairs well with dark chocolate. Maple syrup is too thin and will result in a soggy bar, so avoid it as a primary binder.
The Chocolate
Semi-Sweet or Dark: Because the base is sweet, a dark chocolate (60-70% cocoa) offers the best balance. Milk chocolate can make the bar overwhelmingly sugary. Use high-quality chips or couverture chocolate bars for the smoothest melt.
🛠️ Essential Equipment
No oven is required, but the right tools make assembly a breeze.
- 8×8 or 9×9 inch Baking Pan: An 8×8 pan yields a nice, thick bar (as seen in the photo). A 9×13 pan will result in thinner, crisper bars.
- Parchment Paper: Essential for lifting the bars out of the pan for clean slicing. Do not rely on just greasing the pan.
- Large Pot: You need plenty of room to stir the cereal into the sticky mixture without it flying all over your stove.
- Offset Spatula: This tool is perfect for spreading the chocolate into a smooth, glass-like layer.
🛒 Ingredients
Gather everything before you start the heat. The sugar mixture can harden quickly.
- — Base Layer —
- 6 cups crisp rice cereal (fresh)
- 1 cup creamy peanut butter
- 1 cup granulated sugar (or 3/4 cup honey for a softer bite)
- 1 cup light corn syrup (or brown rice syrup)
- 1 teaspoon vanilla extract
- Pinch of salt
- — Chocolate Topping —
- 2 cups semi-sweet or dark chocolate chips
- 2 tablespoons creamy peanut butter (to soften the chocolate)
- 1 tablespoon flaky sea salt (Maldon is best)
🔥 Instructions
These come together fast, so read through before you light the stove!
Salted Chocolate Peanut Butter Crispy Bars
Ingredients
Equipment
Method
- Line an 8×8-inch square pan with parchment paper and lightly grease it.
- In a large pot over medium heat, combine sugar and corn syrup. Stir until sugar dissolves and mixture begins to bubble. Do not overcook.
- Remove from heat. Stir in 1 cup peanut butter, vanilla, and salt until smooth.
- Add rice cereal to the pot and fold gently until evenly coated.
- Press mixture firmly into the prepared pan to create an even layer.
- Melt chocolate chips with 2 tablespoons of peanut butter in the microwave or double boiler until smooth.
- Spread chocolate over the cereal base. Sprinkle immediately with flaky sea salt.
- Allow to cool at room temperature until chocolate sets (approx 2 hours) before slicing.
Notes
- Prep the Pan: Line an 8×8-inch square baking pan with parchment paper, leaving an overhang on two sides to act as handles. Lightly grease the parchment with butter or cooking spray to ensure zero sticking. Measure your cereal into a very large heat-proof bowl.
- Make the Binder: In a medium saucepan over medium heat, combine the sugar and corn syrup (or honey). Stir frequently until the sugar has completely dissolved and the mixture just begins to bubble. Warning: Do not let it boil vigorously or cook for too long, or your bars will be rock hard. As soon as it bubbles, remove from heat.
- Add Flavors: Immediately stir the 1 cup of peanut butter, vanilla extract, and pinch of salt into the hot sugar mixture. Stir vigorously until the peanut butter melts and the mixture is smooth and uniform.
- Combine with Cereal: Pour the hot peanut butter mixture over the rice cereal. Using a sturdy silicone spatula or wooden spoon, fold the mixture gently but quickly. Ensure every grain of rice is coated. Work fast as the mixture stiffens as it cools.
- Press into Pan: Dump the mixture into the prepared pan. Grease your hands or use a piece of wax paper to press the mixture firmly and evenly into the corners. You want a flat, compacted surface.
- Melt the Topping: In a microwave-safe bowl, combine the chocolate chips and the 2 tablespoons of peanut butter. Microwave in 30-second intervals, stirring in between, until completely smooth and glossy. Alternatively, use a double boiler on the stove.
- Spread and Sprinkle: Pour the melted chocolate over the cereal base. Use an offset spatula or the back of a spoon to spread it into an even layer, reaching all the way to the edges. Immediately sprinkle the flaky sea salt over the wet chocolate so it adheres.
- Set: Let the bars sit at room temperature until the chocolate sets (about 2-3 hours). If you are in a rush, you can refrigerate them for 30 minutes, but let them come back to room temperature before cutting to prevent the chocolate from cracking.
- Slice and Serve: Lift the bars out using the parchment handles. Place on a cutting board. Use a large, sharp knife to cut into 16 squares. Wipe the knife with a warm cloth between cuts for clean edges.
✨ Expert Tips for the Perfect Slice
The “Crack” Prevention: We have all tried to cut a chocolate-covered treat only to have the top shatter into a mess. To avoid this, add a teaspoon of coconut oil or butter to the chocolate if you aren’t using the peanut butter trick. Also, score the chocolate lightly with your knife where you plan to cut before it fully hardens.
Don’t Over-Press: While you want the bars to hold together, pressing them down with hydraulic force will crush the air pockets in the rice cereal, resulting in a dense, hard brick. Use firm but gentle pressure.
Flavor Variations:
The “Nutty” One: Stir 1/2 cup of roasted peanuts into the cereal mixture for extra crunch.
The “Browned Butter” One: If using marshmallows instead of the syrup binder, brown the butter first for a nutty, caramel flavor.
The “Double Chocolate”: Stir 1/2 cup of mini chocolate chips into the cereal base (wait for it to cool slightly so they don’t melt completely).
📦 Storage and Shelf Life
These bars are sturdy, making them excellent for shipping or gifting.
Room Temperature: Store in an airtight container at room temperature for up to 5 days. Layer them with wax paper to prevent sticking. Do not store them in direct sunlight or the chocolate will bloom (turn white) and melt.
Freezing: Yes, you can freeze them! Wrap individual squares in plastic wrap and place in a freezer bag. They keep for up to 6 weeks. Thaw on the counter for 15 minutes before eating—eating them frozen is delicious but dangerous for your teeth!
🍽️ Serving Suggestions
While perfect on their own, you can elevate these for a dessert course.
- Plated Dessert: Serve a slightly warm square (microwave for 5 seconds) with a scoop of salted caramel ice cream.
- Coffee Companion: The salty dark chocolate pairs exceptionally well with an espresso or a dark roast coffee.
- Party Platter: Cut them into smaller “bite-sized” pieces (1×1 inch) and serve on a platter with strawberries and pretzels for a sweet and savory spread.
Conclusion: The Bar That Has It All
The Salted Dark Chocolate Peanut Butter Rice Crispy Bar is the ultimate crowd-pleaser. It bridges the gap between the comfort food of our youth and the gourmet flavors we appreciate as adults. It requires no oven, minimal ingredients, and delivers maximum satisfaction. The contrast of the crispy, airy rice against the smooth, rich chocolate and the sharp bite of sea salt creates a sensory experience that is hard to beat.
So next time you are asked to bring a dessert, or simply need a treat to get you through the week, skip the bakery and make these. They are effortless, impressive, and utterly addictive. Enjoy the crunch!