
There are few flavor combinations in the culinary world as universally beloved and fiercely celebrated as chocolate and peanut butter. It is a match made in dessert heaven—a symphony of rich, slightly bitter cocoa notes dancing in perfect harmony with the salty, nutty, creamy profile of roasted peanuts. If you are looking for a show-stopping dessert that requires zero time in the oven but delivers maximum flavor impact, you have just found your new holy grail. Welcome to the world of the No-Bake Chocolate Peanut Butter Pie.
This article will guide you through every single step, secret, and scientific reason why this pie works so beautifully. Whether you are preparing for a massive holiday gathering, a casual weekend potluck, or simply treating yourself after a long week, this comprehensive guide will ensure your pie turns out flawlessly. Grab your whisk, prepare your tastebuds, and let’s dive into the ultimate dessert experience! 🥧✨
Why This Flavor Symphony is Pure Magic 🎶
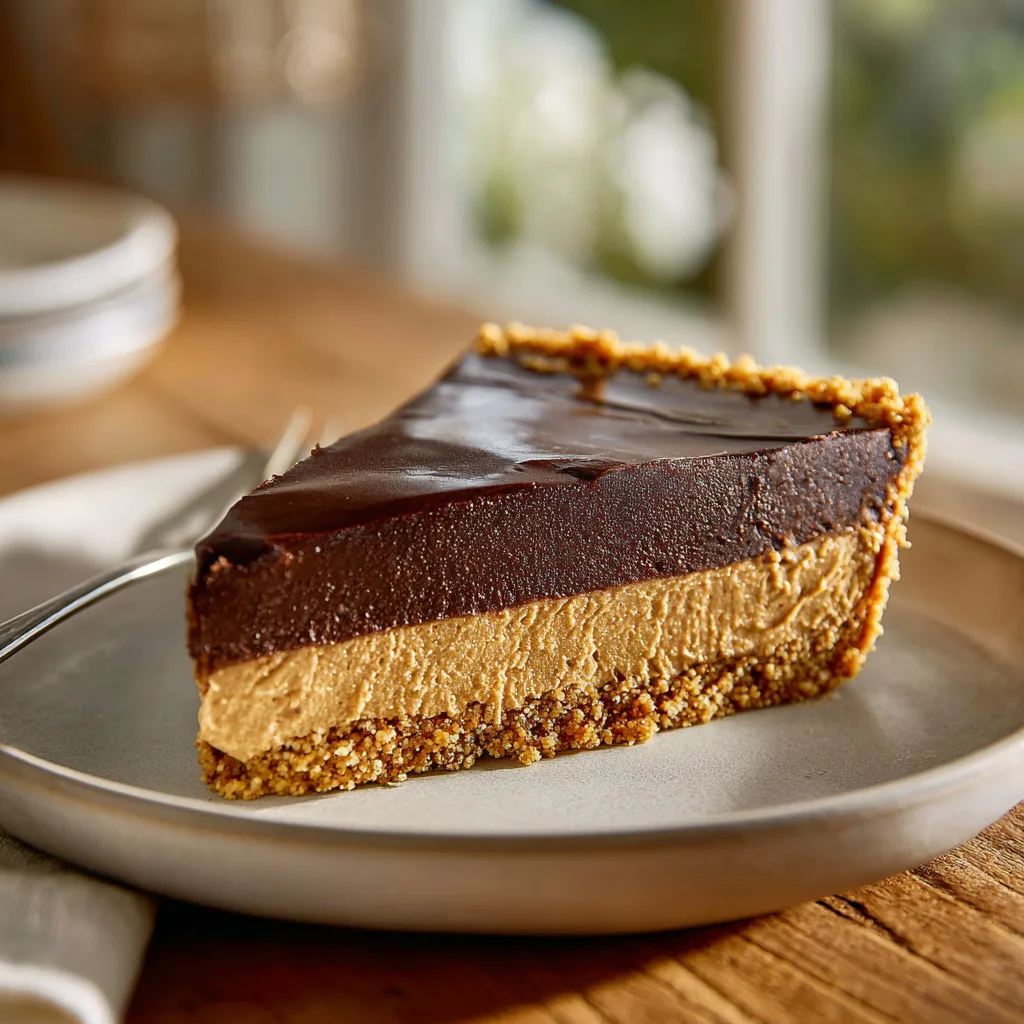
Understanding why we crave this specific pie requires a brief foray into the science of taste. Human palates are naturally drawn to contrasting flavor profiles. The sweetness of the chocolate ganache combined with the savory, salty notes of the peanut butter creates a phenomenon known as “flavor layering.” When you add the textural elements—the satisfying granular crunch of a buttery graham cracker crust, the airy, mousse-like consistency of the peanut butter center, and the dense, silky smoothness of the chocolate top—you create a multisensory experience.
Furthermore, because this is a no-bake recipe, the ingredients maintain their pure, unadulterated flavors. The peanut butter doesn’t dry out or become chalky, as it sometimes can in baked goods, and the chocolate retains its luxurious melt-in-the-mouth temper. It’s an effortless dessert that tastes like you spent hours toiling away in a professional patisserie.
The Anatomy of the Perfect Pie 🏗️
To master this pie, we must break it down into its three crucial layers. Each component plays a vital role in the structural integrity and flavor balance of the final slice.
1. The Golden Foundation: The Crust
Every great pie needs a sturdy foundation. For this recipe, we utilize a classic graham cracker crust. The honey and cinnamon notes in graham crackers provide a beautiful, subtle background flavor that complements both the chocolate and the peanut butter. By blending the crumbs with melted butter, we create a binding agent that, when chilled, sets into a firm, sliceable base. The key here is compression—pressing the crumbs firmly and evenly into the pan ensures your pie won’t crumble when you cut into it.
2. The Cloud-Like Center: Peanut Butter Mousse
The heart of this pie is its peanut butter filling. We aren’t just slathering peanut butter into a crust; we are creating a luscious, stabilized mousse. By combining smooth peanut butter with softened cream cheese, we introduce a slight tang that cuts through the heavy sweetness. Whipping heavy cream (or using a stabilized whipped topping) and gently folding it into the peanut butter mixture introduces trapped air, resulting in a layer that is rich in flavor but impossibly light in texture.
3. The Crowning Glory: Dark Chocolate Ganache
The top layer is where the decadence truly shines. A classic ganache—made by pouring simmering heavy cream over finely chopped high-quality chocolate—creates a glossy, exquisite finish. As the ganache cools and sets over the chilled peanut butter layer, it transforms into a fudgy, firm, yet yielding topping that seals the pie and provides a beautiful visual contrast.
Essential Equipment for Baking Success 🥣
While this is an easy, no-bake recipe, having the right tools on hand makes the process infinitely smoother:
- – A standard 9-inch pie dish (glass or ceramic works beautifully).
- – A food processor (for effortlessly crushing the graham crackers).
- – An electric hand mixer or stand mixer (crucial for whipping the cream cheese and heavy cream to the right volume).
- – Silicone spatulas (for gently folding ingredients without deflating them).
- – A flat-bottomed measuring cup (the secret tool for pressing your crust perfectly flat).
- – Microwave-safe bowls or a double boiler (for the ganache).
Ingredients 🛒
- – 1 1/2 cups graham cracker crumbs (about 10-12 full sheets)
- – 1/3 cup granulated sugar
- – 6 tablespoons unsalted butter, melted
- – 1 (8 oz) block cream cheese, softened to room temperature
- – 1 cup creamy peanut butter (avoid natural, oil-separated varieties for this recipe)
- – 1 cup powdered sugar
- – 1 teaspoon pure vanilla extract
- – 1 cup heavy whipping cream, cold (for the filling)
- – 1 cup semi-sweet or dark chocolate chips
- – 1/2 cup heavy whipping cream (for the ganache)
Instructions 📝
- Prepare the Crust: In a medium mixing bowl, combine the graham cracker crumbs, granulated sugar, and melted butter. Stir until the mixture resembles wet sand and holds together when squeezed.
- Form the Base: Pour the crumb mixture into your 9-inch pie dish. Use the bottom of a measuring cup or a glass to firmly press the crumbs into the bottom and up the sides of the dish. Place the crust in the freezer for 15-20 minutes to set while you make the filling.
- Whip the Cream: In a chilled bowl, use an electric mixer to beat the 1 cup of cold heavy whipping cream until stiff peaks form. Set aside.
- Mix the Peanut Butter Base: In a separate large bowl, beat the softened cream cheese and creamy peanut butter together until completely smooth and blended. Add the powdered sugar and vanilla extract, and beat until light and fluffy.
- Fold to Combine: Gently fold the whipped cream into the peanut butter mixture using a silicone spatula. Use broad, sweeping motions to avoid deflating the air in the whipped cream. Mix until no white streaks remain.
- Fill the Pie: Remove the crust from the freezer. Spoon the peanut butter filling into the crust, smoothing the top with an offset spatula. Return the pie to the refrigerator to chill for at least 1 hour.
- Create the Ganache: Place the chocolate chips in a heat-proof bowl. In a small saucepan or the microwave, heat the remaining 1/2 cup of heavy cream until just simmering (do not boil). Pour the hot cream over the chocolate chips. Let it sit untouched for 3 minutes, then whisk gently until smooth, glossy, and fully combined.
- Top the Pie: Pour the chocolate ganache evenly over the chilled peanut butter layer. Use a spatula to gently coax the chocolate to the edges.
- Final Chill: Refrigerate the pie for at least 3 to 4 hours, preferably overnight, to allow all the layers to firmly set.
- Serve: Slice with a hot, clean knife for perfect, bakery-style cuts. Serve cold and enjoy!
No-Bake Chocolate Peanut Butter Pie
Ingredients
Equipment
Method
- In a bowl, mix graham cracker crumbs, granulated sugar, and melted butter. Press firmly into the bottom and sides of a 9-inch pie dish. Freeze for 15-20 minutes.
- Whip 1 cup of cold heavy cream until stiff peaks form. Set aside.
- In another bowl, beat softened cream cheese and peanut butter until smooth. Add powdered sugar and vanilla, beating until fluffy.
- Gently fold the whipped cream into the peanut butter mixture until fully combined. Pour into the chilled crust and smooth the top. Refrigerate for 1 hour.
- Heat 1/2 cup of heavy cream until simmering, then pour over the chocolate chips. Let sit for 3 minutes, then whisk until smooth.
- Pour the chocolate ganache over the pie, spreading it to the edges. Chill the pie for at least 3-4 hours before serving.
Notes
Pro-Tips for Flawless Execution 💡
Want to guarantee your pie looks like it belongs in a magazine? Follow these insider tips:
The Hot Knife Trick: Because the chocolate ganache sets firmly and the peanut butter layer is softer, cutting the pie can sometimes result in a messy slice. To get perfect, sharp edges like the one in our photos, run a sharp chef’s knife under very hot water, wipe it completely dry with a towel, and make your cut. Repeat the heating and wiping process for every single slice.
Room Temperature Ingredients: Ensure your cream cheese is truly at room temperature before you begin. If it is even slightly cold, you will end up with tiny, stubborn lumps in your smooth peanut butter filling that are impossible to beat out later.
Choosing the Right Peanut Butter: While we all love natural, organic peanut butter, this is not the time to use it. Natural peanut butters that require stirring can separate and release oils into the pie, compromising the structural integrity of the mousse layer. Stick to conventional, stabilized creamy peanut butter (like Jif or Skippy) for the best results.
Frequently Asked Questions 🤔
Can I freeze this pie? Absolutely! In fact, this pie freezes beautifully. You can freeze the entire pie wrapped tightly in plastic wrap and aluminum foil for up to 2 months. Thaw it in the refrigerator overnight before serving. Alternatively, you can serve it straight from the freezer for an ice-cream-cake-like experience!
How long will it last in the fridge? If kept in an airtight container or wrapped well, the pie will stay fresh and delicious in the refrigerator for up to 5 days.
Can I make this gluten-free? Yes, incredibly easily. Simply swap the standard graham crackers for your favorite brand of gluten-free graham crackers or gluten-free vanilla cookies. The rest of the ingredients are naturally gluten-free (always double-check your specific chocolate and peanut butter labels to be safe).
Creative Variations to Try 🎨
Once you master the base recipe, this pie becomes a fantastic canvas for your culinary creativity. Here are a few variations to elevate your dessert game:
The Pretzel Crust: Swap the graham crackers for an equal amount of crushed salted pretzels. You may need to add an extra tablespoon of butter to help it bind. The pretzel crust amplifies the salty-sweet dynamic beautifully.
The Candy Bar Upgrade: Before pouring the ganache over the top, sprinkle a layer of chopped peanut butter cups, crushed peanuts, or caramel bits over the peanut butter filling. Pour the ganache over the surprises for a hidden textural treat.
Oreo Overload: Love chocolate? Swap the graham cracker crust for an Oreo cookie crust. Just remember that if you use the cream-filled cookies, you will need slightly less melted butter for the crust.
Conclusion: A Slice of Heaven ✨
In the vast world of desserts, the No-Bake Chocolate Peanut Butter Pie stands as a towering achievement of flavor, texture, and convenience. It bypasses the stress of baking, utilizes accessible ingredients, and delivers a sophisticated, incredibly satisfying result. Whether you are a novice baker looking to impress your friends or a seasoned chef wanting a reliable, crowd-pleasing classic, this pie is guaranteed to earn you standing ovations at the dinner table. So, gather your ingredients, embrace the magic of chocolate and peanut butter, and enjoy every decadent, creamy bite!


