
🎄 Grinch Mini Cheesecakes: Festive Green Holiday Treats 🎄
Bring the magic of Whoville to your holiday table with these adorable Grinch Mini Cheesecakes! These delightful bite-sized desserts feature a vibrant green cheesecake filling nestled in a buttery graham cracker crust, topped with fluffy whipped cream and fresh strawberries. Perfect for Christmas parties, holiday gatherings, or anyone who loves the classic tale of the Grinch who stole Christmas, these mini cheesecakes are as fun to make as they are to eat.
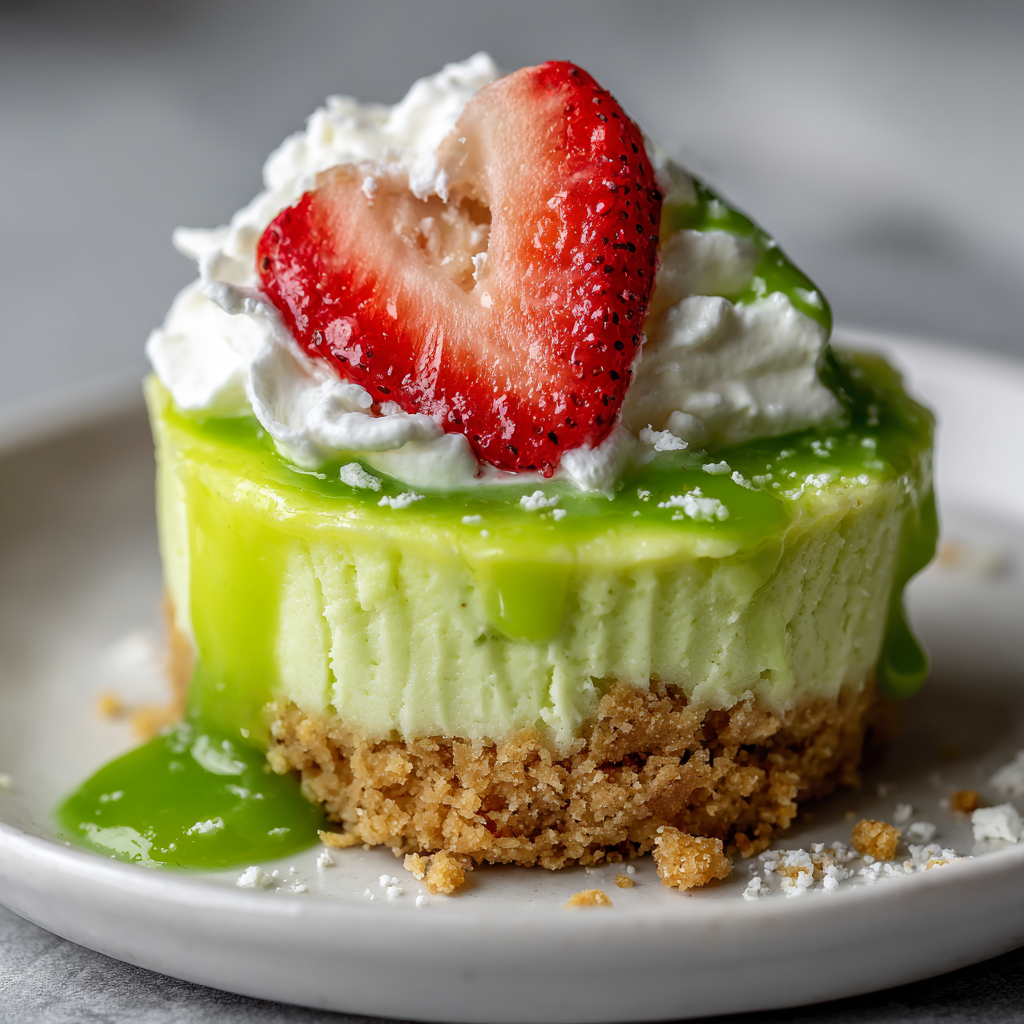
The beauty of these Grinch-inspired treats lies in their simplicity and visual appeal. The bright green color immediately evokes the iconic character, while the individual serving size makes them perfect for entertaining. No need to slice and serve a full cheesecake – these mini versions are grab-and-go friendly, making them ideal for busy holiday celebrations where guests can easily enjoy their dessert without the fuss of plates and forks.
What makes this recipe particularly special is how it combines classic cheesecake flavor with a whimsical holiday theme. The tangy cream cheese filling is perfectly balanced with just the right amount of sweetness, while the graham cracker crust provides a satisfying crunch. The addition of lime juice not only contributes to the vibrant green color but also adds a subtle citrus note that brightens the rich cheesecake filling.
Whether you’re hosting a Christmas movie marathon featuring the Grinch, planning a festive cookie exchange, or simply looking for a creative holiday dessert that will delight both kids and adults, these mini cheesecakes are guaranteed to steal hearts (in the best way possible!). They’re also incredibly versatile – you can make them ahead of time and store them in the refrigerator, making your holiday hosting duties much more manageable.
🥄 Why You’ll Love This Grinch Mini Cheesecake Recipe 🥄
These Grinch Mini Cheesecakes check all the boxes for the perfect holiday dessert. First and foremost, they’re incredibly easy to make, requiring no advanced baking skills or complicated techniques. Even beginner bakers can achieve impressive results with this straightforward recipe. The no-bake aspect of the filling means you won’t heat up your kitchen during the busy holiday season, and there’s no risk of cracked cheesecake tops that sometimes plague traditional baked cheesecakes.
The portion control aspect of mini cheesecakes is another huge advantage. Each guest gets their own perfectly sized dessert, eliminating the guesswork of cutting uniform slices. This also means everyone can enjoy their treat without feeling guilty about overindulging – after all, they’re just mini! The individual servings also make these cheesecakes ideal for packaging as gifts or including in holiday dessert boxes for friends and family.
From a visual standpoint, these green beauties are absolute showstoppers. The bright, festive color immediately draws attention on any dessert table, and the contrast between the green filling, white whipped cream, and red strawberry creates a perfect Christmas color palette. Kids especially love these themed treats, and they’re fantastic for getting little ones excited about holiday baking and cooking together as a family.
The make-ahead convenience cannot be overstated. These mini cheesecakes can be prepared up to two days in advance and stored in the refrigerator, with the whipped cream and strawberry garnish added just before serving. This advance preparation takes pressure off busy holiday schedules and ensures you have one less thing to worry about on the day of your gathering.
🍰 Ingredients 🍰
For the Crust:
- 1½ cups graham cracker crumbs
- ¼ cup granulated sugar
- 6 tablespoons unsalted butter, melted
For the Cheesecake Filling:
- 16 ounces cream cheese, softened to room temperature
- ½ cup granulated sugar
- 2 large eggs, room temperature
- 1 teaspoon vanilla extract
- 2 tablespoons fresh lime juice
- Green gel food coloring
- ½ cup sour cream, room temperature
For the Topping:
- 1 cup heavy whipping cream
- 2 tablespoons powdered sugar
- Green food coloring (optional)
- Fresh strawberries, sliced
- Red heart sprinkles (optional)
📝 Step-by-Step Instructions 📝
- Begin by preheating your oven to 325°F (165°C) and line a standard 12-cup muffin tin with aluminum foil or paper cupcake liners. This preparation ensures your mini cheesecakes will bake evenly and release easily from the pan once cooled.
- Prepare the graham cracker crust by combining the graham cracker crumbs, sugar, and melted butter in a medium mixing bowl. Stir the mixture thoroughly until all the crumbs are evenly moistened and the texture resembles wet sand. This proper distribution of butter ensures your crust will hold together nicely.
- Divide the graham cracker mixture evenly among the 12 lined muffin cups, using approximately 1½ tablespoons per cup. Press the mixture firmly into the bottom of each liner using the back of a spoon or a small glass to create a compact, even layer. The firmer you press, the better your crust will hold together.
- Bake the crusts in the preheated oven for 5 minutes to set them slightly. Remove from the oven and allow to cool while you prepare the cheesecake filling. This brief baking helps create a sturdier base for your filling.
- In a large mixing bowl, beat the softened cream cheese with an electric mixer on medium speed until completely smooth and creamy with no lumps remaining. This typically takes about 2-3 minutes. Scrape down the sides of the bowl as needed to ensure even mixing.
- Add the granulated sugar to the cream cheese and continue beating until fully incorporated and the mixture is light and fluffy. This process helps dissolve the sugar and creates a smooth texture in your final cheesecake.
- Add the eggs one at a time, beating well after each addition and scraping down the bowl sides between additions. Be careful not to overmix once the eggs are added, as this can incorporate too much air and cause cracking during baking.
- Mix in the vanilla extract, fresh lime juice, and sour cream until just combined. The lime juice not only adds flavor but also helps activate the green color you’ll add next.
- Add green gel food coloring gradually, starting with a small amount and mixing thoroughly before adding more. Continue adding color until you achieve your desired vibrant Grinch-green shade. Gel coloring works better than liquid as it won’t thin your filling.
- Carefully spoon or pipe the green cheesecake filling over the prepared crusts in each muffin cup, filling each about three-quarters full. Tap the muffin tin gently on the counter a few times to release any air bubbles trapped in the filling.
- Bake the mini cheesecakes for 18-20 minutes, until the edges are set but the centers still jiggle slightly when gently shaken. Avoid overbaking as this can cause dry, cracked cheesecakes. The residual heat will continue cooking them as they cool.
- Turn off the oven and crack the oven door open slightly, allowing the cheesecakes to cool gradually in the oven for about 15 minutes. This slow cooling process helps prevent cracking from sudden temperature changes.
- Remove the cheesecakes from the oven and let them cool completely at room temperature on a wire rack for about an hour. Once cooled, transfer them to the refrigerator to chill for at least 3 hours or preferably overnight for the best texture and flavor.
- Before serving, prepare the whipped cream topping by beating the heavy cream with powdered sugar in a chilled bowl until stiff peaks form. If desired, add a tiny amount of green food coloring to tint the cream light green for extra Grinch effect.
- Top each chilled mini cheesecake with a dollop of whipped cream, a fresh strawberry slice, and optional red heart sprinkles to represent the Grinch’s growing heart. Serve immediately and watch these festive treats disappear!
🎁 Pro Tips for Perfect Grinch Mini Cheesecakes 🎁
Achieving bakery-quality mini cheesecakes at home is easier than you think with these professional tips. First, always ensure your cream cheese is properly softened to room temperature before beginning. Cold cream cheese will create lumps in your filling that are difficult to smooth out, resulting in an uneven texture. Leave your cream cheese on the counter for at least an hour before starting, or soften it gently in the microwave using 10-second intervals.
The water bath method, while not required for these mini cheesecakes, can be adapted if you want extra insurance against cracking. Place your muffin tin inside a larger baking pan and add about an inch of hot water to the outer pan. This creates a humid baking environment that helps cheesecakes bake more gently and evenly.
Don’t skip the gradual cooling process in the oven with the door cracked. This step is crucial for preventing those unsightly cracks that can occur when cheesecakes experience sudden temperature changes. Patience during cooling pays off with beautiful, smooth-topped mini cheesecakes.
When adding food coloring, remember that gel colors are more concentrated and won’t thin your filling like liquid colors can. Start with less than you think you need – you can always add more, but you can’t take it away. Mix thoroughly and allow a moment for the color to develop fully before deciding if you need additional coloring.
For the cleanest removal from the muffin tin, make sure to use high-quality liners that won’t stick to your cheesecakes. Aluminum foil liners tend to release more easily than paper ones, though both work well. If you’re concerned about sticking, you can lightly spray the liners with non-stick cooking spray before adding the crust.
🎅 Creative Variations and Serving Suggestions 🎅
While these classic Grinch Mini Cheesecakes are delicious as written, there are countless ways to customize and personalize them for your specific tastes and occasions. For a chocolate twist, add 2 tablespoons of cocoa powder to your graham cracker crust for a chocolate cookie base. You could also use crushed Oreos instead of graham crackers for an even more decadent chocolate crust option.
Experiment with different citrus flavors in the filling by substituting lemon or key lime juice for the regular lime juice. Each citrus variety will bring its own unique brightness to the cheesecake while maintaining that vibrant green color. For an extra festive touch, add a teaspoon of peppermint extract along with the vanilla for a candy cane-inspired flavor profile.
The topping possibilities are endless beyond the traditional whipped cream and strawberries. Try crushed candy canes, white chocolate shavings, green sugar crystals, or festive holiday sprinkles. For adult gatherings, a drizzle of chocolate ganache or caramel sauce adds an elegant touch. You could even create a “melted Grinch” effect by drizzling green candy melts over white whipped cream.
Consider serving these mini cheesecakes on individual dessert plates with a small pool of raspberry or strawberry sauce for an upscale presentation. The red fruit sauce complements the green cheesecake beautifully and adds another layer of flavor complexity. Garnish the plate with fresh mint leaves for additional color and a hint of freshness.
For a fun interactive dessert station at parties, set up a Grinch Mini Cheesecake bar where guests can customize their own toppings. Provide various options like different colored whipped creams, assorted fruits, chocolate chips, crushed cookies, and festive sprinkles. This approach is particularly popular with children’s parties and takes the pressure off you for perfect decoration.
🎄 Storage and Make-Ahead Magic 🎄
One of the best features of these Grinch Mini Cheesecakes is their excellent make-ahead potential, making holiday entertaining stress-free. The cheesecakes themselves can be baked, cooled, and stored in an airtight container in the refrigerator for up to 4 days before your event. Keep them in their muffin tin or transfer to a storage container, ensuring they’re covered to prevent them from absorbing other refrigerator odors.
For optimal freshness and texture, add the whipped cream and strawberry garnishes no more than 2-3 hours before serving. Whipped cream tends to deflate and become watery if added too far in advance, so save this final decorating step until closer to serving time. If you need to garnish them earlier, stabilized whipped cream (made with added gelatin or cream cheese) will hold up better for longer periods.
These mini cheesecakes also freeze beautifully for up to 2 months when stored properly. Place the un-garnished cheesecakes in a single layer on a baking sheet and freeze until solid, then transfer to a freezer-safe container or bag with parchment paper between layers. Thaw overnight in the refrigerator before adding toppings and serving. This freezer-friendly quality makes them perfect for preparing well in advance of busy holiday schedules.
If you have leftover decorated cheesecakes (though that’s unlikely!), store them loosely covered in the refrigerator for up to 2 days. The whipped cream will soften slightly, but they’ll still taste delicious. For best results with leftovers, remove strawberry garnishes before storing and add fresh fruit when ready to serve again.
Remember that cheesecakes always taste best when served slightly chilled but not ice-cold straight from the refrigerator. Remove them from the fridge about 15-20 minutes before serving to allow them to come to the perfect serving temperature where the flavors are most pronounced and the texture is optimally creamy.
🌟 Final Thoughts: Spreading Holiday Cheer 🌟
These Grinch Mini Cheesecakes represent everything wonderful about holiday baking – they’re fun, festive, delicious, and bring people together. Whether you’re a seasoned baker or just starting your culinary journey, this recipe offers the perfect balance of simplicity and impressive results. The joy on faces when these bright green treats appear on the dessert table is truly priceless and captures the whimsical spirit of the season.
Beyond their obvious visual appeal and delightful taste, these mini cheesecakes create opportunities for memory-making. Baking them with children teaches valuable kitchen skills while celebrating beloved holiday characters. Sharing them with neighbors and friends spreads joy and strengthens community bonds. Serving them at gatherings creates conversation starters and photo opportunities that will be remembered long after the last crumb is enjoyed.
So embrace your inner Grinch (the reformed, kind-hearted version, of course!) and whip up a batch of these charming mini cheesecakes. They prove that holiday baking doesn’t have to be complicated or time-consuming to be spectacular. With their perfect combination of creamy texture, refreshing flavor, and festive appearance, these treats are guaranteed to make your heart grow three sizes – and your dessert table the star of any celebration!
Grinch Mini Cheesecakes
Ingredients
Equipment
Method
- Preheat oven to 325°F (165°C). Line a 12-cup muffin tin with aluminum foil or paper cupcake liners.
- Mix graham cracker crumbs, sugar, and melted butter until combined. Press 1½ tablespoons into each muffin cup firmly.
- Bake crusts for 5 minutes. Remove and let cool while preparing filling.
- Beat softened cream cheese until smooth and creamy, about 2-3 minutes.
- Add sugar and beat until light and fluffy. Add eggs one at a time, mixing well after each addition.
- Mix in vanilla extract, lime juice, and sour cream until just combined.
- Add green gel food coloring gradually until desired Grinch-green shade is achieved.
- Spoon filling over crusts, filling each cup three-quarters full. Tap pan to release air bubbles.
- Bake 18-20 minutes until edges are set but centers jiggle slightly. Turn off oven, crack door, and cool 15 minutes.
- Remove from oven, cool completely at room temperature, then refrigerate at least 3 hours or overnight.
- Before serving, whip cream with powdered sugar until stiff peaks form. Add green coloring if desired.
- Top each cheesecake with whipped cream dollop, strawberry slice, and optional heart sprinkles. Serve chilled.


