
The Ultimate Creamy Pistachio Crumble Cheesecake Bars: A Nutty, Green Dream
There is something undeniably sophisticated about pistachios. Their vibrant green hue, their distinctively savory-sweet flavor profile, and their satisfying crunch elevate any dessert from ordinary to gourmet. If you have been scrolling through social media lately, you have likely noticed that pistachio desserts are having a massive moment. From viral chocolate bars to intricate pastries, the “green gold” nut is everywhere. Enter the Creamy Pistachio Crumble Cheesecake Bar.
Imagine a dessert that combines the buttery, melt-in-your-mouth texture of a shortbread crust, the tang and richness of a New York-style cheesecake, and the intense, nutty aroma of roasted pistachios. This recipe is not just a treat; it is a textural journey. You get the crunch of the base, the velvety smoothness of the cream cheese filling, a surprise layer of gooey pistachio cream, and a final scatter of crispy, buttery crumble on top. It is the kind of dessert that looks like it came from a high-end bakery but is surprisingly achievable in your own home kitchen.
In this comprehensive guide, we are going to break down exactly how to achieve these lush, layered bars. We will cover everything from selecting the right nuts to achieving that perfect, crack-free cheesecake layer. Whether you are baking for a holiday gathering, a sophisticated dinner party, or just a Tuesday night craving, these bars are guaranteed to be the star of the show.
Why This Recipe Works
Many pistachio desserts rely heavily on artificial flavorings or pudding mixes, resulting in a cloying sweetness and a fake neon green color. This recipe takes a different approach. We focus on real ingredients to build depth of flavor.
First, the crust is not just a vessel; it is a flavor component. By incorporating ground pistachios directly into the crust and crumble, we ensure that the nutty flavor permeates every bite. Second, the filling strikes a delicate balance. It is rich enough to feel indulgent but tangy enough (thanks to sour cream) to cut through the sweetness of the pistachio cream layer. Finally, the “crumble” topping adds that necessary contrast. A soft dessert needs a bit of resistance, and the caramelized bits of dough and nuts on top provide the perfect finish.
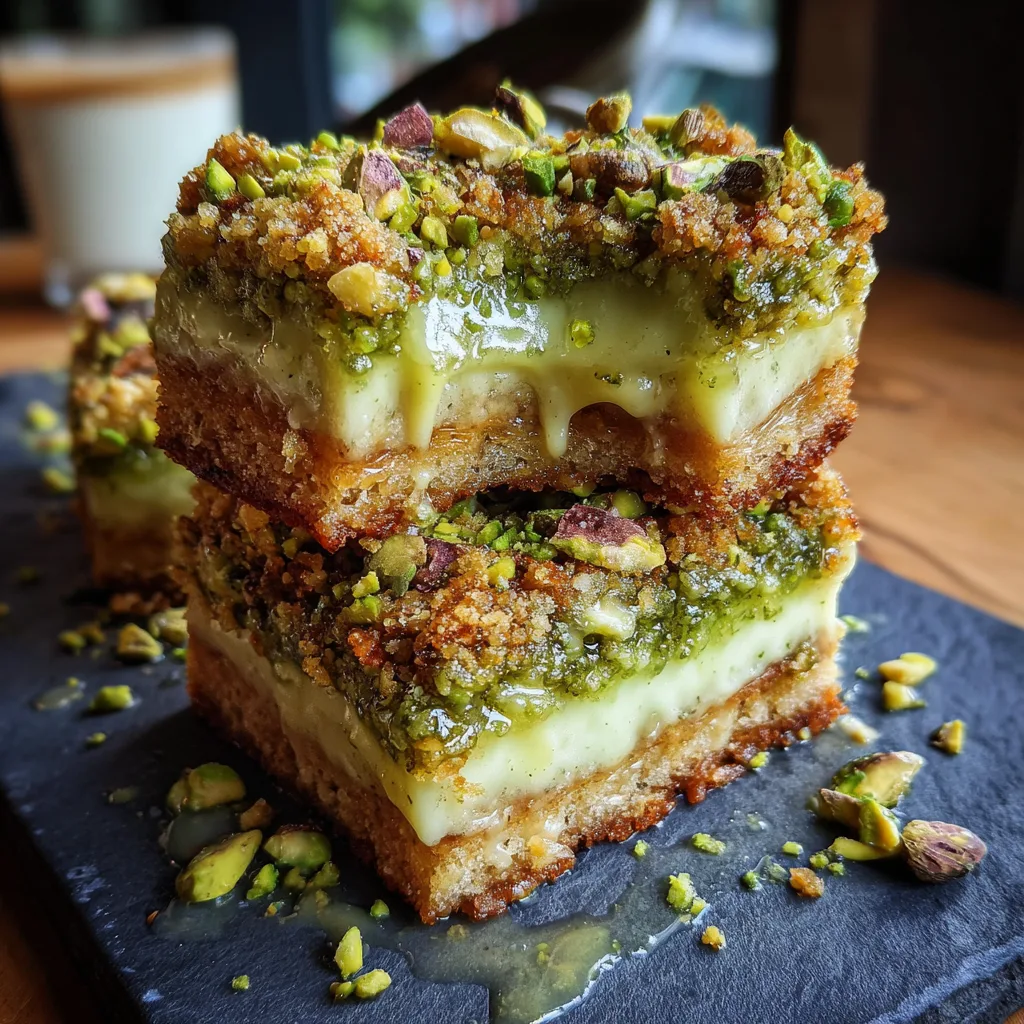
The Star Ingredient: Pistachios
Before we dive into the cooking process, let’s talk about the nut itself. For this recipe, the type of pistachio you buy matters significantly. You generally have two choices: raw or roasted, and salted or unsalted.
Recommendation: We highly recommend using roasted, unsalted pistachios. Roasting releases the essential oils in the nut, intensifying the flavor and making them crunchier. Using unsalted nuts allows you to control the sodium level in your dessert. If you can only find salted roasted pistachios, simply omit the added salt called for in the crust recipe to maintain balance. Avoid raw pistachios if possible, as they can sometimes have a softer, chewier texture that doesn’t work as well in a crumble.
Ingredients Checklist
To ensure your baking process is smooth and stress-free, here is a detailed breakdown of what you will need.
For the Crust and Crumble
- 2 cups All-Purpose Flour: The structural backbone of your crust.
- 1 cup Shelled Pistachios: Finely chopped or pulsed in a food processor. Divide these—some for the dough, some for the final topping.
- 3/4 cup Brown Sugar: Packed. The molasses content adds a caramel depth that white sugar lacks.
- 1 cup Unsalted Butter: Cold and cubed. Keeping the butter cold ensures a flaky, crumbly texture rather than a greasy one.
- 1/2 tsp Salt: To enhance the nutty flavors.
For the Creamy Filling
- 16 oz Cream Cheese: Full fat, softened to room temperature. This is non-negotiable for a lump-free batter.
- 1/2 cup Granulated Sugar: Sweetens the cheesecake layer without overpowering the tang.
- 2 Large Eggs: Room temperature. They bind the custard together.
- 1/4 cup Sour Cream: Adds moisture and that classic cheesecake tang.
- 1 tsp Vanilla Extract: Use pure vanilla for the best flavor.
- 1/2 cup Pistachio Cream/Paste: This is the secret weapon. It’s a sweet spread made of pistachios (similar to Nutella but green). You can find it in specialty stores or Italian markets.
Step-by-Step Instructions
Creamy Pistachio Crumble Cheesecake Bars
Ingredients
Equipment
Method
- Preheat oven to 350°F (175°C). Line a 9×9 inch pan with parchment paper.
- In a food processor, pulse 3/4 cup pistachios until finely chopped (reserve remaining 1/4 cup).
- In a bowl, mix flour, brown sugar, salt, and processed pistachios. Cut in cold butter until crumbly.
- Press 2/3 of the crumb mixture into the bottom of the pan. Bake for 10-12 minutes. Set aside.
- Beat cream cheese and granulated sugar until smooth. Add sour cream and vanilla.
- Add eggs one at a time, mixing on low speed just until combined. Do not overmix.
- Pour filling over the crust. Drizzle pistachio cream over the cheesecake layer.
- Mix reserved chopped pistachios into the remaining crumble topping and sprinkle over the bars.
- Bake for 30-35 minutes until center is almost set but slightly wobbly.
- Cool completely, then refrigerate for 4 hours before slicing.
Notes
Phase 1: The Crust and Crumble
1. Preheat and Prep:
Start by preheating your oven to 350°F (175°C). Line a 9×9 inch square baking pan with parchment paper, leaving an overhang on the sides. This “sling” will allow you to lift the bars out easily once they are chilled.
2. Blend the Dry Ingredients:
In a food processor, pulse 3/4 cup of the pistachios until they resemble coarse sand. Be careful not to over-process, or you will end up with nut butter. In a large bowl, whisk together the flour, brown sugar, salt, and the processed pistachios.
3. Cut in the Butter:
Add the cold, cubed butter to the dry mixture. Use a pastry cutter or your fingers to rub the butter into the flour until the mixture looks like coarse crumbs. It should hold together when squeezed.
4. Bake the Base:
Take about two-thirds of this crumble mixture and press it firmly into the bottom of your prepared pan. You want a solid, compact base. Bake this for 10-12 minutes until it is just starting to set and smell fragrant. Keep the oven on.
Phase 2: The Filling
5. Cream the Cheese:
While the crust bakes, make the filling. In a large mixing bowl (or stand mixer), beat the softened cream cheese and granulated sugar until it is completely smooth and creamy. Scrape down the sides of the bowl to ensure no lumps remain.
6. Add Liquids:
Mix in the sour cream and vanilla extract. Then, add the eggs one at a time, mixing on low speed just until combined. Crucial Tip: Do not overmix after adding the eggs. Overmixing introduces air bubbles, which can cause the cheesecake to crack or deflate later.
Phase 3: Assembly and Final Bake
7. Layering:
Pour the cheesecake batter over the hot crust. Smooth it out with a spatula.
8. The Pistachio Ribbon:
Take your pistachio cream (warm it slightly if it’s too stiff) and drizzle it generously over the cheesecake layer. You can swirl it slightly with a knife for a marbled effect or leave it as a distinct layer.
9. The Topping:
Take the remaining one-third of the crust mixture. Mix in the remaining 1/4 cup of chopped pistachios (for extra texture). Sprinkle this crumble evenly over the top of the cheesecake/pistachio layer.
10. Bake:
Return the pan to the oven and bake for 30-35 minutes. The center should still have a slight wobble (like Jell-O) when you gently shake the pan. It will firm up as it cools.
11. Chill:
Allow the bars to cool completely at room temperature on a wire rack (about 1 hour). Then, transfer them to the refrigerator and chill for at least 3-4 hours, preferably overnight. This setting time is essential for clean slices.
Expert Baking Tips
Room Temperature is Key:
We cannot stress this enough—if your cream cheese is cold, you will have lumpy cheesecake. If your eggs are cold, they will shock the batter. Set your dairy out at least an hour before you start.
The Cutting Technique:
To get those sharp, professional-looking squares seen in the photos, use a sharp chef’s knife. Run the knife under hot water, wipe it dry, and make a cut. Wipe the knife clean and reheat it between every single cut. This melts through the butter and cheese cleanly without dragging crumbs everywhere.
Customizing the Green:
If you want that vibrant green look but your pistachios are looking a bit dull, you can add a tiny drop of green gel food coloring to the cheesecake batter. However, high-quality pistachio cream usually provides a beautiful natural olive-green hue.
Variations to Try
Once you have mastered the base recipe, feel free to experiment:
White Chocolate Drizzle
Melt 1/2 cup of white chocolate chips and drizzle it over the cooled bars. White chocolate pairs beautifully with the earthy notes of pistachio.
Lemon Zest Kick
Add 1 tablespoon of fresh lemon zest to the cheesecake batter. The citrus brightens up the heavy cream cheese and cuts through the nuttiness.
Gluten-Free Option
Swap the all-purpose flour for a high-quality 1:1 gluten-free flour blend. The texture of the crumble is very forgiving, so this substitution works seamlessly.
Serving Suggestions
These bars are rich, so a small square goes a long way. They are best served chilled, straight from the fridge. For an elegant dinner party presentation, place a square on a dark slate or ceramic plate (as pictured). Dust lightly with powdered sugar right before serving.
Pairing wise, these are a match made in heaven with:
- Espresso or Turkish Coffee: The bitterness of strong coffee balances the sweet creaminess.
- Mint Tea: A hot cup of fresh mint tea complements the Middle Eastern roots of pistachio flavors.
- Dessert Wine: A small glass of Muscat or Sauternes works beautifully.
Storage
These bars keep wonderfully, making them a great make-ahead dessert.
- Refrigerator: Store in an airtight container for up to 5 days.
- Freezer: These bars freeze exceptionally well. Cut them into squares, freeze them on a baking sheet until solid, then wrap them individually in plastic wrap and store in a freezer bag for up to 2 months. Thaw in the fridge overnight before eating.
Final Thoughts
The Creamy Pistachio Crumble Cheesecake Bar is more than just a dessert; it is a celebration of flavor and texture. It bridges the gap between a comforting crumb bar and an elegant cheesecake. The stunning contrast of the green pistachio layer against the creamy white filling makes it visually arresting, while the taste ensures that the plate will be licked clean.
So go ahead, buy that jar of pistachio cream, shell those nuts, and treat yourself to a bake that is truly worth the calories. Happy baking!


