
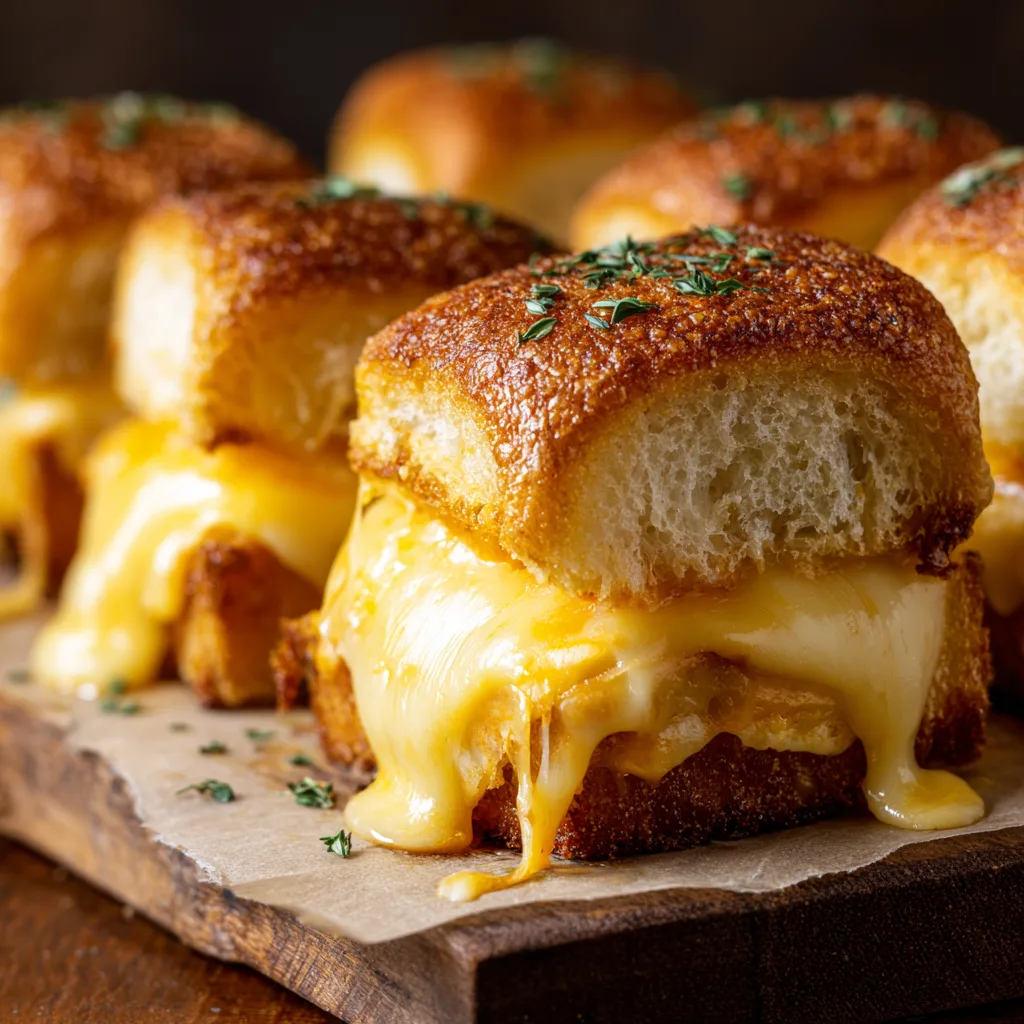
When it comes to hosting a party, feeding a hungry family on a busy weeknight, or simply craving the ultimate comfort food, nothing quite hits the mark like a tray of freshly baked, bubbling, gooey cheese sliders. Imagine the classic grilled cheese sandwich, but elevated, multiplied, and baked to golden perfection. These Garlic Butter Pull-Apart Cheese Sliders are a masterclass in culinary contrast: the subtle sweetness of soft Hawaiian rolls perfectly balanced by a rich, savory, and herbaceous garlic butter glaze, all acting as the vessel for a molten core of your favorite cheeses.
Whether you are prepping for a Sunday football gathering, organizing a casual backyard get-together, or looking for a comforting side dish to pair with a steaming bowl of roasted tomato soup, this recipe is guaranteed to be the star of the show. Get ready to experience the ultimate cheese pull that will have your guests reaching for seconds before they’ve even finished their first.
🔥 The Magic Behind the Pull-Apart Phenomenon
There is a specific psychological joy associated with pull-apart bread. It transforms eating from a solitary act into a communal experience. The beauty of using connected dinner rolls—specifically sweet Hawaiian rolls—is that they bake as a single unit, trapping the steam and heat inside to create an incredibly soft, pillow-like interior, while the edges and top get beautifully toasted.
The “pull-apart” aspect is not just a fun visual trick; it serves a structural purpose. By keeping the rolls attached until the very moment of serving, the cheese melts uniformly across the entire slab of bread, creating a solid layer of gooey perfection that stretches beautifully when a slider is finally separated from the pack. It minimizes the risk of the cheese leaking out and burning on the baking sheet, ensuring every single bite is packed with maximum flavor and texture. This method also drastically cuts down on prep time. Instead of making twelve individual sandwiches, you are essentially making one giant sandwich and then letting your guests do the dividing.
🧀 Choosing Your Cheeses: Crafting the Perfect Melt
The soul of this recipe lies entirely in the cheese. While you could technically use just one type, the secret to a truly gourmet slider experience is blending cheeses for both flavor and texture. You want a combination that provides a spectacular, stringy stretch (the melt) alongside a robust, sharp, and salty kick (the flavor).
For the ultimate melt factor, low-moisture mozzarella or provolone are absolute must-haves. These cheeses are renowned for their elasticity and mild flavor, which acts as a blank canvas for the other ingredients. To bring the flavor, an aged sharp cheddar, a nutty Gruyère, or a smooth fontina are excellent choices. Cheddar provides that classic orange hue and tangy bite, while Gruyère introduces a sophisticated, slightly sweet earthiness that pairs miraculously well with the garlic butter. Pro-tip: Always try to grate your cheese from a block rather than buying pre-shredded bags. Pre-shredded cheese is coated in anti-caking agents like potato starch or cellulose, which prevents it from melting smoothly and can leave a gritty texture.
🌿 Ingredients
- – 1 package (12 count) sweet Hawaiian rolls
- – 8 slices sharp cheddar cheese
- – 8 slices provolone or low-moisture mozzarella cheese
- – 1/2 cup (1 stick) unsalted butter, melted
- – 3 cloves garlic, finely minced
- – 1 tablespoon fresh parsley, finely chopped (or 1 tsp dried)
- – 1 teaspoon dried oregano or thyme
- – 1/2 teaspoon onion powder
- – 1/4 teaspoon salt
- – 1 tablespoon grated parmesan cheese (optional, for topping)
📝 Instructions
- Preheat and Prep: Preheat your oven to 350°F (175°C). Line a 9×13 inch baking dish or a rimmed baking sheet with parchment paper for easy cleanup.
- Slice the Rolls: Keeping the rolls completely attached to one another, use a large serrated bread knife to slice the entire slab of rolls in half horizontally, creating one large top bun section and one large bottom bun section.
- Base Layer: Place the bottom half of the rolls onto your prepared baking sheet. Layer the cheddar cheese slices evenly across the bread, ensuring the entire surface is covered.
- Top Layer: Add a second layer using the provolone or mozzarella slices directly on top of the cheddar. Carefully place the top half of the connected rolls over the cheese layer.
- Mix the Glaze: In a small mixing bowl, whisk together the melted butter, minced garlic, chopped parsley, dried oregano (or thyme), onion powder, and salt until well combined.
- Brush and Coat: Using a pastry brush, generously coat the top and sides of the rolls with the garlic butter mixture. Make sure to get those herbs and garlic bits evenly distributed across the top. Sprinkle with a little grated parmesan if desired.
- Bake to Perfection: Cover the sliders loosely with aluminum foil (this prevents the tops from burning while the cheese melts). Bake for 10-12 minutes. Remove the foil and bake for an additional 3-5 minutes, or until the tops are golden brown, slightly crispy, and the cheese is visibly bubbling and melted.
- Cool and Serve: Remove from the oven and let them rest for about 2-3 minutes. Use a sharp knife or a pizza cutter to slice along the seams of the rolls, pull apart, and serve immediately while hot and gooey!
✨ Elevating the Garlic Butter Glaze
The cheese might be the star, but the garlic butter glaze is the director calling all the shots. This savory topping drips down the sides of the rolls, crisping up the edges and infusing every bite with a rich, aromatic flavor. The glaze is what transforms these from simple cheese sandwiches into irresistible, gourmet appetizers.
To take your glaze to the next level, consider blooming your spices. If you have a few extra minutes, gently heat the butter, minced garlic, and dried herbs in a small saucepan over low heat for about 5 minutes before brushing it on. This slow infusion draws the essential oils out of the garlic and herbs, creating a much deeper, more complex flavor profile than just whisking them into warm butter. You can also add a splash of Worcestershire sauce or a pinch of red pepper flakes to the butter mixture for an unexpected depth of umami and a subtle kick of heat.
❄️ Storing and Reheating for Later
While these sliders are undeniably at their absolute peak when served fresh out of the oven, leftovers (if you are lucky enough to have any!) can easily be saved. The key to maintaining their texture is proper storage and reheating techniques.
To Store: Allow the baked sliders to cool completely to room temperature. This prevents condensation from forming and making the bread soggy. Once cool, wrap them tightly in plastic wrap or place them in an airtight container. They will keep well in the refrigerator for up to 3 days.
To Reheat: Avoid the microwave if possible, as it will make the bread rubbery. Instead, preheat your oven to 350°F (175°C). Place the leftover sliders on a baking sheet, cover them loosely with foil to prevent the tops from drying out, and bake for 10-15 minutes until the cheese is re-melted and the centers are warm. For an extra touch of freshness, you can lightly brush them with a tiny bit more melted butter before reheating.
💡 Delicious Variations to Try
The beauty of this recipe is its versatility. Consider this garlic butter cheese slider recipe as your foundational blueprint. Once you master the base, the variations are truly endless. Here are a few ways to customize your next batch:
The Meat Lover’s Dream: Layer thinly sliced honey baked ham, crispy bacon, or savory turkey beneath the cheese. A spread of Dijon mustard on the bottom bun before layering adds a fantastic, tangy contrast to the rich meats and cheese.
The Spicy Jalapeño Popper: Mix a layer of softened cream cheese with diced, pickled jalapeños and spread it on the bottom bun before adding cheddar cheese and Monterey Jack. Top with a buttery breadcrumb glaze for that authentic jalapeño popper crunch.
The Pizza Party: Swap the garlic butter glaze for a garlic-parmesan topping. Inside, layer marinara sauce, pepperoni slices, and a heavy hand of mozzarella cheese. It’s a massive hit with kids and adults alike.
🎉 Conclusion: The Ultimate Party Pleaser
In the vast world of appetizers and comfort foods, these Garlic Butter Pull-Apart Cheese Sliders stand in a league of their own. They require minimal effort, utilize affordable and accessible ingredients, and deliver an outsized flavor payoff that looks incredibly impressive on a serving platter. The glorious combination of sweet, soft bread, an herbaceous, salty crust, and a molten river of blended cheeses is simply impossible to resist.
Whether you stick strictly to the classic cheese recipe or use it as a launching pad for your own culinary creations, these sliders are guaranteed to disappear fast. So, gather your ingredients, preheat your oven, and get ready to enjoy the most satisfying, cheese-pull-worthy dish you’ll make all year. Happy baking!
Garlic Butter Cheese Sliders
Ingredients
Equipment
Method
- Preheat oven to 350°F (175°C). Line a baking sheet with parchment paper.
- Using a serrated knife, slice the entire slab of Hawaiian rolls in half horizontally, keeping the individual rolls attached.
- Place the bottom half of the rolls on the baking sheet. Layer evenly with cheddar cheese, followed by a layer of provolone or mozzarella cheese.
- Place the top half of the rolls onto the cheese layers.
- In a small bowl, whisk together the melted butter, minced garlic, parsley, oregano, onion powder, and salt.
- Brush the garlic butter mixture generously over the top and sides of the assembled sliders.
- Cover loosely with aluminum foil and bake for 10-12 minutes. Remove foil and bake 3-5 more minutes until tops are golden and cheese is melted.
- Let rest for 2 minutes, slice along the roll seams, and serve warm.


