Welcome to your newest dessert obsession! We all have those moments when a sudden craving for something sweet, rich, and chocolatey hits us, but the thought of turning on the oven, measuring out flour, and waiting an hour for a cake to bake feels like a monumental task. Enter the ultimate solution: Decadent No-Bake Chocolate Peanut Butter Oat Cups. These little bites of heaven are the perfect intersection of healthy wholesome ingredients and rich, indulgent flavors. They require absolutely no baking, minimal cleanup, and they deliver a flavor profile that rivals any gourmet candy bar you could pick up at the store.
Whether you are looking for a quick after-school snack for the kids, a pre-workout energy boost, or a sophisticated yet simple dessert to serve after a dinner party, these oat cups fit the bill perfectly. The combination of a chewy, nutty oat crust and a silky, melt-in-your-mouth dark chocolate ganache—finished with an elegant sprinkle of flaky sea salt—is truly a match made in culinary heaven. Let us dive deep into why this recipe will become a permanent staple in your weekly meal prep routine and how you can master these delightful little treats in your own kitchen.
The Ultimate Guilt-Free Sweet Treat: Why You Need These ✨
In today’s fast-paced world, finding a sweet treat that doesn’t completely derail your nutritional goals can be a challenge. Most store-bought cookies and candies are loaded with refined sugars, artificial preservatives, and processed oils. That is exactly why these no-bake oat cups are a revelation. They are made entirely from wholesome, recognizable pantry staples that provide real nutritional value alongside incredible taste.
Let’s talk about the base. Rolled oats are a fantastic source of complex carbohydrates and soluble fiber, specifically beta-glucan, which helps keep you feeling full and satisfied for much longer than a traditional sugar-laden dessert. When combined with natural peanut butter, you are adding a robust dose of healthy monounsaturated fats and plant-based protein. This means that these cups won’t cause the dreaded sugar spike and subsequent crash that usually follows eating a candy bar. Instead, they provide sustained, slow-release energy.
Furthermore, the dark chocolate topping isn’t just there for its luxurious flavor; high-quality dark chocolate (ideally 70% cocoa or higher) is packed with antioxidants, specifically flavonoids, which have been shown to support heart health. By making these at home, you have complete control over the sweetness level. You can use natural sweeteners like pure maple syrup or raw honey, completely bypassing the highly refined white sugars. It is the definition of a “guilt-free” indulgence that actually nourishes your body while satisfying your soul.
Breaking Down the Layers: Chewy Oats Meet Rich Chocolate 🥣
The magic of this recipe lies in its contrasting textures and harmonious flavors. A truly great dessert always balances elements—sweet and salty, crunchy and smooth, light and dense. These oat cups execute this balance flawlessly through their two distinct layers.
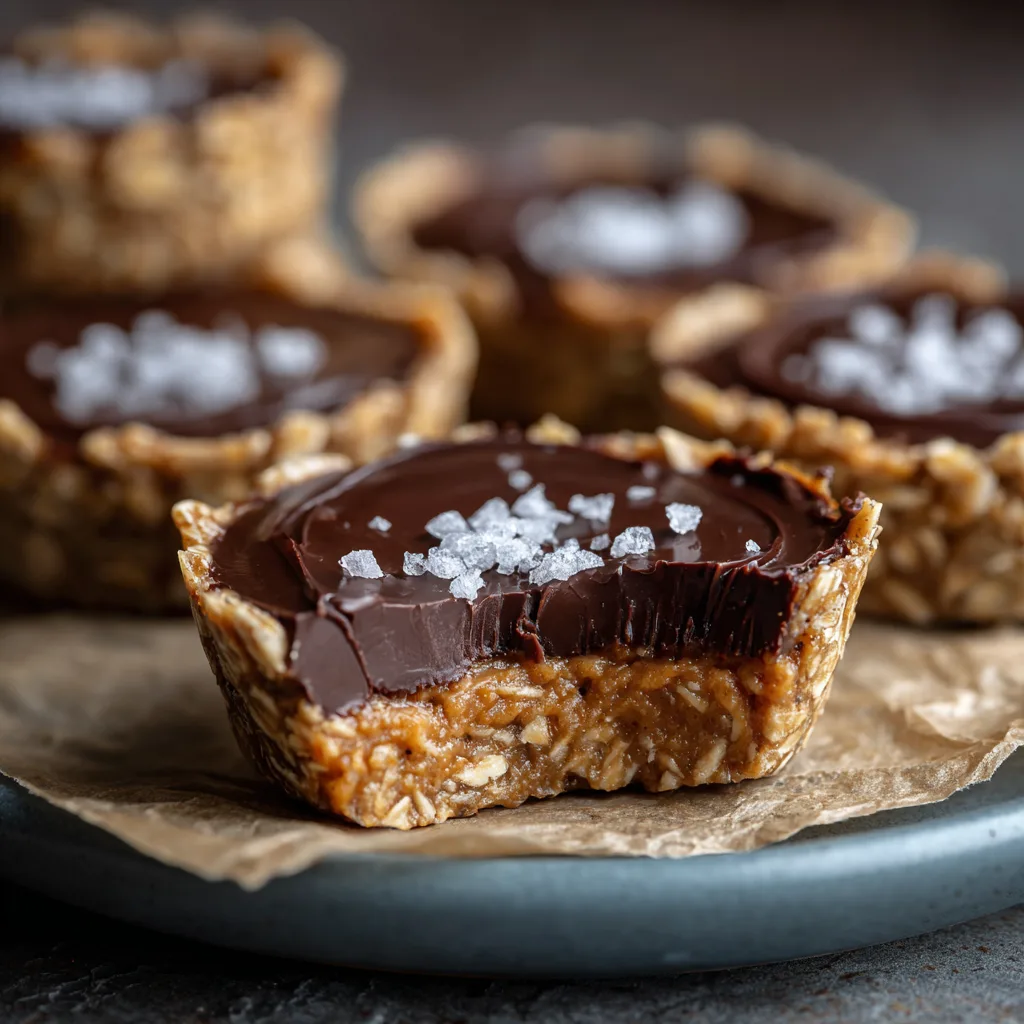
The Chewy Oat Base: This is not your average pie crust. By mixing rolled oats with sticky, natural peanut butter, a touch of maple syrup for sweetness, and a hint of coconut oil to help it set, you create a dense, chewy, and highly satisfying base. It resembles the texture of a high-quality granola bar or a dense cookie dough. The oats provide a slightly nutty, earthy flavor that acts as the perfect canvas. The secret here is to pack the mixture tightly into your muffin tin so it holds its shape perfectly when removed.
The Silky Chocolate Topping: Resting gracefully on top of the rustic oat base is a thick layer of pure, unadulterated dark chocolate. By melting high-quality chocolate chips with just a tiny spoonful of coconut oil or peanut butter, you create a pseudo-ganache. It sets up firm in the refrigerator but melts instantly the moment it hits your tongue. The slight bitterness of the dark chocolate beautifully counteracts the sweetness of the oat base beneath it.
The Flaky Sea Salt Crown: Never underestimate the power of finishing salt. A tiny pinch of flaky sea salt (like Maldon) sprinkled on top of the chocolate right before it sets elevates this treat from “good” to “gourmet.” The salt crystals hit your tongue first, amplifying the cocoa notes and cutting through the richness, making every single bite dangerously addictive.
Ingredients – Your Pantry Staples Checklist 🛒
One of the best parts about this recipe is that you likely already have all of these ingredients sitting in your pantry right now. Here is everything you need to create these little masterpieces:
- – 1.5 cups old-fashioned rolled oats (ensure they are certified gluten-free if needed)
- – 1/2 cup creamy natural peanut butter (the kind where the only ingredients are peanuts and salt)
- – 1/3 cup pure maple syrup (or raw honey if not strictly vegan)
- – 2 tablespoons melted coconut oil (divided: 1 tbsp for the base, 1 tbsp for the topping)
- – 1 teaspoon pure vanilla extract
- – 1/4 teaspoon ground cinnamon (optional, but adds a lovely warmth)
- – 1 cup high-quality dark chocolate chips (or semi-sweet, depending on preference)
- – Coarse flaky sea salt (for garnishing)
Instructions – Your Path to Chocolatey Bliss 👩🍳
Ready in just a few minutes of active prep time, this recipe is foolproof. Follow these simple steps for perfect no-bake cups every single time:
- Prepare Your Pan: Line a standard 12-cup muffin tin with paper or silicone liners. If you don’t have liners, you can lightly grease a silicone muffin pan, but liners make removal significantly easier.
- Mix the Wet Ingredients: In a medium-sized microwave-safe bowl (or in a small saucepan over low heat), combine the peanut butter, maple syrup, and 1 tablespoon of the melted coconut oil. Gently heat for about 20-30 seconds just until the mixture is warm and easy to whisk together into a smooth caramel-like consistency. Stir in the vanilla extract.
- Incorporate the Oats: Pour the old-fashioned rolled oats and the optional cinnamon into the wet mixture. Use a silicone spatula or wooden spoon to fold everything together. Ensure every single oat is thoroughly coated in the peanut butter mixture. The mix should be sticky and hold together when you squeeze a small amount in your hand.
- Form the Bases: Divide the oat mixture evenly among the prepared muffin cups (about 1 to 1.5 tablespoons per cup). Using your fingers, the back of a spoon, or the bottom of a small shot glass, press the mixture down firmly into an even, flat layer at the bottom of each liner. Place the muffin tin in the freezer for 10 minutes to allow the bases to firm up while you prepare the topping.
- Melt the Chocolate: In a separate microwave-safe bowl, combine the dark chocolate chips and the remaining 1 tablespoon of coconut oil. Microwave in 30-second increments, stirring well after each one, until the chocolate is completely melted, glossy, and smooth. Alternatively, you can use a double boiler on the stove for a gentler melt.
- Add the Top Layer: Remove the chilled oat bases from the freezer. Spoon about 1 tablespoon of the melted chocolate over each oat base. Gently tap the muffin tin on the counter a few times to help the chocolate spread into an even, flat layer and release any trapped air bubbles.
- Garnish and Chill: Sprinkle a small pinch of flaky sea salt over the top of each chocolate layer. Place the muffin tin back into the refrigerator for at least 30 minutes, or into the freezer for 15 minutes, until the chocolate is completely set and firm to the touch.
- Serve and Enjoy: Once fully set, pop the cups out of the muffin tin, peel off the liners, and enjoy your spectacular homemade treat!
No-Bake Chocolate Peanut Butter Oat Cups
Ingredients
Equipment
Method
- Line a 12-cup muffin tin with paper or silicone liners.
- In a microwave-safe bowl, gently warm the peanut butter, maple syrup, and 1 tbsp coconut oil until smooth. Stir in vanilla and cinnamon.
- Fold the rolled oats into the wet mixture until completely coated and sticky.
- Divide the oat mixture evenly among the muffin cups. Press down firmly to create a flat, dense base. Place in the freezer for 10 minutes.
- In another bowl, melt the chocolate chips and the remaining 1 tbsp coconut oil in the microwave in 30-second increments, stirring until smooth.
- Spoon the melted chocolate evenly over the chilled oat bases.
- Sprinkle a pinch of flaky sea salt on top of the melted chocolate in each cup.
- Refrigerate for at least 30 minutes until the chocolate is fully set. Remove from liners and serve cold.
Notes
Pro Tips for the Perfect Chocolate Ganache Top 💡
While melting chocolate seems straightforward, it can quickly turn into a clumpy, seized mess if not handled with care. To get that perfectly smooth, glossy top layer that snaps beautifully when you bite into it, keep these professional tips in mind.
First, always add a fat to your chocolate chips. In this recipe, we use a tablespoon of coconut oil. This prevents the chocolate from becoming rock-hard when chilled in the fridge, giving it a softer, more fudge-like consistency that won’t crack off entirely when you take a bite. It also gives the chocolate a gorgeous, professional sheen.
Second, patience is key when microwaving. Chocolate burns incredibly quickly. Always use 50% power if your microwave runs hot, and never skip the stirring step between 30-second intervals. Often, the chocolate retains its shape even when melted, so stirring is required to distribute the heat and turn it into a liquid.
Finally, timing the salt is crucial. If you sprinkle the heavy flaky sea salt onto the chocolate while it is piping hot and completely liquid, the salt crystals may sink to the bottom or dissolve. Let the chocolate sit for just a minute or two in the cups before sprinkling the salt, so it rests proudly on the surface.
Delicious Variations to Customize Your Cups 🔄
Once you master the basic formula of these no-bake cups, the world is your oyster. They are incredibly versatile and easily adapted to whatever you have in your pantry or whatever flavor profile you are currently craving.
Nut-Free Zone: If you are dealing with peanut allergies or sending these to a nut-free school, you can easily swap the peanut butter for sunflower seed butter (SunButter) or soy nut butter. The ratios remain exactly the same, and the result is just as delicious.
Almond Joy Vibes: Swap the peanut butter for almond butter. Mix a handful of shredded, unsweetened coconut into the oat base, and press a single whole almond into the top of the melted chocolate before it sets. It tastes just like the famous candy bar!
Protein Powerhouse: If you want to turn these into a serious post-workout recovery snack, add a scoop of your favorite chocolate or vanilla protein powder to the oat mixture. You may need to add an extra splash of maple syrup or a tiny bit of water to ensure the mixture stays sticky enough to hold together.
Storage Secrets for Optimal Freshness 🧊
Because these cups are no-bake and rely on chilled fats (like coconut oil and peanut butter) to hold their shape, proper storage is essential. If left out on a warm kitchen counter for too long, they will become quite soft and potentially messy to eat.
For short-term storage, keep the oat cups in an airtight container in the refrigerator. They will stay perfectly fresh, chewy, and delicious for up to two weeks. The fridge keeps the chocolate top firm and the oat base pleasantly chewy.
If you want to make a massive batch for meal prep, these are wonderfully freezer-friendly. Place them in a single layer in a freezer-safe zip-top bag or airtight container. They will keep in the freezer for up to 3 months. When a craving strikes, you can eat them straight from the freezer (the oat base doesn’t freeze rock solid) or let them sit at room temperature for 5 minutes to soften up slightly.
A Sweet Farewell: Your New Favorite Snack 🎬
There you have it—the comprehensive guide to making the most incredible, satisfying, and wholesome Decadent No-Bake Chocolate Peanut Butter Oat Cups. By combining simple, nutrient-dense ingredients with minimal effort, you can create a dessert that looks like it came from a high-end bakery but nourishes your body like a healthy snack.
Whether you make a batch on Sunday afternoon to prepare for a busy work week, or whip them up on a Friday night for a cozy movie marathon, these little cups are guaranteed to bring a smile to your face. The beautiful collision of chewy oats, creamy peanut butter, rich dark chocolate, and sharp sea salt is a culinary triumph that you deserve to experience. So, grab your mixing bowl, raid your pantry, and treat yourself to the easiest, most delicious homemade dessert you will ever make. Happy snacking!