There is something almost magical about the phrase “dump cake.” It implies a level of simplicity that seems too good to be true, yet the results are consistently spectacular. When you combine that effortless preparation with the timeless, legendary pairing of chocolate and peanut butter, you get the Peanut Butter Cup Dump Cake. This isn’t just a dessert; it’s a warm, gooey, indulgent experience that satisfies the deepest cravings of any sweet tooth.
In this comprehensive guide, we are going to dive deep into why this recipe has become a viral sensation, the science behind the perfect chocolate-peanut butter ratio, and how you can master this dish in your own kitchen with minimal effort. Whether you are a seasoned baker or someone who rarely touches an oven mitt, this Peanut Butter Cup Dump Cake is guaranteed to become your new secret weapon for potlucks, birthdays, and “just because” weeknight treats.
The Ultimate Comfort Food: Why Dump Cakes Rule
The concept of the dump cake dates back decades, born from the need for quick, reliable, and delicious desserts that didn’t require a sink full of dirty dishes. The traditional method involves “dumping” ingredients—usually a combination of canned fruit or pie filling and a boxed cake mix—directly into a baking pan. No mixing bowls, no whisks, just layers of flavor that meld together in the heat of the oven.
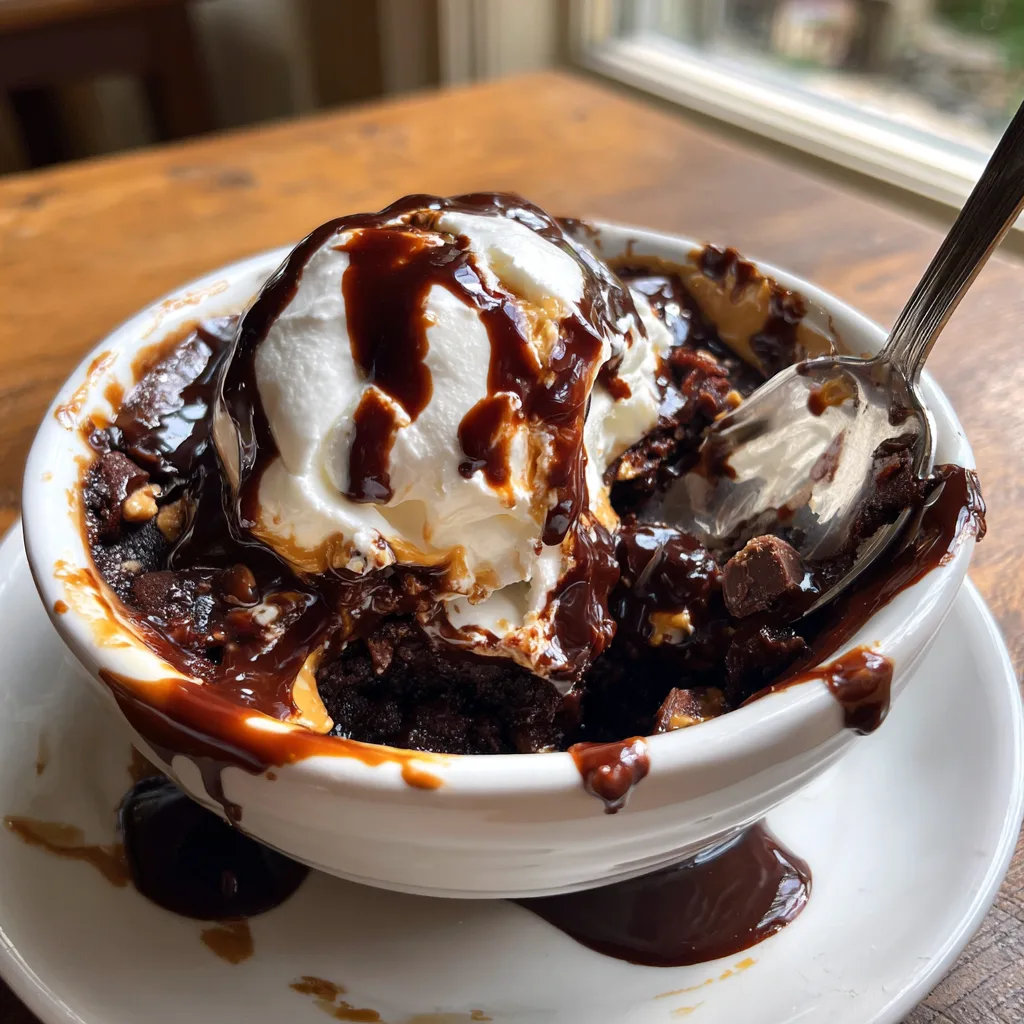
The Peanut Butter Cup Dump Cake takes this nostalgic format and gives it a modern, decadent upgrade. Instead of fruit, we utilize the rich, earthy tones of peanut butter and the deep, comforting sweetness of milk chocolate. It’s the kind of dessert that smells like a dream while it’s baking and tastes even better when served warm with a scoop of cold vanilla ice cream.
Ingredients You Will Need
To create the perfect Peanut Butter Cup Dump Cake, you need ingredients that provide both structure and moisture. While many dump cakes use just three ingredients, we’ve refined this version to ensure maximum “gooeyness” and flavor depth.
Peanut Butter Cup Dump Cake
Ingredients
Equipment
Method
- Preheat oven to 350°F (175°C) and grease a 9×13 inch baking dish.
- Spread the dry chocolate cake mix evenly into the bottom of the pan.
- Top the cake mix with the frozen peanut butter cups and chocolate chips.
- Whisk milk and melted peanut butter together, then pour evenly over the cake mix.
- Drizzle the melted unsalted butter over the entire surface.
- Bake for 35-40 minutes until the edges are set and the center is slightly bubbly.
- Allow to rest for 10 minutes before serving.
- Serve warm with whipped cream or vanilla ice cream.
Notes
- – 1 box (15.25 oz) Devil’s Food or Chocolate Fudge Cake Mix
- – 1 bag (10-12 oz) Miniature Peanut Butter Cups (frozen for 30 minutes for best results)
- – 1 cup Semi-sweet or Milk Chocolate Chips
- – 1.5 cups Milk (whole milk provides the richest texture)
- – 1/2 cup Creamy Peanut Butter (melted slightly for easy drizzling)
- – 1/2 cup Unsalted Butter, melted
- – Optional: Chocolate syrup and whipped cream for serving
Step-by-Step Instructions
Follow these steps precisely to ensure your Peanut Butter Cup Dump Cake achieves that iconic molten center and perfectly baked top.
- Preheat and Prep: Start by preheating your oven to 350°F (175°C). Lightly grease a 9×13 inch glass or ceramic baking dish with non-stick cooking spray or a thin layer of butter.
- The Base Layer: Take your chocolate cake mix and pour the dry powder directly into the bottom of the prepared pan. Use a spatula or the back of a spoon to spread it out into an even layer. Do not pack it down; keep it light and airy.
- Add the “Cored” Flavors: Evenly distribute the miniature peanut butter cups and the chocolate chips over the top of the dry cake mix. If you want a surprise in every bite, make sure to push a few of the peanut butter cups slightly into the powder.
- The Liquid Magic: In a separate measuring cup, whisk together the milk and the melted peanut butter until mostly combined. Slowly pour this mixture over the entire surface of the cake mix. Try to cover as much of the dry powder as possible.
- The Butter Seal: Finally, drizzle the melted unsalted butter over the top of the liquid layer. The butter reacts with the cake mix to create a fudge-like crust that is absolutely irresistible.
- Bake to Perfection: Place the dish in the center rack of your oven and bake for 35 to 40 minutes. You are looking for the edges to be set and the center to be slightly bubbly but still soft.
- Rest and Serve: This is the hardest part: let the cake sit for at least 10 minutes after removing it from the oven. This allows the internal “lava” to thicken slightly. Serve warm with plenty of whipped cream and a drizzle of extra chocolate syrup.
The Science of the Chocolate and Peanut Butter Pairing
Have you ever wondered why the Peanut Butter Cup Dump Cake is so satisfying? It’s not just luck; it’s chemistry. The “Dynamic Contrast” between the salty, fatty profile of peanut butter and the sweet, slightly acidic profile of chocolate creates a sensory experience that the human brain is hardwired to enjoy. This is known as “flavor layering.”
In this recipe, the salt in the peanut butter cuts through the sugar of the chocolate cake mix, preventing the dessert from being “one-note” sweet. Additionally, the fats in the peanut butter help to carry the cocoa flavors longer on your palate, making every bite feel more substantial and luxurious.
Pro-Tips for Success
While the Peanut Butter Cup Dump Cake is designed to be easy, these “pro-tips” will elevate your bake from good to legendary:
1. Freeze Your Candy: As mentioned in the ingredients, freezing your peanut butter cups for 30 minutes before baking prevents them from completely disintegrating. This ensures you get actual chunks of peanut butter goodness in the finished cake.
2. Don’t Overmix: The beauty of a dump cake is the lack of mixing. If you stir the ingredients together in the pan, you will end up with a standard sheet cake. By layering, you create distinct textures: a fudgy bottom, a gooey middle, and a slightly crisp top.
3. Use High-Quality Cake Mix: Since the cake mix is the primary structural component, don’t skimp here. A “Double Chocolate” or “Dark Chocolate” mix will provide a much more sophisticated flavor than a generic brand.
4. Check Your Oven Temp: Dump cakes are moisture-heavy. If your oven runs cold, the center will stay liquid; if it runs hot, the edges will burn before the middle sets. Use an oven thermometer for accuracy.
Creative Variations to Try
Once you’ve mastered the classic Peanut Butter Cup Dump Cake, why not experiment? Here are a few ways to switch things up:
- The “Fluffernutter” Version: Add a layer of marshmallow fluff dollops in between the peanut butter cups for a gooey, toasted marshmallow finish.
- The Nutty Crunch: Sprinkle half a cup of crushed roasted peanuts over the top before baking to add a much-needed crunch to the soft texture.
- Slow Cooker Method: If you don’t want to use the oven, you can “dump” everything into a greased crockpot and cook on HIGH for 2 hours or LOW for 4 hours. This results in a much more pudding-like consistency.
- White Chocolate Twist: Use a white cake mix and white chocolate chips with the peanut butter cups for a lighter, “blondie” style dump cake.
Serving and Presentation Ideas
Presentation is key when it comes to dump cakes, as they can sometimes look a bit “rustic” (read: messy) in the pan. To make your Peanut Butter Cup Dump Cake look as good as it tastes:
Serve it in individual ramekins. This makes it look like a planned molten lava cake rather than a scoop from a large pan. Dust the top with a little bit of powdered sugar and garnish with a single un-melted miniature peanut butter cup. For the ultimate decadence, serve it alongside a tall glass of cold milk or a robust espresso—the bitterness of the coffee pairs perfectly with the rich chocolate.
Storage and Reheating
If you happen to have leftovers (which is rare!), the Peanut Butter Cup Dump Cake stores surprisingly well. Cover the baking dish tightly with aluminum foil or plastic wrap and keep it at room temperature for up to 2 days, or in the refrigerator for up to 5 days.
To reheat, avoid the oven as it might dry the cake out. Instead, place a serving in a microwave-safe bowl and heat for 20-30 seconds. This will reactivate the fats in the peanut butter and chocolate, returning the cake to its original gooey glory.
Frequently Asked Questions (FAQ)
Can I use full-sized peanut butter cups?
Yes, but you should chop them into bite-sized pieces first to ensure they are distributed evenly throughout the cake.
My cake is too liquidy in the middle, what happened?
This usually means the milk/peanut butter mixture didn’t fully absorb into the cake mix, or it needs another 5 minutes in the oven. Remember, it will firm up as it cools!
Is this recipe gluten-free?
You can easily make this gluten-free by using a certified gluten-free chocolate cake mix. Most peanut butter cups are naturally gluten-free, but always check the label.
Conclusion: The Joy of Simple Baking
The Peanut Butter Cup Dump Cake is a testament to the idea that you don’t need a culinary degree to create a masterpiece. It’s about the joy of sharing something warm, sweet, and comforting with the people you love. It’s about the smell that fills your home and the sound of spoons hitting the bottom of the bowl as everyone rushes for seconds.
Next time you’re stressed about what to bring to a party or what to serve for dessert, remember this recipe. It’s easy, it’s reliable, and above all, it is absolutely delicious. Happy baking!