
There is a specific kind of magic that happens when you combine the spiced, caramelized flavor of Lotus Biscoff cookies with the tangy richness of cream cheese. If you have been searching for the ultimate crowd-pleasing dessert that requires zero oven time and delivers maximum flavor impact, look no further. These Mini Biscoff Cheesecakes are the epitome of indulgence, perfectly portioned and undeniably elegant.
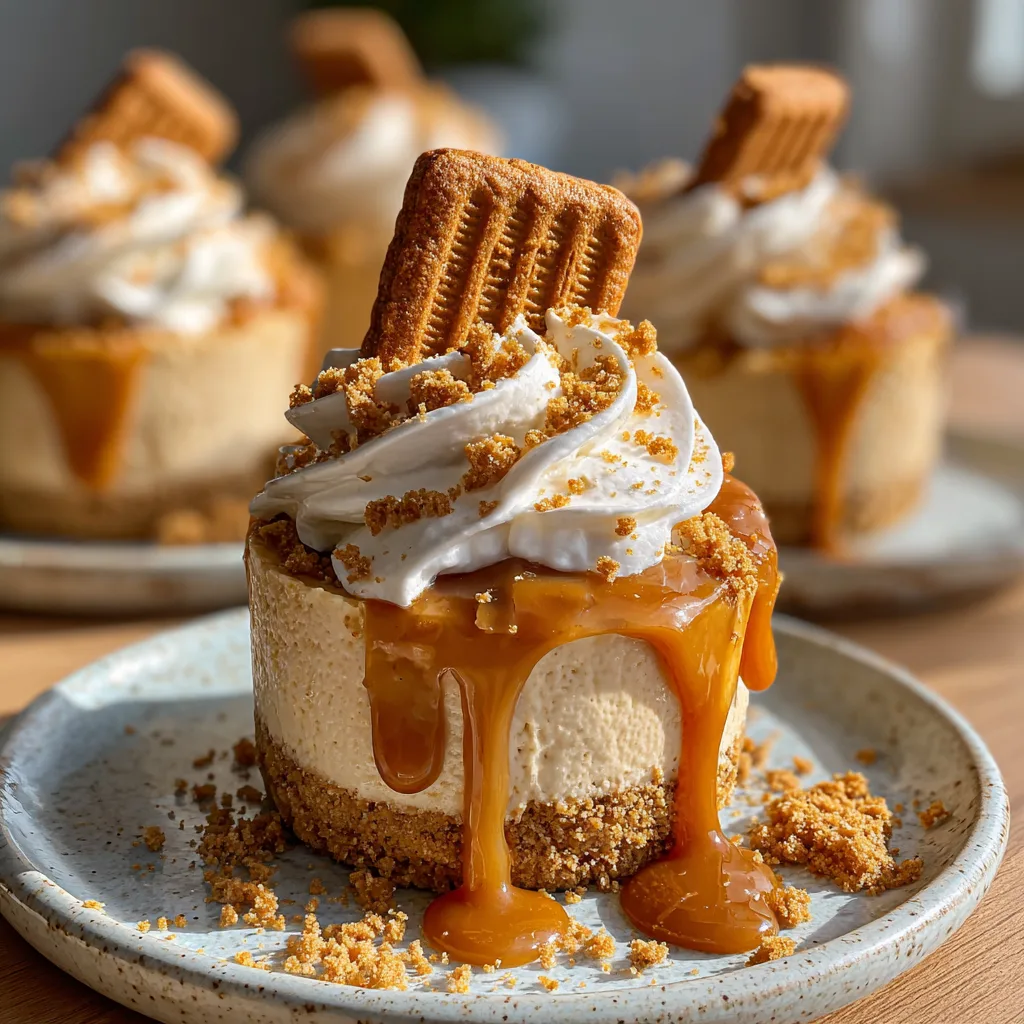
Whether you are hosting a sophisticated dinner party, looking for a treat to bring to a potluck, or simply craving a moment of sweet solitude, these mini cheesecakes are your answer. They combine a buttery, crunchy crust with a velvety, mousse-like cookie butter filling, all crowned with a luscious drip of melted Biscoff spread. In this comprehensive guide, we will walk you through every step to ensure your cheesecakes turn out unmatched in texture and taste.
Why This Recipe Will Become Your Favorite
The world of desserts is vast, but few recipes strike the perfect balance between ease of preparation and gourmet presentation like this one. Here is why this recipe stands out:
- Texture Contrast: The crunch of the biscuit base against the smooth, airy filling creates a delightful mouthfeel.
- Flavor Depth: Biscoff spread (cookie butter) offers notes of cinnamon, nutmeg, and caramelized sugar, which elevates the plain cheesecake base into something warm and complex.
- No-Bake Simplicity: Forget water baths, cracked tops, or oven monitoring. This recipe relies on chilling time to set, making it practically foolproof.
- Perfect Portions: Making individual cheesecakes means no messy slicing and easy serving for guests.
Understanding the Star Ingredient: Lotus Biscoff
Before diving into the mixing bowls, it is worth appreciating the core ingredient. Lotus Biscoff (a portmanteau of “Biscuit” and “Coffee”) is a Belgian specularuloos cookie. It is famous for its distinct caramelized flavor profile and crisp texture. The “spread” or “cookie butter” used in this recipe is essentially these cookies crushed and emulsified into a peanut-butter-like consistency.
Using both the actual biscuits for the crust and the spread for the filling ensures that the flavor permeates every single bite of the dessert. It provides a cohesive taste experience that is rich without being overly cloying.
Essential Equipment for Success
While this recipe is simple, having the right tools will ensure your mini cheesecakes look like they came from a high-end bakery.
- Mini Cheesecake Pan: This is the best tool for the job. These pans have loose bottoms (removable disks) that allow you to pop the cheesecakes out perfectly without damaging the crust.
- Cupcake Liners (Alternative): If you do not have a mini cheesecake pan, a standard muffin tin lined with paper liners works well, though the sides will have ridges.
- Electric Mixer: A hand mixer or stand mixer is crucial for getting the cream cheese and heavy cream to the right consistency.
- Piping Bag: For that professional swirl of whipped cream on top, a piping bag with a star tip (like a 1M) is recommended.
Ingredients
The quality of your ingredients will dictate the final result. Ensure your cream cheese is full-fat and at room temperature to avoid lumps.
Mini Biscoff Cheesecakes
Ingredients
Equipment
Method
- Place Biscoff cookies in a food processor and pulse until fine crumbs form. Mix with melted butter.
- Press about 1.5 tablespoons of the crumb mixture firmly into the bottom of each mini cheesecake mold. Freeze for 10 minutes.
- In a large bowl, beat softened cream cheese until smooth and lump-free.
- Add Biscoff spread, powdered sugar, and vanilla extract. Beat until fluffy.
- In a separate cold bowl, whip heavy cream to stiff peaks. Gently fold whipped cream into the cheesecake mixture.
- Spoon filling over the prepared crusts and smooth the tops. Refrigerate for at least 6 hours or overnight.
- Remove from pan. Melt extra Biscoff spread and drip over the edges.
- Top with whipped cream and a cookie before serving.
Notes
Crust
- 1 ½ cups Lotus Biscoff cookies (finely crushed)
- 5 tablespoons unsalted butter, melted
Cheesecake Filling
- 16 oz (450g) full-fat cream cheese, softened to room temperature
- ½ cup Lotus Biscoff spread (smooth)
- ½ cup powdered sugar (sifted)
- 1 teaspoon pure vanilla extract
- ¾ cup heavy whipping cream (cold)
Topping & Assembly
- ½ cup Lotus Biscoff spread (melted for the drip)
- ½ cup heavy whipping cream
- 1 tablespoon powdered sugar
- 6-12 whole Lotus Biscoff cookies (for garnish)
- Extra cookie crumbs
Instructions
- Prepare the Crust: Start by placing your Biscoff cookies in a food processor. Pulse them until they are fine crumbs. If you don’t have a processor, place them in a zip-top bag and crush them with a rolling pin. Transfer the crumbs to a medium bowl and pour in the melted butter. Mix until the texture resembles wet sand.
- Form the Base: Line your muffin tin with liners or grease your mini cheesecake pan. Place about 1 ½ tablespoons of the crumb mixture into the bottom of each mold. Use the back of a spoon or a small shot glass to press the crust down firmly and evenly. Place the pan in the freezer for 10 minutes to set while you make the filling.
- Beat the Cheese: In a large mixing bowl, beat the softened cream cheese until it is completely smooth and creamy. There should be no lumps. This usually takes about 2-3 minutes on medium speed.
- Add Flavor: Add the Biscoff spread, sifted powdered sugar, and vanilla extract to the cream cheese. Beat again until combined and fluffy. Scrape down the sides of the bowl to ensure everything is incorporated.
- Whip the Cream: In a separate cold bowl, whip the ¾ cup of heavy cream until stiff peaks form. Be careful not to overbeat it into butter.
- Fold and Fill: Gently fold the whipped cream into the Biscoff cream cheese mixture using a rubber spatula. Fold slowly to keep the air in the mixture, which keeps the cheesecake light. Spoon or pipe the filling over the chilled crusts, filling them to the top. Smooth the tops with a spatula.
- Chill: Place the pan in the refrigerator for at least 6 hours, or preferably overnight. They need to be firm to hold their shape when removed from the pan.
- The Drip Topping: Once set, remove the cheesecakes from the pan. Melt the remaining Biscoff spread in the microwave for 20-30 seconds until it is pourable. Spoon a small amount over the center of each cheesecake, allowing it to drip slightly down the sides.
- Final Garnish: Whip the remaining heavy cream with the tablespoon of sugar until stiff peaks form. Pipe a rosette swirl on top of each cheesecake. Garnish with a half or whole Biscoff cookie and a sprinkling of crumbs. Serve immediately.
The Science of the Perfect No-Bake Texture
One common issue with no-bake cheesecakes is that they can sometimes be too soft. This recipe combats that issue through two mechanisms: the fat content in the butter and cream cheese, and the aeration from the whipped cream.
When you chill the cheesecake, the fats solidify, creating a firm structure. By folding in whipped cream rather than just mixing liquid cream in, you introduce air bubbles that are suspended in that fat matrix. This gives you a dessert that is sliceable and firm, yet melts in your mouth like a mousse. Do not rush the chilling time; the molecular structure needs those cold hours to stabilize.
Creative Variations to Try
While the classic Biscoff flavor is incredible, you can easily tweak this base recipe for different occasions:
- Salted Caramel: Add a pinch of sea salt to the Biscoff spread before mixing it in, or drizzle actual salted caramel sauce on top alongside the cookie butter.
- Chocolate Biscoff: Use the chocolate-filled Biscoff cookies for the crust and add a tablespoon of cocoa powder to the filling for a mocha-like twist.
- Berry Bliss: The spice of the cookie pairs surprisingly well with tart fruits. Top with a fresh raspberry or a strawberry slice to cut through the sweetness.
Troubleshooting Common Issues
Even the best bakers run into hiccups. Here is how to solve them:
Lumpy Filling: This almost always happens because the cream cheese was too cold. If you are already mixing and see lumps, you can try passing the mixture through a fine-mesh sieve before folding in the whipped cream.
Crust Falling Apart: This means there wasn’t enough butter or it wasn’t pressed firmly enough. Ensure you really pack that crust down hard.
Stuck in the Pan: If using a metal tin without liners, run a thin knife dipped in hot water around the edge of the cheesecake before popping it out.
Storage and Shelf Life
These mini cheesecakes are excellent for making ahead of time. They can be stored in an airtight container in the refrigerator for up to 4 days. As time passes, the crust will soften slightly as it absorbs moisture from the filling, becoming more cake-like.
Freezing Instructions: You can freeze these cheesecakes (without the whipped cream topping and cookie garnish) for up to 2 months. Place them on a baking sheet to freeze solid, then transfer to a bag. Thaw in the fridge overnight before adding the final toppings.
Conclusion
These Mini Biscoff Cheesecakes are more than just a dessert; they are an experience. The warm, spiced notes of the cookie butter combined with the cool, creamy filling make them perfect for any season, from summer cookouts to cozy autumn evenings. They look incredibly impressive with their caramel drips and piped toppings, yet they require minimal effort to create.
So, grab a jar of cookie butter and get ready to impress your friends and family with a treat that looks professional but is secretly simple. Enjoy the process of creating these little masterpieces!


