The Ultimate Red Velvet Molten Lava Cake: A Decadent Symphony of Hot and Cold
There are few desserts that command attention quite like a molten lava cake. The anticipation as your fork breaks the delicate outer shell, followed by the dramatic flow of a warm, liquid center, is a culinary experience that never gets old. It’s a dessert that feels exclusively high-end, something reserved for fancy restaurants. Yet, the secret lies in its surprising simplicity. Today, we are taking this classic concept and giving it a vibrant, velvety twist that is perfect for any romantic occasion or when you simply need a show-stopping treat.
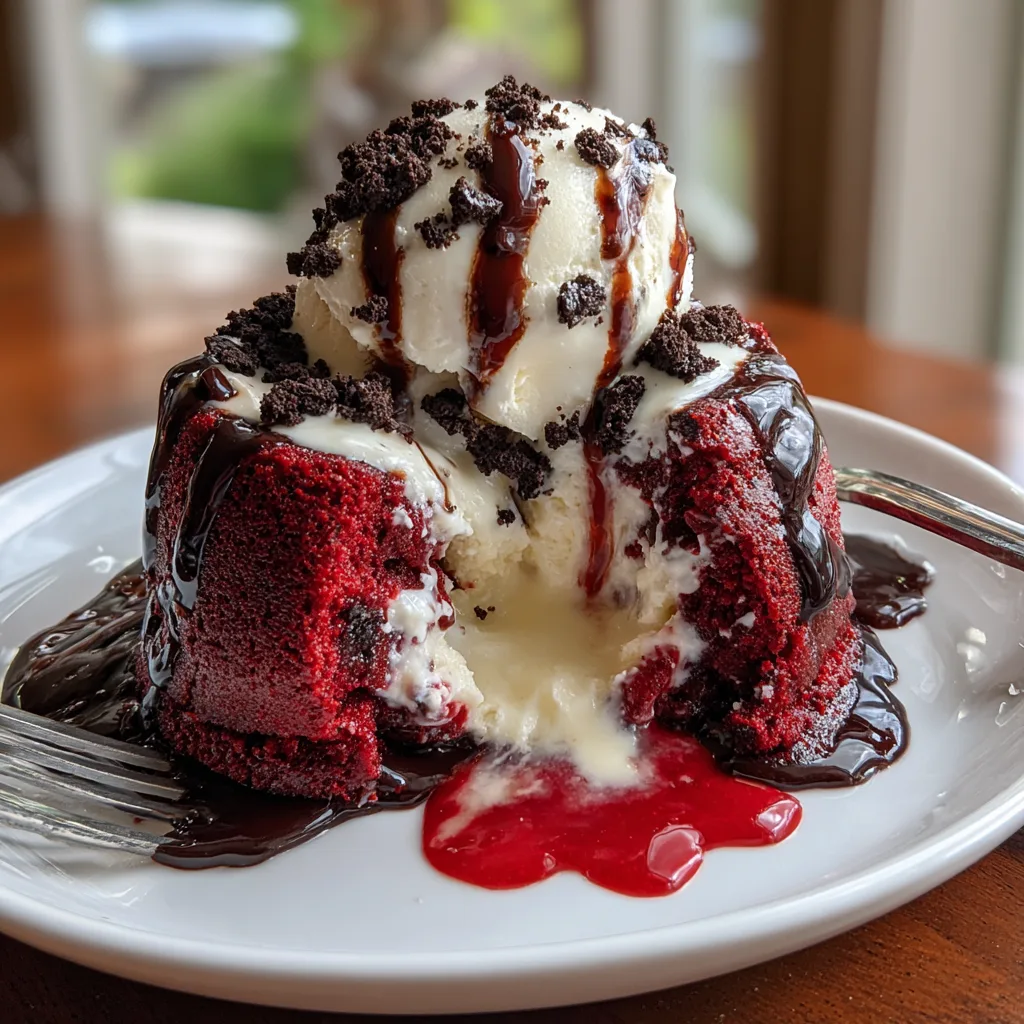
This is not your standard chocolate lava cake. We are marrying the beloved, mild cocoa and tangy buttermilk flavors of red velvet cake with its perfect partner: cream cheese. Instead of a molten chocolate center, this cake features a flowing, sweet cream cheese lava that brilliantly contrasts with the deep red sponge. Topped with a cold scoop of vanilla ice cream, a rich chocolate drizzle, and crunchy cookie crumbles, as seen in the image, this dessert is a masterclass in texture and temperature. It’s warm, cold, soft, liquid, and crunchy all at once.
In this comprehensive guide, we will demystify the process of making these individual cakes. We’ll explore the science behind the molten center, the importance of each ingredient, and the precise steps to ensure you get that perfect, photogenic flow every single time. Let’s dive into the world of decadent red velvet.
The Science of the “Molten” Center
The “magic” of a lava cake isn’t magic at all; it’s precise timing and temperature control. In a traditional chocolate lava cake, the center is simply undercooked batter. The outside sets into a cake, while the inside remains liquid. However, for our Red Velvet version, we are using a different technique to ensure a distinct cream cheese flavor and a reliable molten core.
We will create a frozen plug of sweetened cream cheese ganache. This frozen center is placed inside the cake batter within the ramekin. As the cake bakes, the batter around the outside cooks and sets, while the frozen cream cheese center slowly melts. The goal is to pull the cakes from the oven at the exact moment the cake is cooked through but the center has just finished melting into a luscious pool. If cooked too long, the center will cook into a solid cheesecake-like texture. If removed too early, the cake walls will collapse. It’s a delicate balance, but one that is easily mastered with the right instructions.
Selecting Your Ingredients for Success
A dessert with so few components relies heavily on the quality of its ingredients. Here is what you need to know before you start baking.
For the Cake
The red velvet flavor is subtle. It’s not powerfully chocolatey like a brownie, nor is it just a vanilla cake colored red. It’s a delicate balance of both, with a distinct tang.
- – Cocoa Powder: Use natural unsweetened cocoa powder. Its acidity reacts with the baking soda (if used in some recipes) and buttermilk to help create a tender crumb and deepen the red color. Do not use Dutch-processed cocoa, as it is neutral and won’t provide the same flavor profile or reaction.
- – Red Food Coloring: This is essential for the signature look. Gel paste coloring is more concentrated than liquid and produces a more vibrant color without thinning the batter.
- – Buttermilk: The acid in buttermilk is crucial. It tenderizes the gluten in the flour, leading to a softer cake, and adds that characteristic tangy flavor that cuts through the sweetness. If you don’t have it, you can make a substitute by adding a teaspoon of lemon juice or vinegar to milk and letting it sit for 5 minutes.
- – Cake Flour vs. All-Purpose Flour: Cake flour has less protein, which means less gluten formation. This results in a lighter, more velvety crumb. If you only have all-purpose flour, you can substitute it, but the cake may be slightly denser.
For the Molten Filling
This is the heart of the dessert. You want a filling that is smooth, creamy, and sweet, but not cloying.
- – Cream Cheese: Use full-fat brick-style cream cheese. The tub varieties often have added air or water, which can affect the texture of the filling. Ensure it is completely softened to room temperature to avoid lumps.
- – Powdered Sugar: This sweetens the filling and dissolves easily for a smooth texture. Granulated sugar would leave a gritty texture.
- – Egg Yolk: A single egg yolk helps to emulsify the filling and adds a rich, custard-like quality that ensures it melts beautifully without just turning thin and watery.
Step-by-Step to Molten Perfection
The process is broken down into two main parts: the filling and the cake. The filling must be made ahead of time to freeze.
Part 1: The Cream Cheese Lava (Make Ahead)
You’ll need to create the filling and freeze it into small portions. An ice cube tray or a silicone mini-muffin pan works perfectly for this. The frozen solid state is critical so it doesn’t melt into the batter before the cake sets.
Part 2: Ramekin Preparation
This step is non-negotiable. If your cakes stick to the ramekins, you won’t be able to unmold them to reveal the lava. Generously butter the inside of your ramekins, getting into every corner. Then, dust them with flour or cocoa powder, tapping out the excess. This creates a non-stick barrier that ensures a clean release.
Part 3: The Red Velvet Batter
The batter comes together quickly. The key is not to overmix once the flour is added. Overmixing develops gluten, which can make your cake tough instead of tender. Mix just until the dry ingredients are incorporated. The batter will be relatively thick.
Part 4: Assembly and Baking
Fill your prepared ramekins about halfway with the red velvet batter. Then, place one of your frozen cream cheese pucks in the center. Gently top with the remaining batter, ensuring the filling is completely covered. Bake until the edges are firm and pull away slightly from the sides, but the center still has a tell-tale jiggle. This jiggle means the inside is still liquid.
Part 5: The Unmolding
This is the most nerve-wracking part. Let the cakes cool in the ramekins for just a minute or two. This allows the structure to firm up slightly. Then, place your serving plate upside down over the ramekin. Holding both firmly (use a towel, the ramekin is hot!), flip them over in one smooth motion. Gently lift the ramekin off. If you prepared it correctly, the cake should slide right out.
Serving: The Final Flourish
As the image demonstrates, the toppings are an integral part of the experience. You must serve this cake immediately while it’s warm.
- – **Vanilla Ice Cream:** The cold, creamy ice cream begins to melt against the hot cake, creating a delicious sauce of its own.
- – **Chocolate Sauce:** A quality chocolate fudge sauce or ganache adds a rich chocolate element that ties everything together.
- – **Crunchy Element:** The crushed cookies in the picture (like chocolate sandwich cookies) provide a necessary textural contrast to the soft cake, liquid filling, and smooth ice cream. Chopped nuts would also work well.
- – **Fruit Sauce (Optional):** A drizzle of raspberry or strawberry coulis on the plate, as seen in the image, adds a bright, acidic note that cuts through the richness and complements the red color.
Ingredients
Prepare your *mise en place* before you begin. This recipe makes 4 individual cakes.
Red Velvet Molten Lava Cakes with Cream Cheese Filling
Ingredients
Equipment
Method
- To make the filling: Whisk together the softened cream cheese, powdered sugar, egg yolk, and vanilla until smooth. Divide into 4 sections of an ice cube tray and freeze until solid (at least 2 hours).
- Preheat oven to 400°F (200°C). Generously grease four 6-ounce ramekins with butter and dust with flour.
- In a medium bowl, whisk melted butter and sugar. Mix in eggs, vanilla, and food coloring.
- In a small bowl, sift together flour, cocoa powder, and salt.
- Add half the dry ingredients to the wet mixture, folding gently. Stir in buttermilk. Fold in remaining dry ingredients just until combined.
- Fill ramekins half full with batter. Place a frozen cream cheese piece in the center of each. Top with remaining batter to cover the filling.
- Bake on a baking sheet for 12-14 minutes, until edges are firm but centers still jiggle.
- Let cool for 1 minute, then carefully invert onto plates. Top with ice cream, chocolate sauce, and cookie crumbs. Serve immediately.
Notes
- Cream Cheese Filling:
- – 4 oz full-fat cream cheese, softened
- – 3 tbsp powdered sugar
- – 1 large egg yolk
- – 1/2 tsp vanilla extract
- Red Velvet Cake:
- – 1/2 cup unsalted butter, melted
- – 3/4 cup granulated sugar
- – 2 large eggs
- – 1 tsp vanilla extract
- – 1 tbsp liquid red food coloring (or 1-2 tsp gel paste)
- – 3/4 cup all-purpose flour (or cake flour)
- – 2 tbsp unsweetened cocoa powder
- – 1/4 tsp salt
- – 1/4 cup buttermilk
- For Preparation & Serving:
- – Butter and flour for preparing ramekins
- – Vanilla ice cream
- – Chocolate sauce or ganache
- – Crushed chocolate cookies
- – Raspberry coulis (optional)
Instructions
Follow these steps carefully for the best results.
- Prepare the Filling (At least 2 hours ahead): In a small bowl, whisk together the softened cream cheese, powdered sugar, egg yolk, and vanilla extract until completely smooth. Divide this mixture equally into 4 cavities of an ice cube tray or a mini silicone mold. Place in the freezer for at least 2 hours, or until solid frozen.
- Prep Ramekins and Oven: Preheat your oven to 400°F (200°C). Generously butter four 6-ounce ramekins. Dust the insides with flour, tapping out any excess. Place the ramekins on a baking sheet.
- Mix Wet Ingredients: In a medium mixing bowl, whisk together the melted butter and granulated sugar until combined. Add the eggs and vanilla extract, whisking until smooth. Stir in the red food coloring until you reach your desired shade of red.
- Combine Dry Ingredients: In a separate small bowl, sift together the flour, cocoa powder, and salt.
- Make the Batter: Gently fold half of the dry ingredients into the wet ingredients. Stir in the buttermilk. Fold in the remaining dry ingredients, mixing just until combined and no streaks of flour remain. Do not overmix.
- Assemble the Cakes: Spoon about half of the batter evenly among the four prepared ramekins. Remove the frozen cream cheese pucks from the freezer and place one in the center of each ramekin, pressing it down slightly into the batter. Top with the remaining batter, ensuring the filling is completely covered and the surface is relatively level.
- Bake: Bake for 12-14 minutes. The exact time will depend on your oven. The cakes are done when the edges are set and firm, but the center still has a distinct jiggle when you gently shake the pan.
- Unmold: Remove from the oven and let them sit in the ramekins for 1-2 minutes. Run a small, thin knife around the very edge of the cake to ensure it’s loose. Place a serving plate upside down on top of a ramekin. Carefully but quickly flip the plate and ramekin over. Gently lift the ramekin to release the cake. Repeat for the remaining cakes.
- Serve Immediately: Top each warm cake with a scoop of vanilla ice cream. Drizzle generously with chocolate sauce and sprinkle with crushed cookies. Serve immediately and enjoy the molten flow!
Make-Ahead and Storage
These cakes are best baked just before serving, but you can prep ahead.
Filling: The cream cheese centers can be made and kept frozen for up to a week.
Batter: You can prepare the batter, fill the ramekins with batter and the frozen centers, cover them tightly with plastic wrap, and refrigerate for up to 24 hours. You may need to add 1-2 minutes to the baking time since you are starting with cold batter.
Leftovers: Lava cakes do not store well after baking because the molten center will cook through upon reheating. If you have leftovers, you can store them in the fridge and eat them as a solid mini-cake, but the “lava” effect will be gone.
Conclusion
The Red Velvet Molten Lava Cake is a dessert that promises drama and delivers deliciousness. It’s a testament to the power of contrasting elements coming together to create something greater than the sum of its parts. The visual appeal of the red cake against the white lava, combined with the delightful interplay of hot cake and cold ice cream, makes it an unforgettable treat. While it requires a little bit of planning with the frozen centers, the assembly and baking are surprisingly quick. So, the next time you want to impress a loved one, or simply treat yourself to an indulgent dessert experience, this recipe is your answer. Break out the ramekins and prepare for a truly spectacular sweet.