
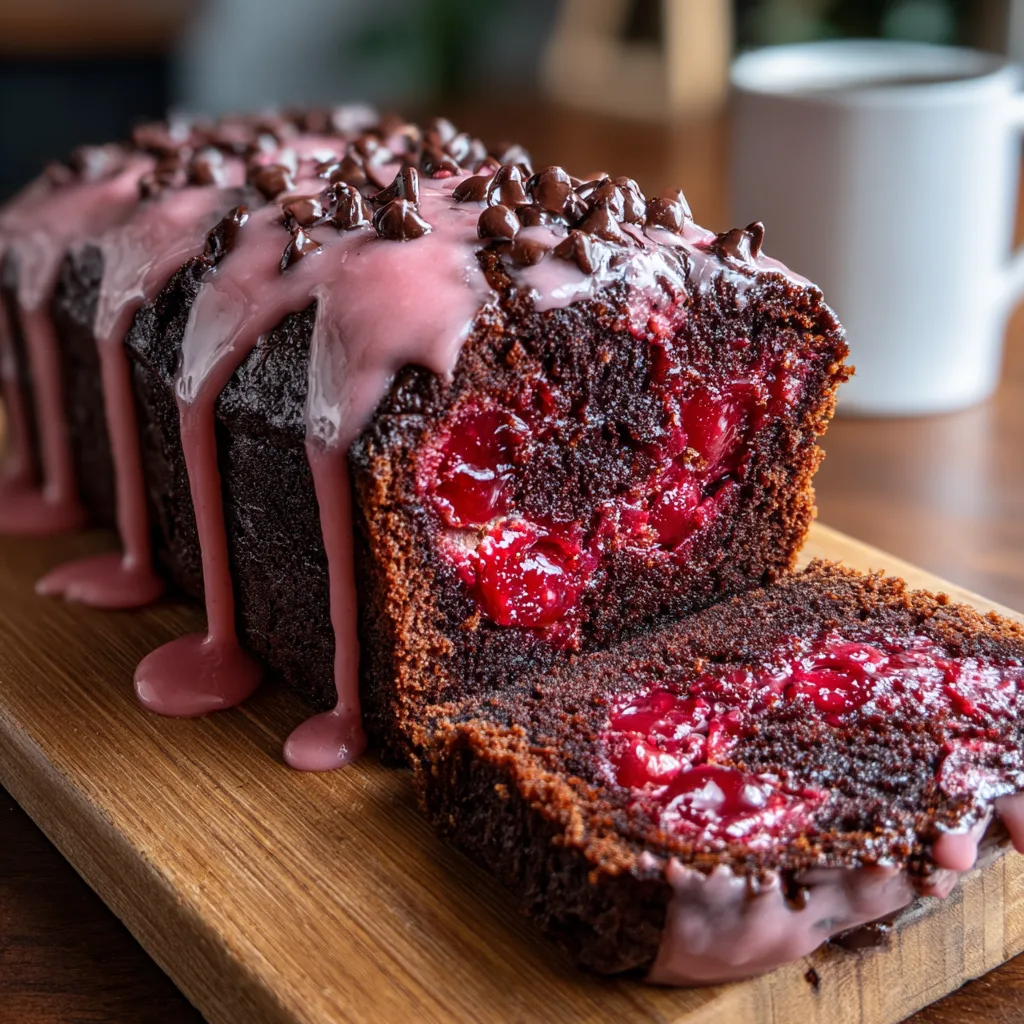
There are certain flavor combinations that just feel right. Peanut butter and jelly. Salt and caramel. And, perhaps one of the most romantic and decadent pairings of all: rich, dark chocolate and sweet, tart cherries. This Chocolate Cherry Loaf Cake is the physical embodiment of that perfect pairing. It’s a dessert that looks incredibly impressive—almost intimidatingly so, with that vibrant pink glaze—but is surprisingly simple to put together in a standard loaf pan.
Imagine a deeply chocolatey, moist, dense cake crumb that surrounds a hidden heart of luscious cherry filling. As if that wasn’t enough, the entire loaf is bathed in a sweet, cherry-infused pink glaze and studded with chocolate chips for that extra textural crunch. This isn’t just a quick bread; it’s an event. It’s the perfect centerpiece for a Valentine’s Day breakfast, a comforting treat for a rainy weekend afternoon alongside a hot cup of coffee, or a show-stopping dessert brought to a dinner party.
If you are looking for a recipe that delivers maximum flavor impact with relatively minimal effort, this glazed chocolate cherry loaf is your new go-to. Let’s dive into what makes this cake so special and how you can create this masterpiece in your own kitchen.
Why This Chocolate and Cherry Combination Wins Every Time
Why do we love chocolate and cherries together so much? It comes down to the science of flavor balancing. Cocoa, especially good quality unsweetened cocoa powder used in baking, has inherent bitter and earthy notes. Cherries, particularly when cooked down into a filling, offer a bright acidity and intense sweetness.
When these two meet, the acidity of the cherry cuts through the richness of the chocolate, preventing the dessert from becoming too heavy or cloying. Meanwhile, the deep flavor of the chocolate provides a grounded base that lets the bright fruit flavor shine. It’s the same principle that makes a Black Forest gateau such a timeless classic. In this loaf cake format, you get all that complex flavor profile in a comforting, easy-to-slice package.
Let’s look at the components that make this specific recipe a success.
Ingredient Spotlight: What Makes This Loaf So Luscious
To achieve the result seen in the picture—a dark crumb, a distinct filling layer, and that gorgeous glaze—we need the right ingredients. Here is a breakdown of the key players in this recipe:
- Dutch-Process Cocoa Powder: For that deep, dark color and intense chocolate flavor without too much acidity, Dutch-process cocoa is preferred over natural cocoa powder. It gives the cake a velvety texture.
- Sour Cream or Greek Yogurt: This is the secret weapon for moisture. The fat and acid in sour cream tenderize the gluten in the flour, ensuring your loaf cake is dense and fudge-like, not dry or crumbly.
- Cherry Pie Filling: To get that distinct “core” of cherries seen in the image, canned cherry pie filling is actually better than fresh cherries here. Fresh cherries release too much water during baking, which can make the batter soggy and the fruit sink. Pie filling is already thickened, so it stays put and provides that lovely jammy texture.
- Maraschino Cherry Juice: Don’t throw away the juice from the jar! This is what gives the glaze its vibrant pink color and distinct cherry candy flavor without needing artificial food coloring.
Chocolate Cherry Loaf Cake with Cherry Glaze
Ingredients
Equipment
Method
- Preheat oven to 350°F (175°C). Grease a 9×5-inch loaf pan and line with parchment paper.
- In a medium bowl, whisk together flour, cocoa powder, baking powder, baking soda, and salt. Set aside.
- In a large bowl, cream softened butter and sugar until light and fluffy (about 3-4 minutes).
- Beat in eggs one at a time, followed by the vanilla extract.
- Gradually mix in dry ingredients alternating with the sour cream and milk, starting and ending with dry ingredients. Do not overmix. Fold in 1/2 cup chocolate chips.
- Pour half the batter into the loaf pan. Spoon cherry pie filling down the center. Top with remaining batter and smooth.
- Bake for 55-65 minutes until a toothpick inserted into the chocolate part comes out mostly clean. Tent with foil if browning too fast.
- Cool in pan for 20 minutes, then remove to a wire rack to cool completely.
- To make glaze: Whisk powdered sugar, melted butter, vanilla, and cherry juice until smooth. Pour over cooled cake and sprinkle with mini chocolate chips.
- Let glaze set for 15 minutes before slicing.
Notes
The Essential Ingredients
Here is everything you need to gather to bake this decadent treat. Ensure your refrigerated items are at room temperature for the best emulsion of the batter.
The Chocolate Loaf Batter:
The Cherry Center:
The Pink Cherry Glaze & Topping:
Step-by-Step Instructions to Baking Bliss
Follow these steps carefully to ensure your loaf has that perfect structure and the hidden cherry center.
- Prep the Oven and Pan: Preheat your oven to 350°F (175°C). Grease a standard 9×5-inch loaf pan thoroughly with butter or non-stick spray. For easy removal, line the bottom and sides with parchment paper, leaving an overhang on the two longer sides to use as “handles” later.
- Whisk Dry Ingredients: In a medium bowl, sift together the all-purpose flour, cocoa powder, baking powder, baking soda, and salt. Whisk vigorously to ensure the leavening agents are evenly distributed and there are no cocoa lumps. Set aside.
- Cream Butter and Sugar: In a large bowl using a hand mixer, or in the bowl of a stand mixer fitted with the paddle attachment, beat the softened butter and granulated sugar together on medium-high speed until the mixture is light, fluffy, and pale in color (about 3-4 minutes). Scrap down the sides of the bowl.
- Add Wet Ingredients: Beat in the eggs, one at a time, mixing well after each addition. Stir in the vanilla extract.
- Combine Batter: Reduce the mixer speed to low. Add about one-third of the flour mixture to the butter mixture, followed by half of the sour cream and half of the milk. Repeat, alternating between dry and wet ingredients, ending with the dry ingredients. Mix only until just combined; do not overmix. Gently fold in the ½ cup of semi-sweet chocolate chips.
- Layer the Loaf: Pour about half of the thick chocolate batter into the prepared loaf pan and smooth the top with a spatula. Gently spoon the cherry pie filling down the center of the batter, trying to keep it away from the very edges of the pan. Top with the remaining chocolate batter, carefully smoothing it over to completely cover the cherry filling layer.
- Bake: Bake for 55 to 65 minutes. The loaf is done when a toothpick inserted into the chocolate part of the cake (try to miss the cherry center) comes out mostly clean with a few moist crumbs. If the top seems to be browning too quickly after 40 minutes, loosely tent aluminum foil over the top.
- Cool: Let the loaf cool in the pan for at least 20 minutes. Then, using the parchment paper handles, lift it out gently and place it on a wire rack to cool completely before glazing.
- Prepare the Glaze: Once the cake is cool, whisk together the sifted powdered sugar, melted butter, vanilla extract, and 2 tablespoons of maraschino cherry juice in a small bowl. Whisk until smooth. If it’s too thick to drizzle, add more cherry juice ½ teaspoon at a time until you reach the desired consistency. It should be thick but pourable.
- Decorate: Pour the pink glaze over the top of the cooled loaf, letting it drip enticingly down the sides. Immediately sprinkle the mini chocolate chips over the wet glaze so they stick. Let the glaze set for about 15 minutes before slicing.
Pro-Tips for the Perfect Moist Loaf
Baking loaf cakes can sometimes be tricky; they are prone to drying out on the edges before the center is cooked. Here are a few tips to ensure success:
- Measure Flour Correctly: Don’t scoop your measuring cup directly into the flour bag. This compacts the flour, and you’ll end up with too much, leading to a dry cake. Instead, spoon the flour into your measuring cup and level it off with a straight edge.
- Room Temperature Ingredients: Ensure your eggs, sour cream, and milk are at room temperature. This allows them to emulsify much better with the butter, creating a smoother batter and a more uniform texture in the final baked good.
- Don’t Overmix: Once you add the flour, mix slowly and stop as soon as the white streaks disappear. Overmixing develops gluten, which can make this tender loaf tough.
- Cool Completely: It is tempting to glaze a warm cake, but don’t do it! If the cake is warm, that beautiful pink glaze will simply melt right off the cake and pool at the bottom. Patience yields the best visual results.
Customizing Your Chocolate Cherry Creation
This recipe is fabulous as is, but there is always room for creativity in the kitchen. Here are a few ways to switch things up:
The Black Forest Twist: If you want to lean into the classic Black Forest cake vibes, add a teaspoon of cherry liqueur (like Kirsch) or a ½ teaspoon of almond extract to the batter along with the vanilla. You can also add a tablespoon of Kirsch to the glaze.
Double Chocolate Overload: If you are a serious chocoholic, swap the pink cherry glaze for a rich chocolate ganache. Simply melt together equal parts heavy cream and chocolate chips, stir until smooth, and pour over the cake. You can still top it with more cherries or chocolate curls.
Add Nuts: For added texture that complements both chocolate and cherry, fold ½ cup of chopped toasted walnuts or pecans into the batter along with the chocolate chips.
Storing and Serving Your Masterpiece
Because this cake contains a moist fruit filling and dairy, it needs proper storage to maintain its freshness.
At Room Temperature: The cake can be stored in an airtight container at cool room temperature for up to 2 days. However, if your kitchen is warm, it’s safer to refrigerate it.
In the Refrigerator: For longer storage, wrap the cake tightly in plastic wrap or store it in an airtight container in the fridge for up to 5 days. Note that the cold will make the cake seem denser. For the best eating experience, let slices sit out for 15-20 minutes to come to room temperature before enjoying.
Freezing: This loaf freezes very well, though it’s best to freeze it without the glaze. Wrap the cooled loaf tightly in two layers of plastic wrap, followed by a layer of aluminum foil. Freeze for up to 3 months. Thaw overnight in the refrigerator before glazing and serving.
Conclusion: A Slice of Happiness
This Glazed Chocolate Cherry Loaf Cake is more than just a recipe; it’s a gesture of love and indulgence. Whether you are baking it for a sweetheart on Valentine’s Day, taking it to a holiday potluck, or just treating yourself because you deserve it, the combination of deep chocolate, bright cherry, and sweet glaze is sure to bring a smile to anyone’s face. It’s a visually stunning dessert that tastes even better than it looks. Happy baking!


