
🐶 Pawsitively Delicious: Wholesome Homemade Banana Oat Dog Treats 🍌
There is a special kind of joy that comes from baking for your four-legged best friend. When you pull a tray of warm, homemade treats from the oven, the eager anticipation (and drool) from your pup is the best reward imaginable. Unlike store-bought snacks that can be filled with unpronounceable preservatives, artificial colors, and fillers, homemade treats give you complete control over what goes into your dog’s body.
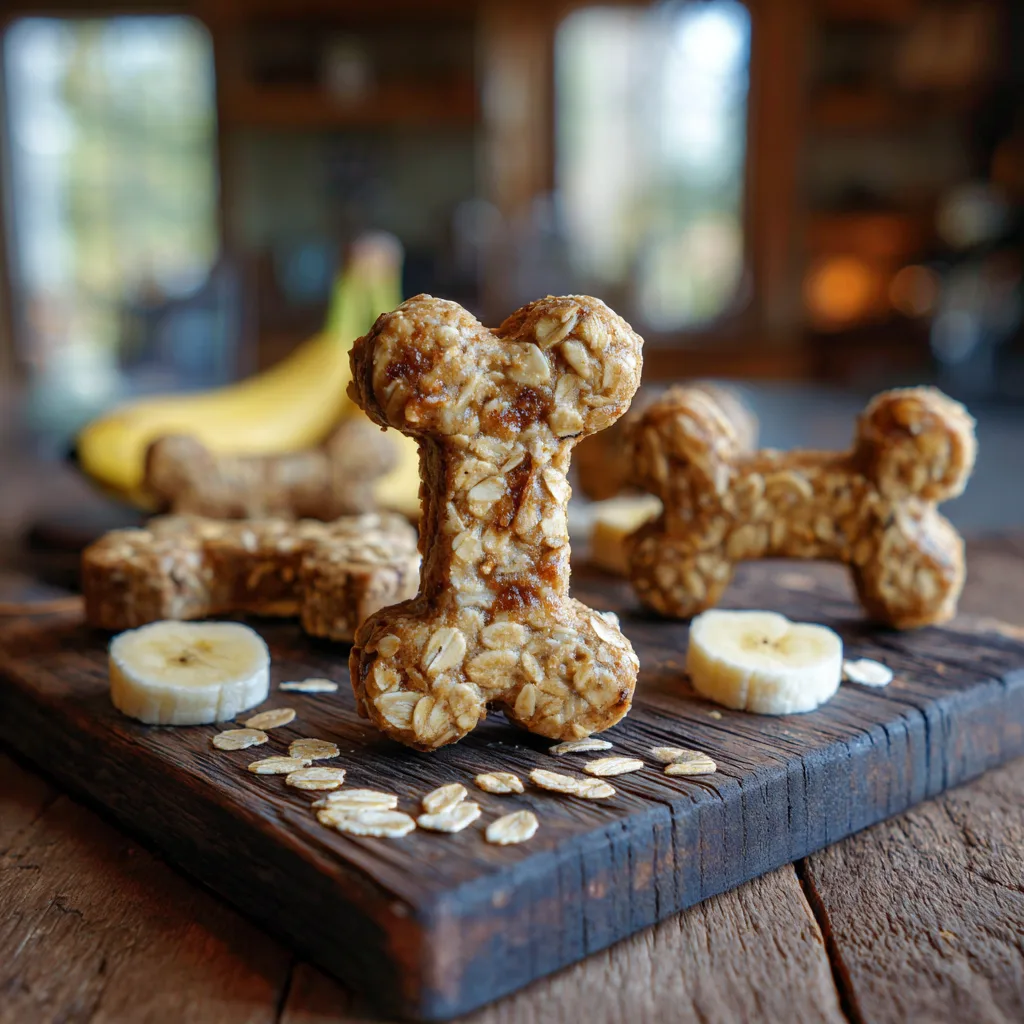
Inspired by the rustic, wholesome treats in the image, we are sharing a recipe for Homemade Banana Oat Dog Treats. These bone-shaped biscuits are not only adorable but are also packed with simple, nutritious ingredients that you probably already have in your kitchen. They are crunchy, satisfying, and naturally sweet from ripe bananas. Whether you have a growing puppy or a wise senior dog, these treats are a fantastic, healthy way to show them some love. Get ready to become your dog’s favorite chef!
Homemade Banana Oat Dog Treats
Ingredients
Equipment
Method
- Preheat oven to 350°F (175°C) and line a baking sheet with parchment paper.
- Place 1.5 cups of oats in a food processor and pulse until fine flour forms. Set aside.
- In a large bowl, mash the banana thoroughly. Whisk in peanut butter and egg (if using) until smooth.
- Add the oat flour and the remaining 1 cup of whole oats to the wet mixture. Mix until a stiff dough forms.
- Roll dough out on a floured surface to 1/4-inch thickness. Cut with cookie cutters.
- Place on baking sheet and bake for 20-25 minutes until golden and firm.
- Cool completely on a wire rack to harden before storing.
Notes
Why DIY Treats are Better for Your Pup
Making your own dog treats might seem like extra effort, but the benefits far outweigh the time spent in the kitchen. Here is why you should consider making the switch:
- Ingredient Control: This is the biggest advantage. If your dog has allergies or sensitivities to common ingredients like wheat, corn, or soy, you can easily avoid them. You know exactly what quality of ingredients you are using.
- No Nasty Additives: Many commercial treats are loaded with artificial preservatives like BHA and BHT, as well as artificial flavors and colors that offer no nutritional value and can sometimes cause adverse reactions.
- Healthier Fats: Instead of mystery animal fats, you can use healthy sources like natural peanut butter or coconut oil, which are great for your dog’s coat and skin.
- Freshness: Homemade treats have no shelf-life extensions. They are baked fresh, ensuring maximum flavor and nutrient retention.
- Cost-Effective: When you compare the price per ounce of high-quality, all-natural store-bought treats with the cost of oats and bananas, DIY wins every time.
The Star Ingredients: Simple & Nutritious
This recipe relies on a few powerhouse ingredients that are not only safe for dogs but also beneficial for their health.
Rolled Oats
As seen prominently in the photo, oats are the base of these treats. They are a fantastic alternative to wheat flour, making these treats naturally gluten-free (ensure you buy certified GF oats if your dog has a severe allergy). Oats are a great source of soluble fiber, which helps regulate digestion and can be soothing for dogs with irregular bowel movements. They also provide essential vitamins and minerals like iron and B vitamins.
Ripe Bananas
Bananas are the perfect natural sweetener and binder. They are loaded with potassium, which is vital for heart and muscle function, as well as Vitamin C and Vitamin B6. The riper the banana, the sweeter and easier it is to mash, making it perfect for this recipe. It’s a great way to use up those brown bananas on your counter!
Natural Peanut Butter (Xylitol-Free)
Most dogs go crazy for peanut butter. It adds a delicious nutty flavor, healthy fats, and protein. **Crucial Safety Warning:** You must use natural peanut butter that does not contain **xylitol**. Xylitol is a sugar substitute commonly found in some peanut butter brands and “sugar-free” products, and it is incredibly toxic, even fatal, to dogs. Always check the label carefully. The only ingredients should be peanuts and maybe a little salt.
Ingredients
Gather these simple pantry staples to get started. This recipe makes a batch of crunchy, wholesome biscuits.
- – 2 ½ cups old-fashioned rolled oats (divided use)
- – 1 large ripe banana
- – 1/3 cup natural peanut butter (xylitol-free!)
- – 1 large egg (optional, helps bind the dough and adds protein)
- – 1 tablespoon water (only if needed so dough sticks together)
Instructions
Follow these simple steps to bake a batch of treats your dog will sit, stay, and roll over for.
- Preheat and Prep: Preheat your oven to 350°F (175°C). Line a large baking sheet with parchment paper or a silicone baking mat.
- Make Oat Flour: Take 1 ½ cups of the rolled oats and place them in a food processor or high-powered blender. Pulse until they are ground into a fine flour. This will help hold the treats together. Leave the remaining 1 cup of oats whole for texture, as seen in the photos.
- Mash the Banana: In a large mixing bowl, peel the ripe banana and mash it thoroughly with a fork until it’s smooth with no large lumps.
- Combine Wet Ingredients: Add the peanut butter and the egg (if using) to the mashed banana. Whisk vigorously until the mixture is well combined and smooth.
- Make the Dough: Add the freshly ground oat flour and the remaining whole rolled oats to the wet mixture. Use a sturdy spatula or your hands to mix until a stiff dough forms. If the dough is too crumbly and won’t hold together, add water 1 teaspoon at a time until it becomes pliable.
- Roll and Cut: On a lightly floured surface (use a little more oat flour), roll the dough out to about 1/4-inch thickness. Use a bone-shaped cookie cutter (or any shape you like) to cut out the treats. Re-roll scraps and repeat until all the dough is used.
- Bake: Place the treats onto the prepared baking sheet, spacing them slightly apart. Bake for 20-25 minutes, or until they are golden brown around the edges and feel firm to the touch.
- Cool for Crunch: Remove the baking sheet from the oven. Let the treats cool on the pan for 5 minutes, then transfer them to a wire rack to cool completely. This step is crucial for them to harden and become crunchy. For an extra-crunchy treat, you can turn the oven off after baking and leave the treats inside as the oven cools down.
Tips for Success and Storage
Getting the Right Consistency
The moisture content in bananas can vary. If your banana is extra large or very ripe, your dough might be a little sticky. If so, add another tablespoon of whole oats or oat flour. If the dough is too dry and cracking, add water slowly. The dough should be like a stiff cookie dough.
Storage
Since these treats contain fresh ingredients and no preservatives, proper storage is important.
Room Temperature: Store completely cooled treats in an airtight container or jar on the counter for up to 5 days.
Refrigerator: For longer freshness, especially in warm weather, store them in an airtight container in the fridge for up to 2 weeks.
Freezer: These treats freeze beautifully! Freeze them in a single layer on a baking sheet, then transfer to a freezer-safe bag or container for up to 3 months. Thaw at room temperature before giving to your dog.
Fun Flavor Variations
Once you have mastered the base recipe, you can customize it for your pup’s preferences or health needs:
- Fresh Breath: Add 2 tablespoons of finely chopped fresh parsley or mint to the dough to help freshen your dog’s breath.
- Pumpkin Power: Substitute the mashed banana with ½ cup of plain, unsweetened pumpkin puree (not pumpkin pie filling) for a dose of beta-carotene and fiber.
- Cheesy Pleasey: Stir in ¼ cup of grated cheddar cheese or parmesan for a savory twist that most dogs adore.
- Veggie Boost: Add ¼ cup of finely grated carrots or zucchini for extra vitamins and a pop of color. Make sure to squeeze out excess moisture from the veggies first.
Conclusion
Making these Homemade Banana Oat Dog Treats is a simple gesture of love that your dog will appreciate with every crunchy bite. They are wholesome, delicious, and free from any worry-inducing ingredients. Plus, your kitchen will smell amazing while they bake!
So, grab those ripe bananas, heat up the oven, and get ready to see some serious tail-wagging action. Happy baking to you and your furry sous-chef!


