
🌟 Elevate Your Self-Care Routine with Homemade Luxury
There is something deeply satisfying about creating your own skincare products. It connects you to the ingredients you put on your body and allows for complete customization of scents and textures. If you have ever been captivated by those high-end boutique jars filled with cloud-like, impossibly fluffy body creams that smell like a fresh garden, this guide is for you. We are diving deep into the art of making the perfect Whipped Rose Body Butter—a product that looks as beautiful in the jar as it feels on the skin.
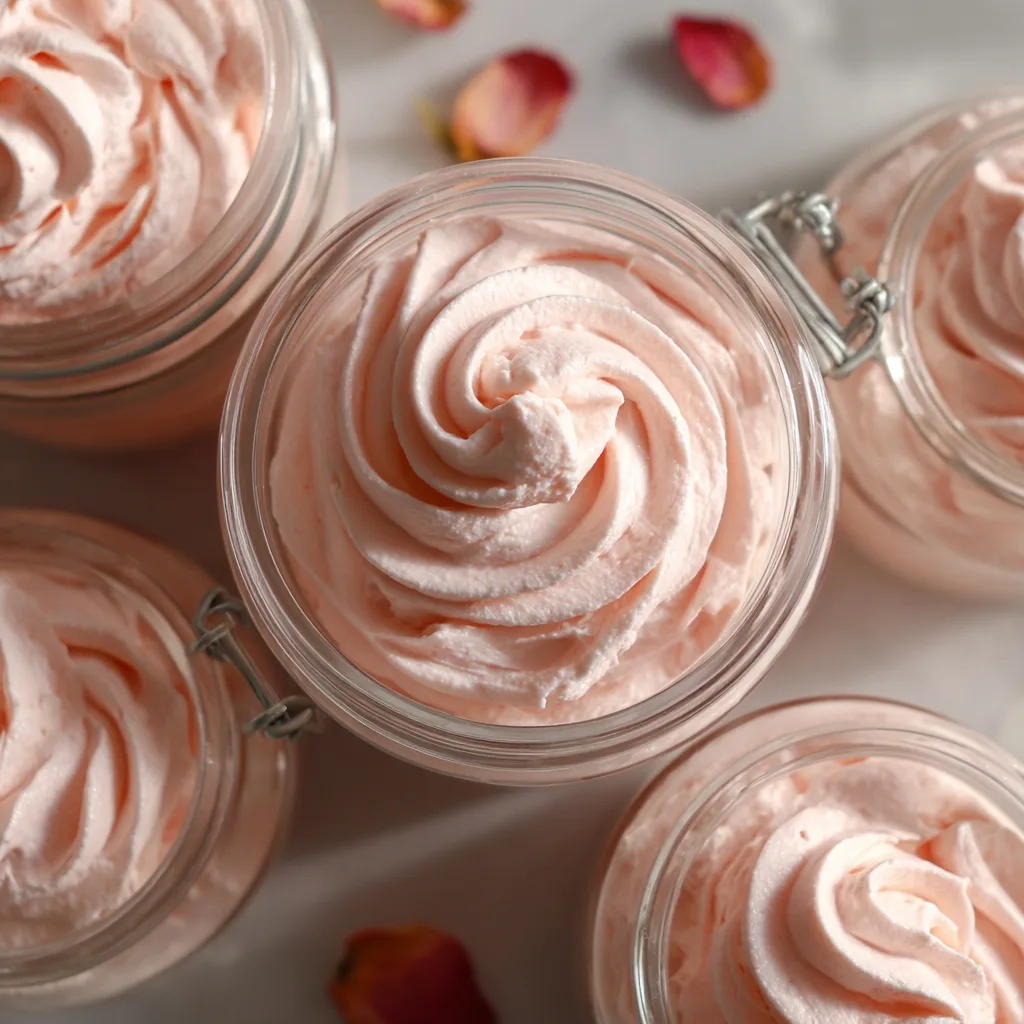
The image above captures the essence of what we are aiming for: a light pastel pink hue, a texture that looks like airy buttercream frosting piped into elegant glass jars, and the romantic adornment of dried rose petals. This isn’t just a lotion; it’s an experience. It’s a rich, deeply moisturizing treatment that melts instantly upon contact with warm skin, leaving behind a velvet-soft finish and the intoxicating, mood-lifting aroma of fresh roses. It is the ultimate pampering treat for yourself or the most thoughtful handmade gift for someone special.
🌹 Why DIY? The Magic Behind the Ingredients
Store-bought lotions are often filled with water (aqua) as the primary ingredient, requiring preservatives like parabens to prevent bacterial growth, along with synthetic fragrances and emulsifiers. When you make your own whipped body butter, you are creating an anhydrous (water-free) product. This means it’s highly concentrated, requiring no strong preservatives if kept dry, and every single ingredient is there to nourish your skin. It’s potent luxury.
To achieve that perfect balance of deep moisture without feeling overly slick or greasy, we need a carefully curated blend of hard butters, liquid carrier oils, and a secret weapon ingredient for texture.
The Hard Butters: The Foundation
The structure of your whipped butter comes from fats that are solid at room temperature. Shea Butter is the classic choice and the star of this recipe. Rich in vitamins A and E, as well as essential fatty acids, it is incredibly nourishing, soothing dry skin and improving elasticity. For the whitest, fluffiest result, refined shea butter is often preferred, though unrefined offers more raw nutrients with a nuttier natural scent. Cocoa Butter can also be added for a firmer texture and a subtle chocolatey undertone that pairs surprisingly well with rose.
The Liquid Oils: The Softeners
To ensure the butter whips up lightly and isn’t too hard to scoop, we incorporate liquid carrier oils. Sweet Almond Oil is a fantastic all-rounder—lightweight, hypoallergenic, and easily absorbed. For this rose-themed butter, however, Rosehip Seed Oil is an opulent addition. It is renowned for its anti-aging properties and ability to brighten the skin tone. Jojoba Oil is another excellent choice as it closely mimics the skin’s natural sebum, balancing oil production.
The Secret Weapon: Arrowroot Powder
The most common complaint about homemade body butter is that it feels too greasy. Since it is 100% fat, it will take longer to absorb than a water-based lotion. However, the addition of Arrowroot Powder (or tapioca starch/cornstarch) changes the game. This fine powder helps to cut the oily feel, absorbing excess sheen and leaving a silky, powdery-soft finish on the skin rather than a slick one. It also helps hold the airy texture of the whip.
The Aromatics and Aesthetics
To achieve the luxurious experience pictured, we use Rose Absolute or a high-quality Rose Geranium Essential Oil. True rose otto is incredibly expensive, so rose geranium is a wonderful, more accessible alternative that offers a similar floral, uplifting scent. For that beautiful pastel pink color, a tiny pinch of skin-safe Pink Mica Powder provides a lovely hue without staining the skin. Finally, Vitamin E Oil is added as an antioxidant to prolong the shelf life of the oils and provide extra skin healing benefits.
🥣 The Technique: Mastering the Whip
Achieving the texture seen in the photos isn’t just about ingredients; it’s entirely about temperature control and patience. If you whip the mixture while it’s too warm, it will stay liquid. If you chill it until it’s rock hard, it won’t whip at all.
The “Goldilocks” zone is a semi-solid state. After melting your fats and oils together, you must let the mixture cool until it becomes opaque and firm around the edges but still slightly soft in the center. This usually requires about 45 minutes to an hour in the refrigerator, stirring occasionally. Once it hits this stage, whipping incorporates air, transforming the yellowish balm into brilliant white (or pink), fluffy clouds. Using a stand mixer yields the best results, but a hand mixer works with a bit more effort.
To get the professional look in the glass jars, don’t just spoon it in. Transfer your finished whipped butter into a piping bag fitted with a large star tip. Pipe it into the jars in a swirling motion, just like you would frost a cupcake. This not only looks stunning but keeps the texture airy in the jar.
Luxurious DIY Whipped Rose Body Butter
Ingredients
Equipment
Method
- Melt Shea Butter and Coconut Oil in a double boiler until completely liquid and clear.
- Remove from heat and stir in Sweet Almond Oil and Vitamin E Oil.
- Refrigerate the mixture for 45-60 minutes until it is semi-solid (opaque and firm at edges, soft in center).
- Using a mixer, whip the semi-solid fats starting on low speed, increasing to high, for 5 minutes until white and fluffy.
- Add Arrowroot Powder, Rose Essential Oil, and Mica Powder. Whip on high for another 5-10 minutes until stiff peaks form and volume has doubled.
- Transfer to a piping bag with a star tip and pipe into jars. Garnish with dried rose petals.
- Store in a cool, dry place away from direct heat/sunlight. If it melts, re-chill and re-whip.
Notes
🛒 Ingredients
- — 1 cup Raw or Refined Shea Butter (Refined gives a whiter base for color)
- — 1/2 cup solid Coconut Oil (adds fluffiness)
- — 1/2 cup Sweet Almond Oil or Jojoba Oil
- — 1 teaspoon Vitamin E Oil
- — 2 tablespoons Arrowroot Powder (crucial for non-greasy finish)
- — 30-50 drops Rose Absolute or Rose Geranium Essential Oil
- — 1/4 teaspoon Pink Mica Powder (optional, for color)
- — Dried Rose Petals for garnish
👩🍳 Instructions
- Melt the Fats: Place the Shea Butter and Coconut Oil in a double boiler (or a heat-safe glass bowl sitting over a pot of simmering water). Heat gently until completely melted and clear. Remove from heat.
- Add Liquid Oils: Stir in the Sweet Almond Oil (or Jojoba) and the Vitamin E Oil into the melted butter mixture.
- The Crucial Cooling Phase: Place the bowl in the refrigerator. Let it cool for roughly 45 minutes to an hour. You are looking for a semi-solid state—it should be opaque and firm around the edges of the bowl, but your finger should still be able to make a dent in the center easily. If it gets too hard, let it sit at room temperature for a bit.
- Initial Whip: Once cooled to the right consistency, use a hand mixer or stand mixer fitted with the whisk attachment. Start on low speed to break up the solids, then gradually increase to high speed. Whip for about 5 minutes. The mixture should start to turn from yellow/translucent to opaque white and begin to increase in volume.
- Add Add-ins: Scrape down the sides of the bowl. Add the Arrowroot Powder, Rose Essential Oil, and Pink Mica Powder (if using).
- Final Whip to Peaks: Continue whipping on high speed for another 5-10 minutes. This is where the magic happens. The butter will double in volume, become incredibly fluffy, lighter in color, and hold stiff peaks, similar to meringue or frosting.
- Package Pretty: For the look in the photo, scoop the whipped butter into a piping bag fitted with a large star tip. Pipe the butter into clean glass jars. Garnish the top immediately with a few dried rose petals before closing the lid.
✨ Conclusion and Storage
Your Whipped Rose Body Butter is now ready to provide luxurious hydration. Because this product contains no water, it has a shelf life of about 6 to 12 months if kept away from moisture. Store your jars in a cool, dry place out of direct sunlight. Because it is whipped fat, if it gets too hot (like in a warm bathroom in summer or left in a hot car), it will melt and lose its fluffy texture. If this happens, you can simply re-chill it and re-whip it back to life.
Enjoy the ritual of applying this luscious butter right after a shower when your skin is warm and damp. A little goes a long way, melting in to leave you feeling petal-soft and smelling divine. It’s simple luxury, handmade by you.


