
Sweet Romance: Soft Strawberry Chocolate Thumbprint Cookies 🍓🍫
There is a special kind of magic that happens when fruit and chocolate meet. It is a timeless dance of acidity and richness, brightness and depth. But when you wrap that flavor combination in a soft, pillowy, sugar-crusted pink cookie, you elevate a simple treat into an edible love letter. These Soft Strawberry Chocolate Thumbprint Cookies are visually stunning, incredibly delicious, and surprisingly simple to make.
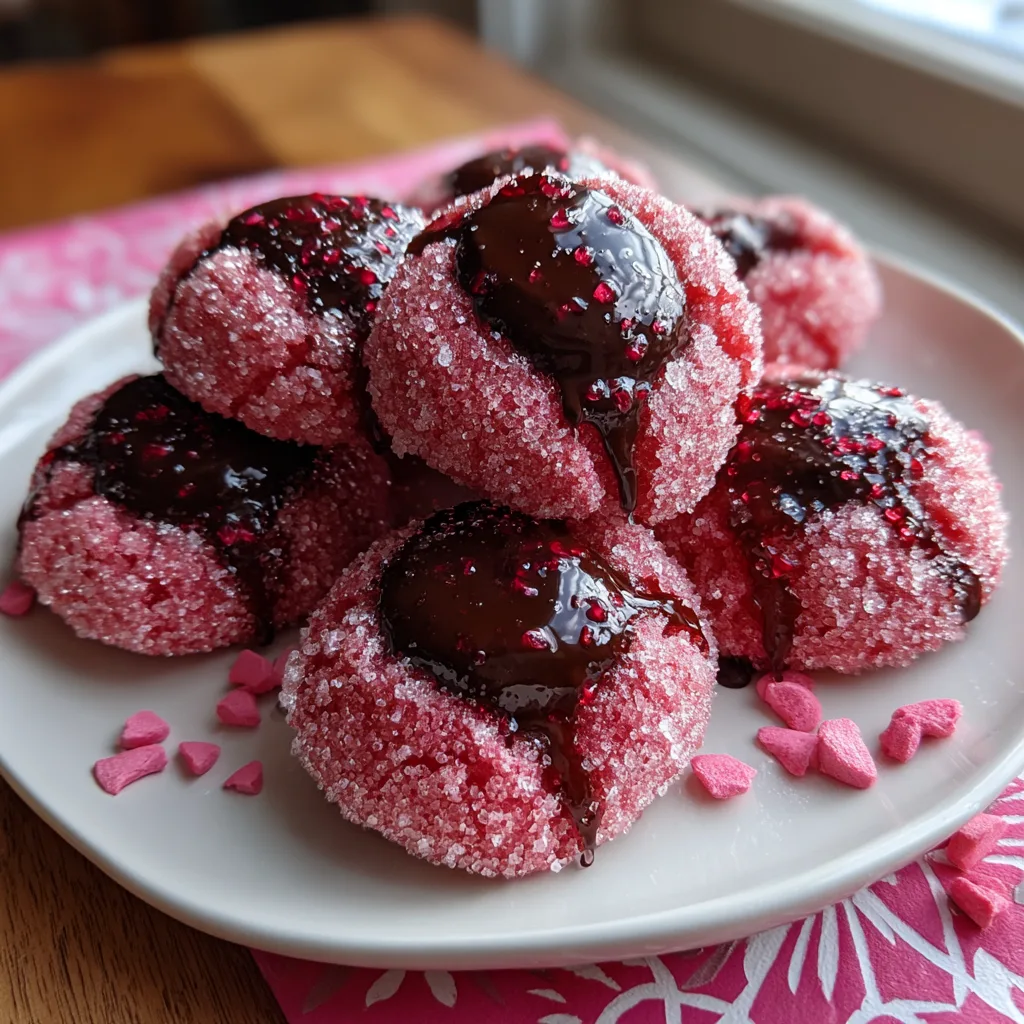
Imagine biting into a cookie that has the tender crumb of a sugar cookie, the vibrant aroma of strawberries, and a crackly exterior of sparkling sugar. Then, just as the sweetness settles, you hit the center: a pool of luxurious, silky dark chocolate ganache that melts on your tongue. It is the perfect balance of texture and flavor, making it the ultimate dessert for Valentine’s Day, bridal showers, or simply a Tuesday afternoon when you need a little joy.
In this extensive guide, we are going to dive deep into the art of making the perfect thumbprint cookie. We will cover everything from achieving that natural pink hue to preventing your cookies from cracking, and how to create a ganache that stays shiny and smooth. Preheat your ovens; we are about to bake something beautiful.
💖 Why This Recipe Will Steal Your Heart
With thousands of cookie recipes on the internet, why should this one be the next on your baking list? It comes down to the sensory experience.
- The “Wow” Factor: Let’s be honest, we eat with our eyes first. The vibrant pink color against the dark chocolate center is striking. These cookies look like they came from a high-end boutique bakery.
- Texture Contrast: The exterior is rolled in granulated sugar before baking, creating a delicate crunch that gives way to a soft, almost cake-like interior. The smooth ganache adds a third texture that ties it all together.
- Versatility: While they scream “Valentine’s Day,” the strawberry flavor is perfect for spring picnics, summer barbecues, or winter holidays when you want a break from gingerbread.
- No Chilling Required: Unlike many cutout sugar cookies that require hours of chilling, this dough comes together quickly and holds its shape well, meaning you get to the eating part faster.
🍓 The Strawberry Secret: Flavoring Without Ruining Texture
One of the biggest challenges in baking fruit-flavored cookies is getting a punchy flavor without adding too much moisture. Fresh strawberries, while delicious, are full of water. Adding chopped fresh fruit to cookie dough often results in a soggy, cakey mess rather than a chewy cookie.
The Solution: Freeze-Dried Strawberries or Emulsions.
For this recipe, we recommend using a high-quality strawberry extract or emulsion for the base flavor. However, if you want an authentic, tangy kick, pulverizing freeze-dried strawberries into a fine powder and whisking it into your flour is a game-changer. It concentrates the flavor intensely without adding liquid. This method ensures your dough stays workable and your cookies bake up with the perfect structure.
🍪 Ingredients – The Symphony of Flavors
Every ingredient plays a crucial role here. Let’s break down your shopping list.
— The Cookie Base —
- 1 cup Unsalted Butter (softened to room temperature)
- 2/3 cup Granulated Sugar (plus extra for rolling)
- 1 large Egg (room temperature)
- 2 tsp Strawberry Extract or Emulsion
- 1 tsp Vanilla Extract
- Pink Gel Food Coloring (optional, for a deeper hue)
- 2 ¼ cups All-Purpose Flour
- 1/2 tsp Baking Powder
- 1/4 tsp Salt
— The Chocolate Filling —
- 1/2 cup Semi-Sweet or Dark Chocolate Chips
- 3 tbsp Heavy Cream
- 1 tsp Unsalted Butter (for shine)
- Red Sprinkles or Edible Glitter (for garnish)
👩🍳 Instructions – The Path to Perfection
Follow these steps carefully to ensure your thumbprints are deep, your cookies are soft, and your chocolate is glossy.
Soft Strawberry Chocolate Thumbprint Cookies
Ingredients
Equipment
Method
- Preheat oven to 350°F (175°C) and line baking sheets with parchment paper.
- Cream butter and sugar together until light and fluffy (about 2-3 minutes).
- Beat in egg, strawberry extract, vanilla, and food coloring until combined.
- Gradually mix in flour, baking powder, and salt on low speed until dough forms.
- Scoop dough into 1-inch balls and roll each ball in granulated sugar.
- Place on baking sheet and gently press a thumb or teaspoon into the center to create a well.
- Bake for 10-12 minutes until set. Re-press indentations if they puffed up. Cool completely.
- Melt chocolate, cream, and butter together, stirring until smooth to make ganache.
- Fill cooled cookie centers with ganache and top with sprinkles. Let set before serving.
Notes
- Prep Your Station: Preheat your oven to 350°F (175°C). Line two large baking sheets with parchment paper or silicone baking mats. Pour about ½ cup of granulated sugar into a small bowl for rolling.
- Cream the Butter and Sugar: In the bowl of a stand mixer fitted with the paddle attachment (or using a hand mixer), beat the softened butter and 2/3 cup granulated sugar on medium-high speed for 2-3 minutes. You want the mixture to be pale and fluffy. This aeration is key to a soft cookie.
- Add Wet Ingredients: Scrape down the sides of the bowl. Add the egg, strawberry extract, vanilla extract, and food coloring (if using). Mix on medium speed until well combined. The mixture may look slightly curdled; this is normal.
- Incorporate Dry Ingredients: In a separate bowl, whisk together the flour, baking powder, and salt. Turn the mixer to low speed and gradually add the flour mixture to the wet ingredients. Mix just until no streaks of flour remain. Do not overmix, or the cookies will be tough.
- Scoop and Roll: Scoop about 1 tablespoon of dough (a #50 scoop works well) and roll it into a smooth ball between your palms. Roll the ball in the bowl of granulated sugar until fully coated.
- Form the Thumbprint: Place the sugar-coated balls on the prepared baking sheet, spaced 2 inches apart. Using your thumb or the back of a rounded measuring teaspoon, gently press an indentation into the center of each cookie. Tip: If the edges crack significantly, gently smooth them back together with your fingers.
- Bake: Bake for 10-12 minutes. The cookies should look set and matte, but they should not be browning on the edges. If the indentations have puffed up during baking, gently press them down again with the teaspoon immediately after taking them out of the oven.
- Cool: Let the cookies cool on the baking sheet for 5 minutes before transferring them to a wire rack to cool completely. They need to be cool before you add the filling.
- Make the Ganache: While cookies cool, place chocolate chips and 1 tsp butter in a small heatproof bowl. Heat the heavy cream in the microwave or on the stovetop until it just begins to simmer (do not boil). Pour the hot cream over the chocolate. Let it sit for 2 minutes, then whisk gently until smooth and glossy.
- Fill and Decorate: Spoon about a teaspoon of the chocolate ganache into the center of each cooled cookie. Immediately sprinkle with red sprinkles or glitter before the chocolate sets. Allow the chocolate to set firmly (about 1 hour) before stacking.
🧪 The Science of the “Thumbprint”
The thumbprint cookie (sometimes called Hallongrotta in Sweden) relies on a specific ratio of fat to flour. Too much fat, and the cookie spreads flat, losing the indentation. Too much flour, and the cookie cracks and crumbles when you press it.
Preventing Cracks: It is the bane of every baker’s existence—you press your thumb in, and the beautiful smooth ball splits open like a fault line. While minor cracking is rustic and charming, deep cracks can cause the filling to leak out. To prevent this:
- Ensure your dough is moist enough. If it feels dry, add a teaspoon of milk.
- Roll the ball until it is perfectly smooth and warm from your hands before rolling in sugar.
- Press slowly and gently. If you press too fast, the structural integrity snaps.
🍫 Ganache 101: Achieving the Perfect Gloss
The filling in the photo isn’t just melted chocolate; it’s ganache. Melted chocolate alone dries hard and can be brittle or chalky. Ganache, which is an emulsion of chocolate and cream, stays soft enough to bite through without cracking your tooth, but firm enough to hold its shape.
The Golden Ratio: For a filling that sets but remains fudgy, a 2:1 ratio of chocolate to cream (by weight) is generally standard for a firm ganache. However, for these cookies, we use slightly more cream to keep it luscious. The addition of a tiny pat of butter at the end creates that professional bakery shine.
🎨 Variations on a Theme
Once you master the base, the possibilities are endless. Here are a few ways to remix this recipe:
The “White Chocolate Raspberry”
Swap the strawberry extract for raspberry extract. Instead of dark chocolate ganache, fill the centers with white chocolate ganache or a dollop of high-quality raspberry jam. The tartness of the raspberry cuts through the sweetness of the white chocolate beautifully.
The “Red Velvet” Twist
To make these true Red Velvet cookies, replace 2 tablespoons of the flour with unsweetened cocoa powder and add a teaspoon of vinegar to the wet ingredients. The cocoa adds that subtle earthy flavor characteristic of red velvet cake.
The “Cheesecake” Center
Instead of chocolate, fill the centers with a cream cheese mixture (cream cheese, sugar, yolk) before baking. This creates a strawberry cheesecake cookie that is absolutely to die for.
🍽️ Serving and Presentation Ideas
These cookies are naturally photogenic, making them perfect for gifting.
- Gift Boxes: Place them in a white bakery box with a clear window. The pink color pops against white packaging. Tie with a red satin ribbon.
- Dessert Boards: Arrange them on a platter with fresh strawberries, chocolate-covered pretzels, and marshmallows for a “Valentine’s Charcuterie” board.
- Tea Time: serve them with a floral tea, like hibiscus or rose, which complements the floral notes of the strawberry flavor.
🥡 Storage and Freezing
Room Temperature: These cookies can be stored in an airtight container at room temperature for up to 5 days. Layer them with parchment paper to prevent the chocolate centers from smudging other cookies.
Freezing: You can freeze the baked cookies without the filling for up to 3 months. When ready to serve, thaw them and then make the fresh ganache to fill them. If you must freeze them filled, freeze them in a single layer until the chocolate is rock hard, then stack them with parchment paper in between.
✨ Conclusion: A Little Bite of Love
The Soft Strawberry Chocolate Thumbprint Cookie is a reminder that baking doesn’t have to be complex to be impressive. With a few simple ingredients and a little bit of care, you can create a treat that looks professional and tastes like home.
The crunch of the sugar shell, the tender pink crumb, and the rich, melting chocolate center create a harmony of textures that is hard to beat. Whether you are baking for a sweetheart, a friend, or just yourself, these cookies are a celebration of sweetness.
So, get that butter softening and find your prettiest sprinkles. It is time to make the world a little bit pinker, one cookie at a time.
Happy Baking!


