
Pistachio Layer Cake with Cream Cheese Frosting 🍰
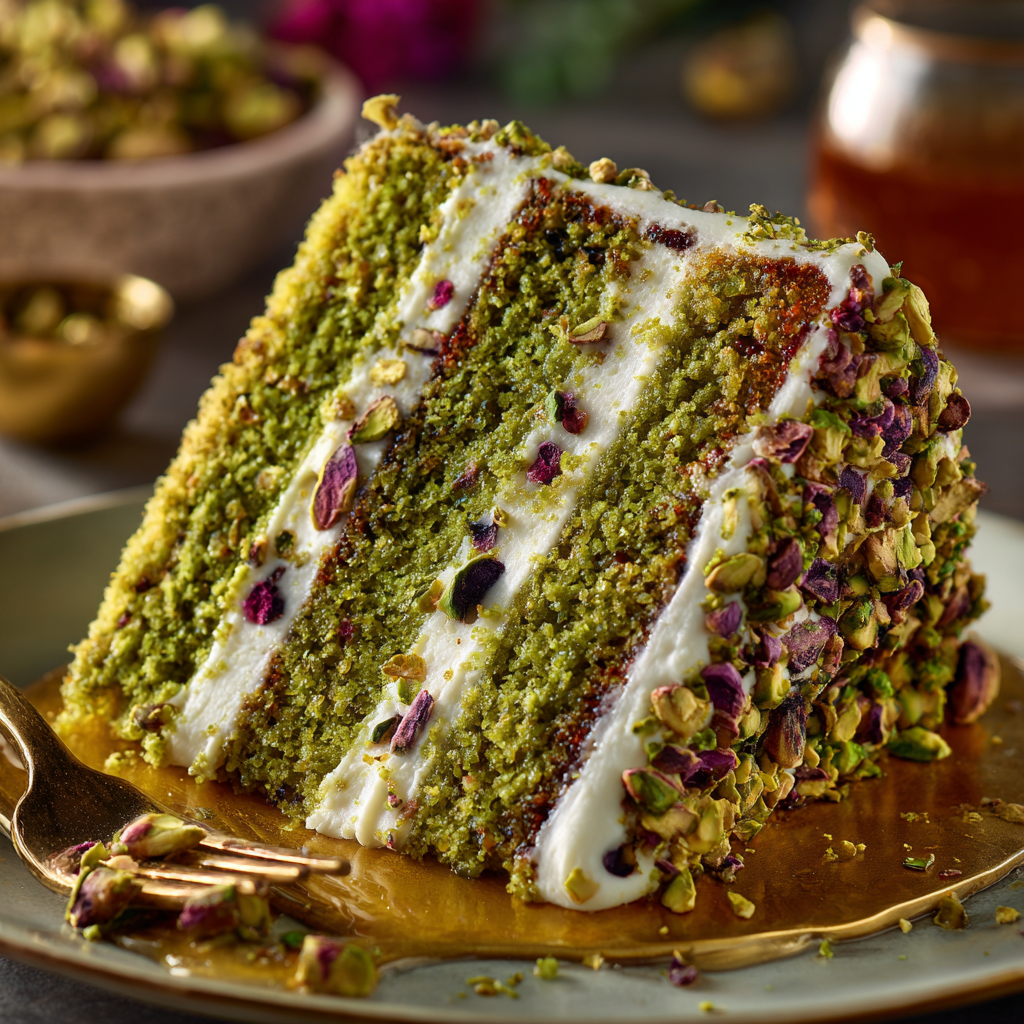
Indulge in the luxurious flavors of this stunning Pistachio Layer Cake that combines the rich, nutty essence of premium pistachios with velvety cream cheese frosting. This show-stopping dessert features three moist, tender cake layers infused with ground pistachios and a hint of honey, separated by silky smooth cream cheese frosting, and finished with a generous coating of crushed pistachios. Whether you’re celebrating a special occasion or simply treating yourself to something extraordinary, this pistachio layer cake delivers both visual appeal and incredible taste that will leave everyone asking for seconds.
Why This Pistachio Layer Cake Will Become Your Go-To Celebration Dessert 💚
Pistachio desserts have been cherished across Mediterranean and Middle Eastern cultures for centuries, and this layer cake brings that timeless tradition into your modern kitchen. What makes this recipe truly special is the use of finely ground pistachios incorporated directly into the cake batter, creating an authentic pistachio flavor that permeates every bite. Unlike cakes that rely solely on artificial flavoring or pistachio pudding mix, this recipe celebrates the natural taste and beautiful green hue of real pistachios.
The combination of textures in this dessert is absolutely divine. The cake layers are incredibly moist and tender, with a delicate crumb that melts in your mouth. The cream cheese frosting provides a tangy counterpoint to the sweet, nutty cake, while the crushed pistachio coating adds a satisfying crunch and intensifies the pistachio experience. A drizzle of honey brings everything together with its floral sweetness and creates a gorgeous glossy finish.
This pistachio layer cake is perfect for birthdays, weddings, anniversaries, holiday gatherings, or any time you want to create something truly memorable. The natural green color makes it especially popular for spring celebrations, St. Patrick’s Day, or as an elegant alternative to traditional wedding cakes. Plus, it photographs beautifully, making it ideal for those special moments you want to capture and share.
The Secret to Perfect Pistachio Flavor 🌰
The key to achieving authentic pistachio flavor lies in using high-quality, unsalted pistachios that you grind yourself. Pre-ground pistachio flour can work in a pinch, but freshly ground pistachios release their natural oils and provide superior flavor and aroma. When grinding pistachios, pulse them in a food processor until they reach a fine, flour-like consistency, being careful not to over-process them into pistachio butter.
For the most vibrant green color, use raw or lightly roasted pistachios rather than heavily roasted ones, which tend to have a darker, more brownish hue. Some bakers add a tiny drop of green food coloring to enhance the color, but this is entirely optional and not necessary if you’re using quality pistachios. The natural color may be more subtle than artificially colored versions, but it’s absolutely authentic and beautiful in its own right.
The honey in this recipe serves multiple purposes beyond sweetness. It enhances the moisture of the cake, helps the layers stay fresh longer, and complements the pistachio flavor with its floral notes. Choose a mild, light-colored honey such as clover or acacia for the best results, as darker honeys can overpower the delicate pistachio taste.
Mastering the Cream Cheese Frosting Balance 🧁
The cream cheese frosting in this recipe is carefully balanced to complement rather than overwhelm the pistachio cake. It’s less sweet than traditional buttercream, allowing the nutty flavor of the pistachios to shine through. The tanginess of the cream cheese cuts through the richness of the cake and provides a refreshing contrast that keeps each bite interesting.
When making the frosting, ensure your cream cheese and butter are at room temperature for the smoothest, most spreadable consistency. Cold ingredients will result in lumpy frosting, while ingredients that are too warm will make the frosting too soft to hold its shape. The ideal temperature is when the butter and cream cheese are soft enough to leave an indentation when pressed but still hold their shape.
If you find your frosting is too thick, add a tablespoon of heavy cream or milk at a time until you reach the desired consistency. If it’s too thin, refrigerate it for 15-20 minutes to firm up, or add more powdered sugar gradually. The frosting should be spreadable but firm enough to hold the cake layers in place without sliding.
Ingredients 🥄
For the Pistachio Cake Layers:
- 2 cups all-purpose flour
- 1 cup finely ground pistachios
- 1.5 cups granulated sugar
- 3.5 teaspoons baking powder
- 1 teaspoon salt
- 3/4 cup unsalted butter, softened
- 4 large eggs, room temperature
- 1 cup whole milk, room temperature
- 1/4 cup honey
- 2 teaspoons vanilla extract
- 1/2 teaspoon almond extract
For the Cream Cheese Frosting:
- 16 ounces cream cheese, softened
- 1 cup unsalted butter, softened
- 5 cups powdered sugar, sifted
- 2 teaspoons vanilla extract
- 1/4 teaspoon salt
- 2-3 tablespoons heavy cream
For Decoration:
- 1 cup crushed pistachios
- 1/4 cup whole pistachios
- 3 tablespoons honey for drizzling
Instructions 📝
- Preheat your oven to 350°F (175°C). Grease and flour three 8-inch round cake pans, then line the bottoms with parchment paper circles for easy removal.
- In a food processor, pulse the pistachios until finely ground but not turned into butter. Set aside. In a large mixing bowl, whisk together the flour, ground pistachios, sugar, baking powder, and salt.
- In another large bowl, beat the softened butter until creamy and smooth, about 2 minutes. Add the eggs one at a time, beating well after each addition until fully incorporated and the mixture is light and fluffy.
- In a measuring cup, combine the milk, honey, vanilla extract, and almond extract, stirring until the honey is dissolved into the liquid mixture.
- Add the dry ingredients to the butter mixture in three additions, alternating with the milk mixture in two additions. Begin and end with the dry ingredients. Mix on low speed just until combined after each addition, being careful not to overmix, which can result in a tough cake.
- Divide the batter evenly among the three prepared pans, using a kitchen scale for accuracy if desired. Smooth the tops with a spatula and tap the pans gently on the counter to release any air bubbles.
- Bake for 25-30 minutes, or until a toothpick inserted into the center comes out clean and the cakes spring back when lightly touched. The edges should be lightly golden and just starting to pull away from the pan sides.
- Remove from the oven and let the cakes cool in the pans for 10 minutes, then turn them out onto wire racks to cool completely before frosting. This is crucial – frosting warm cakes will cause the frosting to melt and slide.
- While the cakes cool, prepare the cream cheese frosting. In a large bowl, beat the softened cream cheese and butter together until smooth, creamy, and no lumps remain, about 3-4 minutes on medium speed.
- Gradually add the sifted powdered sugar, one cup at a time, beating on low speed after each addition. Once all the sugar is incorporated, add the vanilla extract and salt, then increase the speed to medium-high and beat for 2-3 minutes until light and fluffy.
- Add the heavy cream one tablespoon at a time until you reach your desired consistency. The frosting should be spreadable but firm enough to hold its shape between the layers.
- Place the first cake layer on your serving plate or cake stand. Spread about 1 cup of frosting evenly over the top, leaving a small border around the edge as the weight of the next layer will push the frosting to the edges.
- Add the second cake layer and repeat with another cup of frosting. Top with the final cake layer, bottom-side up for a flat, professional-looking top surface.
- Apply a thin crumb coat of frosting over the entire cake – top and sides. This initial layer will trap any crumbs. Refrigerate the cake for 20-30 minutes to set the crumb coat.
- Apply the final layer of frosting, smoothing it with an offset spatula or bench scraper. You can create a smooth finish or textured swirls depending on your preference.
- Gently press the crushed pistachios onto the sides of the cake, allowing them to adhere to the frosting. Sprinkle some on top and garnish with whole pistachios for an elegant presentation.
- Just before serving, drizzle the honey over the top of the cake in a decorative pattern, allowing some to drip down the sides for a stunning finish.
Pro Tips for Pistachio Cake Perfection 🌟
Always use room temperature ingredients, especially eggs, butter, and milk. This ensures proper emulsification and results in a cake with a tender, even crumb. Cold ingredients can cause the batter to curdle or result in an uneven texture.
Measure your flour correctly by spooning it into the measuring cup and leveling it off with a knife. Scooping directly from the bag can pack too much flour into the cup, resulting in a dry, dense cake.
Don’t skip the parchment paper rounds in the bottom of the pans. This simple step ensures your cakes release cleanly every single time without any sticking or tearing.
For the most even layers, weigh your batter if you have a kitchen scale. Each pan should contain approximately the same amount of batter for layers that bake evenly and stack perfectly.
If your cake layers have domed tops, use a serrated knife or cake leveler to trim them flat before assembling. This creates a more stable, professional-looking cake and ensures even frosting distribution.
Storage and Make-Ahead Tips 🧊
This pistachio layer cake can be made ahead, which actually works to your advantage as the flavors have time to meld and develop. The cake layers can be baked up to 2 days in advance. Once completely cooled, wrap each layer tightly in plastic wrap, then in aluminum foil, and store at room temperature.
The cream cheese frosting can be made up to 3 days ahead and stored in an airtight container in the refrigerator. Before using, let it come to room temperature and beat it briefly to restore its fluffy texture.
The fully assembled and frosted cake should be stored in the refrigerator due to the cream cheese frosting. Cover it loosely with plastic wrap or place it in a cake keeper to prevent it from absorbing refrigerator odors. Bring the cake to room temperature about 1 hour before serving for the best flavor and texture.
Leftover cake will keep in the refrigerator for up to 5 days. Individual slices can also be frozen for up to 3 months. Wrap each slice tightly in plastic wrap, then place in a freezer bag. Thaw overnight in the refrigerator before enjoying.
Variations to Try 🎨
For a chocolate-pistachio version, add 1/4 cup of cocoa powder to the dry ingredients and reduce the flour by 1/4 cup. The combination of chocolate and pistachio is absolutely divine and adds another dimension of flavor.
Try adding orange zest to the cake batter for a pistachio-orange combination that’s popular in Mediterranean desserts. The citrus brightens the nutty flavor and adds a sophisticated touch.
For a lighter frosting option, use a Swiss meringue buttercream instead of cream cheese frosting. This provides a less tangy, more delicate sweetness that some prefer with pistachio cake.
Add a layer of raspberry or apricot preserves between the cake layers for a fruity element that complements the pistachios beautifully. The tartness of the fruit balances the richness of the cake and frosting.
For a boozy adult version, brush each cake layer with a simple syrup infused with rose water or orange blossom water before frosting. This adds moisture and a subtle floral note that enhances the Middle Eastern character of the dessert.
Conclusion: Your New Signature Cake 🎂
This Pistachio Layer Cake with Cream Cheese Frosting is more than just a dessert – it’s an experience that engages all the senses. From the moment you grind the pistachios and smell their rich, nutty aroma, to the final bite of moist cake, creamy frosting, and crunchy pistachio coating, every step of making and enjoying this cake is pure pleasure. The combination of authentic pistachio flavor, tangy cream cheese frosting, and honey drizzle creates a sophisticated dessert that’s impressive enough for the most special occasions yet straightforward enough for confident home bakers to master. Once you’ve made this stunning cake and seen the reactions of those who taste it, it’s sure to become your signature dessert – the one everyone requests for celebrations and the recipe friends and family will beg you to share. So gather your ingredients, preheat that oven, and get ready to create a masterpiece that tastes every bit as incredible as it looks.
Pistachio Layer Cake with Cream Cheese Frosting
Ingredients
Equipment
Method
- Preheat oven to 350°F (175°C). Grease and flour three 8-inch round cake pans and line with parchment paper.
- Pulse pistachios in food processor until finely ground. Whisk together flour, ground pistachios, sugar, baking powder, and salt.
- Beat softened butter until creamy. Add eggs one at a time, beating well after each addition until light and fluffy.
- Combine milk, honey, vanilla extract, and almond extract in a measuring cup, stirring until honey dissolves.
- Add dry ingredients to butter mixture in three additions, alternating with milk mixture in two additions. Mix just until combined.
- Divide batter evenly among prepared pans. Smooth tops and tap pans to release air bubbles.
- Bake 25-30 minutes until toothpick comes out clean. Cool in pans 10 minutes, then turn onto wire racks to cool completely.
- Beat cream cheese and butter until smooth. Gradually add powdered sugar, then vanilla and salt. Beat until fluffy.
- Add heavy cream one tablespoon at a time until desired consistency is reached.
- Place first cake layer on serving plate. Spread 1 cup frosting evenly over top. Repeat with second layer.
- Add final layer bottom-side up. Apply thin crumb coat over entire cake. Refrigerate 20-30 minutes.
- Apply final frosting layer, smoothing with offset spatula. Press crushed pistachios onto sides of cake.
- Garnish top with whole pistachios. Drizzle honey over top just before serving.


