Candy Cane Twist Cookies: The Ultimate Festive Holiday Treat
There are certain sights and smells that instantly signal the arrival of the holiday season. The scent of pine needles, the twinkle of string lights, and, of course, the aroma of peppermint and butter wafting from the oven. Among the pantheon of classic holiday baked goods, few are as visually iconic or as nostalgically delicious as the Candy Cane Twist Cookie.
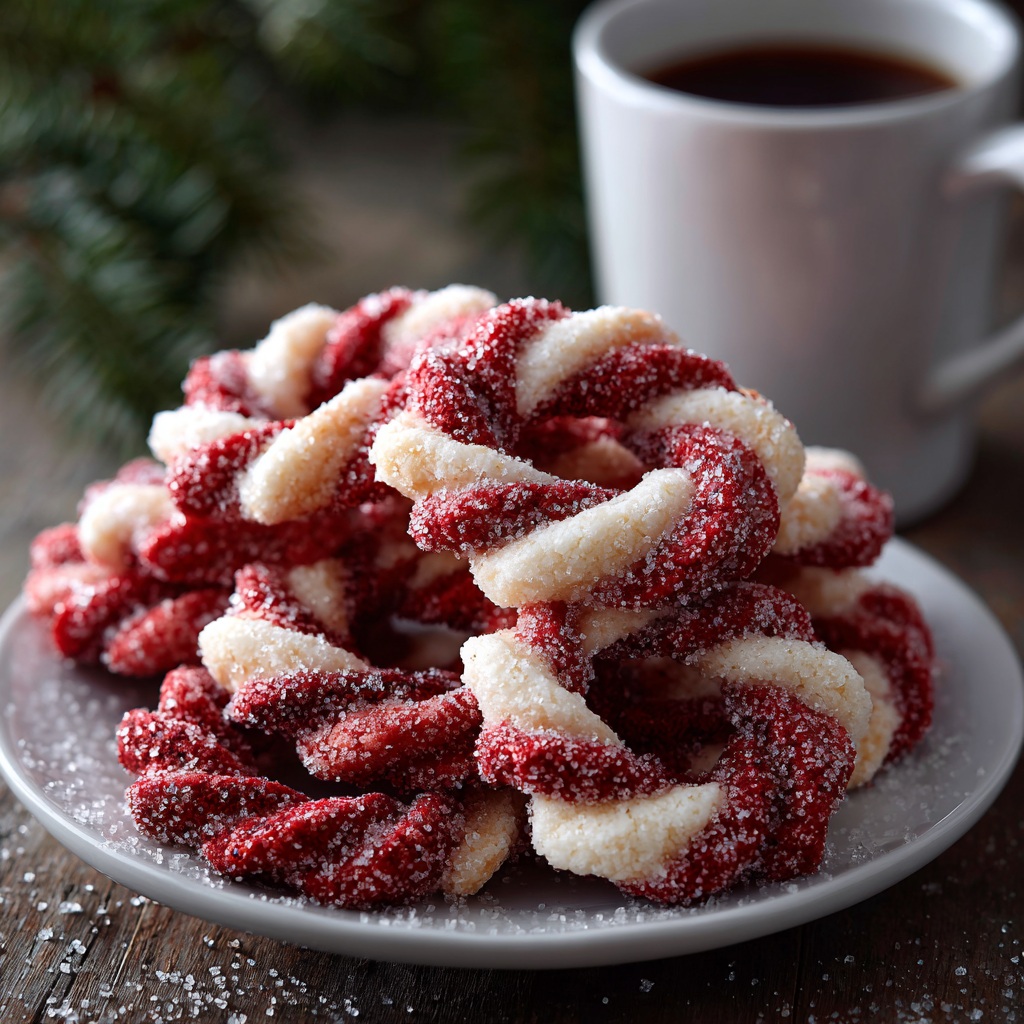
Pictured as vibrant red and white ropes twisted together and coated in a glistening layer of sugar, these cookies are a masterpiece of holiday baking. They look complicated, resembling the intricate knots of a winter wreath or the classic barber-pole stripe of a candy cane, but they are surprisingly achievable for home bakers. They are the perfect balance of soft, tender sugar cookie dough and the refreshing, cool bite of peppermint.
The Nostalgia of the Red and White
Why do we love these cookies so much? It is partly the visual appeal. The striking contrast between the deep crimson red and the creamy white dough creates a pop of color that brightens up any cookie platter. They look like edible ornaments. But beyond the looks, it is the texture. Unlike a hard, crunchy candy cane, these cookies offer a tender melt-in-your-mouth experience. The exterior has a slight crunch from the sugar coating—often referred to as “sparkling sugar”—while the inside remains soft and buttery.
Creating these cookies is also a wonderful family activity. The process of rolling the dough into ropes and twisting them together is akin to playing with clay, making it a fantastic way to get children involved in the kitchen. It turns baking into a craft project where the results are delicious.
The Secret to the Perfect Twist
Many bakers feel intimidated by multi-colored doughs, fearing that the colors will bleed or the ropes will break. The secret lies in the temperature of the dough and the type of food coloring used.
- Temperature Control: The dough needs to be cool enough to handle but warm enough to roll without cracking. It is a delicate balance. If the dough is too warm, the ropes will stretch and break; if it is too cold, they will crumble.
- The Dye: To achieve that vivid red shown in the image without altering the consistency of the dough, gel food coloring is essential. Liquid drops add too much moisture, requiring you to add more flour, which can make the red part of the cookie tough. Gel coloring provides intense pigment with minimal moisture.
Ingredients
To recreate these festive twists, you will need the following pantry staples. Ensure your butter is at room temperature for the best emulsion.
- 1 cup — Unsalted butter (softened to room temperature)
- 1 cup — Powdered sugar (confectioners’ sugar ensures a tender crumb)
- 1 — Large egg (room temperature)
- 1 teaspoon — Vanilla extract (for the base flavor)
- 1 1/2 teaspoons — Peppermint extract (adjust based on potency)
- 2 1/2 cups — All-purpose flour (spooned and leveled)
- 1 teaspoon — Salt (to balance the sweetness)
- 1/2 teaspoon — Red gel food coloring (do not use liquid)
- 1/2 cup — Granulated sugar (for rolling the cookies before baking)
- 1/2 cup — Crushed candy canes (optional, for extra crunch)
Instructions
Follow these steps carefully to ensure your twists come out perfectly shaped and colored.
- Cream the Butter and Sugar: In a large mixing bowl (or stand mixer fitted with the paddle attachment), beat the softened butter and powdered sugar together on medium speed for about 2–3 minutes until the mixture is smooth and creamy. Do not overbeat to the point of being airy; we want a dense cookie.
- Add Wet Ingredients: Add the egg, vanilla extract, and peppermint extract. Beat until fully combined and the egg is emulsified into the butter mixture. Scrape down the sides of the bowl.
- Incorporate Dry Ingredients: In a separate small bowl, whisk together the flour and salt. Gradually add this to the wet ingredients with the mixer on low speed. Mix just until the flour disappears and a dough forms.
- Divide and Color: Remove the dough from the bowl and weigh it to divide it into two equal halves. Return one half to the mixer. Add the red gel food coloring to this half and mix on low until the color is evenly distributed and vibrant deep red. You now have one ball of white dough and one ball of red dough.
- Chill: Wrap each ball of dough separately in plastic wrap. Refrigerate for at least 1 hour (or up to 2 days). The dough must be firm to roll properly.
- Preheat and Prep: Preheat your oven to 375°F (190°C). Line two large baking sheets with parchment paper or silicone baking mats. Place the 1/2 cup of granulated sugar in a shallow bowl.
- Form the Ropes: Take a small piece of white dough (about a teaspoon) and roll it into a 5-inch long rope on a lightly floured surface. Do the same with a piece of red dough.
- The Twist: Place the red rope and white rope side by side. Pinch them together at the top, then gently twist them around each other. You can leave them as a straight “barber pole” stick, or curve them into a circle/wreath shape as seen in the image, pressing the ends together to seal.
- Coat in Sugar: Gently lift the twisted cookie and place it into the bowl of granulated sugar (or a mix of sugar and crushed candy canes). Press lightly so the sugar adheres to the bottom and sides, or sprinkle it over the top for a snowy look.
- Bake: Place cookies on the prepared baking sheets, spaced 2 inches apart. Bake for 8–10 minutes. Important: Do not let them brown. You want them to be set but the white dough should remain white, not golden.
- Cool: Let the cookies cool on the baking sheet for 5 minutes (they are fragile when hot), then transfer to a wire rack to cool completely.
Mastering the Texture
The goal with these Peppermint Twists is a texture that is akin to shortbread but slightly softer. If your cookies are spreading too much in the oven and losing their twisted definition, your butter may have been too warm, or the dough wasn’t chilled enough. A pro tip is to shape the cookies on the tray and then pop the whole tray in the freezer for 10 minutes before putting it in the hot oven. This “shocks” the butter and ensures the intricate twist shape stays sharp.
Flavor Variations
While peppermint is the traditional choice for this aesthetic, not everyone loves mint. You can easily adapt this recipe:
- Almond Twists: Swap the peppermint extract for almond extract. The nutty flavor pairs beautifully with the vanilla.
- Citrus twist: Use lemon extract and lemon zest in the white dough, and orange extract with orange zest in the red dough for a citrus punch.
- Chocolate Mint: Replace 1/4 cup of flour in the “red” half with cocoa powder (and skip the red dye) for a Brown and White chocolate-mint variation.
Storing and Freezing
These cookies are excellent for gifting because they are sturdy enough to be stacked in tins without crumbling.
- Room Temperature: Store in an airtight container for up to 1 week.
- Freezing Dough: You can freeze the dough balls for up to a month. Thaw in the fridge overnight before rolling.
- Freezing Baked Cookies: Baked cookies can be frozen for up to 3 months. Layer them with parchment paper to prevent them from sticking together.
Conclusion
The Candy Cane Twist Cookie is more than just a sweet treat; it is an edible symbol of holiday cheer. The bright colors, the sparkle of the sugar, and the comforting aroma of peppermint make it a staple for any winter gathering. Whether you leave them out for Santa with a glass of milk or serve them alongside a hot espresso at a holiday brunch, these cookies are sure to bring a smile to anyone’s face. They capture the essence of the season in every buttery, minty bite. So, dust off your rolling pin, grab your red food coloring, and start a delicious tradition this year.
Candy Cane Twist Cookies
Ingredients
Equipment
Method
- Cream butter and powdered sugar until smooth. Add egg, vanilla, and peppermint extract; mix well.
- Whisk flour and salt together, then gradually add to the wet ingredients until a dough forms.
- Divide dough in half. Mix red gel food coloring into one half until vibrant. Wrap both halves in plastic and chill for 1 hour.
- Preheat oven to 375°F (190°C) and line baking sheets with parchment.
- Roll small pieces of red and white dough into 5-inch ropes. Twist them together and shape into circles or knots.
- Press the shaped cookies gently into granulated sugar to coat.
- Bake for 8-10 minutes. Do not let them brown. Cool on wire racks.