1. Introduction: A Match Made in Dessert Heaven
There is a distinct kind of magic that happens in the kitchen when you take two seemingly opposite flavor profiles and combine them into one extraordinary dessert. Enter the Chewy Gingerbread Bar with Lemon Glaze. If you have never experienced the deep, warm, earthy spices of traditional gingerbread paired with the bright, zesty, and electric tang of a fresh lemon glaze, your taste buds are in for an absolute revelation. This dessert is not just a treat; it is an experience that awakens the senses and brings a touch of cozy nostalgia to any occasion.
For generations, gingerbread has been relegated to the winter holidays, often baked into crisp, snappy cookies meant for constructing houses or decorating with royal icing. But what if we took those same beloved flavors—ginger, cinnamon, cloves, and rich molasses—and transformed them into a dense, fudgy, brownie-like bar? The result is a texturally magnificent bake that is wonderfully soft and chewy. However, a dense spiced bar can sometimes feel a bit too heavy on the palate. That is where the crowning glory of this recipe comes in: a thick, vibrant, sunshine-yellow lemon glaze that cuts through the richness and balances every single bite.
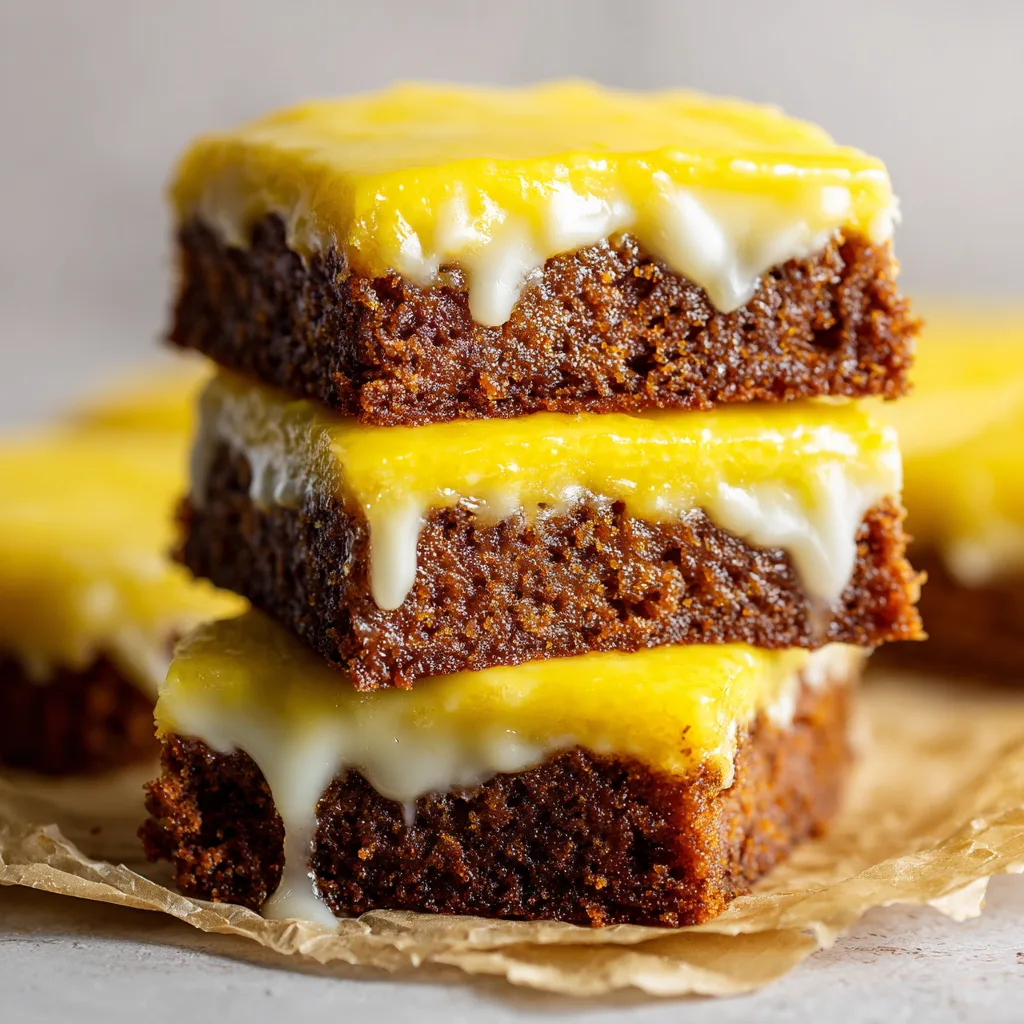
This recipe is incredibly straightforward, requiring no fussy chilling times or rolling pins. It is a one-pan wonder that yields a stunning, bakery-worthy result. The visual contrast alone—the dark, mahogany-brown cake beneath a blanket of glossy, dripping yellow icing—is enough to make anyone’s mouth water. Whether you are baking for a holiday cookie exchange, a cozy autumn afternoon tea, or simply treating yourself to a weekend baking project, these Gingerbread Lemon Bars will quickly become a highly requested favorite among your family and friends. Let’s dive into the delicious details!
2. Why Gingerbread and Lemon are the Perfect Pair
At first glance, pairing dark, robust molasses with vibrant, sunny lemon might seem like an unconventional choice. We are so accustomed to seeing lemon paired with vanilla, berries, or delicate shortbreads. However, in the culinary world, contrasting flavors often create the most harmonious and memorable dishes. The pairing of gingerbread and lemon is a classic example of this balancing act.
Molasses, the foundational ingredient of any good gingerbread, has a complex, slightly bitter, and deeply caramelized flavor profile. It brings a dense sweetness and a distinct earthiness to baked goods. When you add the warming spices of ginger, cinnamon, and cloves, the flavor becomes incredibly rich and enveloping. It is a flavor profile that wraps around you like a warm blanket.
On the other end of the spectrum is lemon. Lemon juice is sharp, acidic, and highly astringent. Lemon zest contains essential oils that are wildly fragrant and bright. When you pour a sweet-tart lemon glaze over a spicy, earthy gingerbread bar, the acid in the lemon immediately cuts through the heavy richness of the molasses. It lifts the entire flavor profile, preventing the dessert from becoming cloying or overwhelming. The spices enhance the citrus, and the citrus brightens the spices. Every bite is a rollercoaster of cozy warmth followed by a refreshing, zesty finish. It is, quite simply, culinary perfection.
3. The Secret to Perfectly Chewy Molasses Bars
The texture of these bars is just as important as the flavor. We are not aiming for a light, airy cake, nor are we looking for a crisp cookie. The goal is a dense, chewy, almost fudgy texture—similar to a brownie or a blondie. Achieving this specific texture requires a careful balance of ingredients and a precise baking method.
The first secret to chewiness is the ratio of brown sugar to white sugar. Brown sugar contains molasses, which adds moisture and encourages a soft, chewy texture. In this recipe, we lean heavily on brown sugar to ensure the bars remain moist for days. The addition of liquid molasses further guarantees that dense, sticky crumb that makes gingerbread so irresistible.
Another crucial factor is the fat used in the recipe. Using melted butter rather than creamed, softened butter prevents the incorporation of too much air into the batter. When you cream butter and sugar together, you create microscopic air pockets that result in a lighter, cake-like texture. By using melted butter and simply whisking it with the sugars and wet ingredients, we maintain a dense, fudgy structure.
Finally, the most critical rule of baking these bars is to avoid overbaking. Because the batter is quite dark due to the molasses and spices, it can be difficult to tell when they are done just by looking at the color. You must rely on the touch test and a toothpick. The edges should be set and slightly pulled away from the sides of the pan, but the center should still feel slightly soft and underbaked. They will continue to cook and firm up in the hot pan as they cool on the counter. Pulling them from the oven just a minute or two early is the ultimate secret to retaining that glorious, chewy center.
4. Ingredients – Everything You Need
Gather these essential ingredients to create your beautiful spiced bars. Ensure your spices are fresh for the most vibrant flavor!
- – 1/2 cup (1 stick) unsalted butter, melted and slightly cooled
- – 1/2 cup packed dark brown sugar
- – 1/4 cup granulated sugar
- – 1/3 cup unsulphured molasses (do not use blackstrap)
- – 1 large egg, room temperature
- – 1 teaspoon pure vanilla extract
- – 1 1/2 cups all-purpose flour
- – 1 teaspoon baking soda
- – 1/4 teaspoon salt
- – 1 1/2 teaspoons ground ginger
- – 1 teaspoon ground cinnamon
- – 1/4 teaspoon ground nutmeg
- – 1/8 teaspoon ground cloves
- – 2 cups powdered sugar, sifted
- – 3 to 4 tablespoons fresh lemon juice
- – 1 tablespoon lemon zest (tightly packed)
- – A pinch of salt for the glaze
- – Optional: 1/4 teaspoon turmeric powder (strictly for enhancing the yellow color of the glaze)
5. Instructions – Step-by-Step Baking Guide
Follow these numbered instructions carefully to ensure your bars turn out fudgy, perfectly spiced, and beautifully glazed.
- Preheat and Prep: Preheat your oven to 350°F (175°C). Line an 8×8-inch square baking pan with parchment paper, leaving an overhang on two sides to act as a sling for easy removal later. Spray lightly with non-stick cooking spray.
- Whisk Dry Ingredients: In a medium mixing bowl, whisk together the all-purpose flour, baking soda, salt, ground ginger, ground cinnamon, ground nutmeg, and ground cloves until evenly distributed. Set aside.
- Combine Wet Ingredients: In a large mixing bowl, whisk together the melted (and slightly cooled) unsalted butter, dark brown sugar, and granulated sugar until smooth. Add the molasses, room temperature egg, and vanilla extract. Whisk vigorously until the mixture is completely glossy and well combined.
- Fold the Batter: Pour the dry ingredient mixture into the wet ingredients. Using a rubber spatula, gently fold the mixture together just until no streaks of dry flour remain. The batter will be quite thick and sticky—this is exactly what you want! Do not overmix.
- Spread and Bake: Transfer the thick batter into your prepared baking pan. Use your spatula or lightly greased hands to press and spread the batter into an even layer, reaching all the way to the corners. Bake on the center rack for 20 to 25 minutes.
- Check for Doneness: The bars are done when the edges look set and the center is just barely firm to the touch. A toothpick inserted into the center should come out with a few moist crumbs attached, but no wet batter.
- Cool Completely: Remove the pan from the oven and place it on a wire cooling rack. It is imperative that you let the bars cool completely in the pan before attempting to glaze or slice them. If you glaze them while warm, the icing will melt right off.
- Prepare the Lemon Glaze: While the bars are cooling, prepare your icing. In a medium bowl, whisk together the sifted powdered sugar, fresh lemon juice, lemon zest, and a tiny pinch of salt. If using turmeric for a brighter yellow hue, add it now. Whisk until perfectly smooth and glossy. The consistency should be very thick but still pourable.
- Glaze the Bars: Once the gingerbread is entirely cool, use the parchment paper overhang to lift the slab out of the pan. Pour the thick lemon glaze over the center of the slab and use a spatula or the back of a spoon to gently push it toward the edges, allowing it to drip down the sides dramatically.
- Set and Slice: Let the glaze set at room temperature for about 30 minutes until it forms a slight crust. Once set, use a large, sharp knife to cut into 16 even squares. Wipe your blade clean between cuts for the neatest presentation.
Chewy Gingerbread Bars with Lemon Glaze
Ingredients
Equipment
Method
- Preheat oven to 350°F (175°C). Line an 8×8-inch baking pan with parchment paper, leaving an overhang for easy removal.
- In a medium bowl, whisk together the flour, baking soda, salt, ginger, cinnamon, nutmeg, and cloves.
- In a large bowl, whisk the melted butter, brown sugar, and granulated sugar until smooth. Add the molasses, egg, and vanilla, whisking until glossy.
- Gently fold the dry ingredients into the wet ingredients using a rubber spatula until just combined. Do not overmix.
- Press the thick batter evenly into the prepared pan. Bake for 20-25 minutes until edges are set and center is just barely firm.
- Allow the bars to cool completely in the pan on a wire rack.
- Once cool, whisk together the sifted powdered sugar, lemon zest, salt, and enough lemon juice to create a thick but pourable glaze.
- Lift the cooled bars from the pan using the parchment. Pour the glaze over the top, letting it drip down the sides. Let set for 30 minutes before slicing into 16 squares.
Notes
6. Mastering the Glossy Lemon Glaze
The icing on these bars is what transforms them from a simple everyday bake into a show-stopping dessert. A good glaze should be thick enough to sit proudly on top of the cake without completely soaking in, but fluid enough to create those beautiful, mouth-watering drips down the sides.
The secret to the perfect consistency is adding your liquid gradually. Powdered sugar is notoriously deceptive; it looks like it needs a lot of liquid, but it melts down incredibly fast. Start by adding just two tablespoons of fresh lemon juice to your two cups of sifted powdered sugar. Stir it well. It will likely seem too dry and crumbly. Add the third tablespoon of lemon juice and keep stirring. Only add the fourth tablespoon if the mixture remains too stiff to spread. You are looking for a consistency similar to thick honey or Elmer’s glue.
Another crucial tip is to strictly use fresh lemon juice. Bottled lemon juice lacks the vibrant, aromatic zing of fresh citrus and often contains preservatives that alter the flavor. Zesting the lemon before you juice it provides a massive flavor boost. The natural oils in the lemon skin are where the true, intense citrus flavor lives. If you want that picture-perfect, bright yellow look seen in bakery windows, a tiny pinch of natural turmeric powder works wonders as a food dye without adding any noticeable savory flavor.
7. Variations and Delicious Twists
While the classic combination of gingerbread and lemon is unbeatable, this versatile recipe serves as a fantastic base for culinary experimentation. Baking is all about making a recipe your own, so feel free to get creative!
If you are a hardcore chocolate lover, try folding a half-cup of dark chocolate chips or white chocolate chunks into the batter before baking. The deep cocoa notes pair wonderfully with the spiced molasses, while white chocolate adds a creamy, sweet contrast. Alternatively, you could swap the lemon glaze for a rich cream cheese frosting if you prefer a less tangy, more traditional red-velvet style pairing.
For an added textural element, consider sprinkling toasted, chopped pecans or walnuts over the wet lemon glaze before it sets. The nutty crunch contrasts beautifully with the fudgy bar and the smooth icing. You could also experiment with the citrus element—try using fresh orange zest and orange juice instead of lemon for a warmer, sweeter citrus profile that marries perfectly with the cloves and cinnamon.
8. Make-Ahead and Storage Tips
These chewy gingerbread bars are incredibly resilient and actually taste better on the second day! The spices have time to meld and deepen, and the moisture from the molasses ensures the bars stay incredibly soft. This makes them the ultimate make-ahead dessert for busy holidays or gatherings.
To store the bars, place them in an airtight container at room temperature. If you need to stack them, place a sheet of wax paper or parchment paper between the layers to prevent the lemon glaze from sticking to the bottoms of the bars above them. They will keep beautifully on the counter for up to 5 days.
Can you freeze these bars? Absolutely. In fact, they freeze exceptionally well. For the best results, it is recommended to freeze the baked, unglazed gingerbread slab. Wrap the fully cooled, unglazed slab tightly in a layer of plastic wrap, followed by a layer of aluminum foil. Freeze for up to three months. When you are ready to serve, let the slab thaw at room temperature for a few hours, then whip up a fresh batch of the lemon glaze, pour it over the top, and slice. If you have already glazed and cut the bars, you can still freeze them; just be aware that the glaze might lose a little bit of its glossy sheen when thawed, though it will still taste spectacular.
9. The Science and History of Molasses in Baking
To truly appreciate this dessert, it is helpful to understand the star ingredient: molasses. Molasses is a viscous byproduct of refining sugarcane or sugar beets into sugar. It is the dark, sweet, sticky syrup that remains after sugar crystals have been extracted. Historically, molasses was much cheaper than refined white sugar, making it the primary sweetener in early American and European baking, which is why traditional recipes like gingerbread, baked beans, and brown bread rely heavily on it.
In baking, molasses does much more than just provide flavor. It is a highly hygroscopic ingredient, meaning it attracts and retains moisture from the air. This chemical property is what guarantees that your gingerbread bars will remain chewy, soft, and moist for days after baking. Unlike desserts made entirely with white sugar, which can dry out quickly, molasses-based treats have a remarkably long shelf life.
It is important to note the different types of molasses available. Light molasses is sweet and mild; dark (or robust) molasses is thicker, less sweet, and has a stronger flavor; blackstrap molasses is the darkest, thickest, and is actually quite bitter as most of the sugar has been extracted. For this recipe, and for most baking, unsulphured dark or light molasses is the ideal choice. Blackstrap should be avoided as it will render your dessert far too bitter and metallic.
10. Conclusion: Your New Go-To Spiced Treat
The Chewy Gingerbread Bar with Lemon Glaze is a testament to the beauty of contrasting flavors and meticulous baking chemistry. It takes the comforting, rustic elements of a traditional winter spice cake and elevates them with a fudgy, modern texture and a vibrant, elegant citrus finish.
Whether you are captivated by the stunning visual of the bright yellow icing dripping over the dark, rich crumb, or you are drawn in by the intoxicating aroma of cinnamon, ginger, and fresh lemon filling your kitchen, this recipe is guaranteed to be a triumphant success. The ease of preparation combined with the spectacular, bakery-quality results makes it a truly indispensable recipe.
So preheat your oven, grab your whisk, and prepare to be amazed by the incredible harmony of gingerbread and lemon. This is one dessert that will have everyone asking for the recipe and reaching for just one more square. Happy baking!