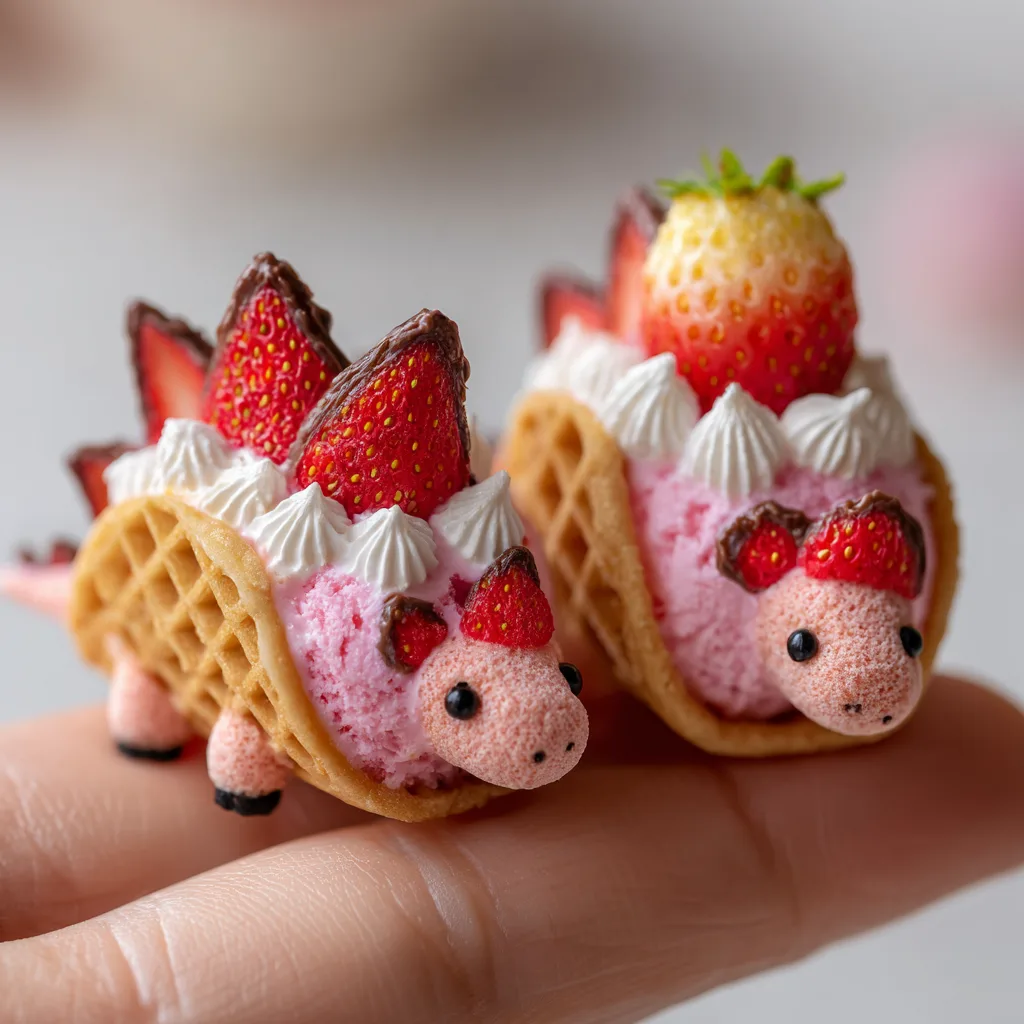
Welcome to the most adorable corner of the culinary world! If you are looking for a show-stopping, heart-melting, and utterly delicious treat, you have found it. These Kawaii Strawberry Dinosaur Dessert Tacos are taking the internet by storm, blending the crunch of a waffle cone, the sweet creaminess of strawberry filling, and the juicy tartness of fresh fruit into one prehistoric masterpiece. Whether you are hosting a child’s dinosaur-themed birthday party, preparing for a whimsical baby shower, or simply wanting to bring a massive smile to someone’s face, these tiny, edible creatures are the perfect solution.
In this comprehensive guide, we will walk you through every single step of creating these magical little bites. From sourcing the right mini waffle shells to the delicate art of piping tiny chocolate eyes, you will become a master of kawaii food art. Grab your apron, preheat your imagination, and let’s dive into the sweet, strawberry-scented world of dessert dinosaurs!
🌸 Welcome to the World of Adorable Edibles
The concept of “Kawaii” (the Japanese word for cute) has transcended fashion and pop culture to heavily influence modern culinary arts. Kawaii food is all about taking standard, delicious ingredients and presenting them in a way that evokes joy, warmth, and whimsy. It is food that almost looks too cute to eat—almost! The trend has given rise to everything from panda-shaped rice balls to cat-shaped macarons.
Our Strawberry Dinosaur Tacos fit perfectly into this aesthetic. By utilizing the natural shape of a folded waffle cone (the taco shell), we instantly have a “body.” The ridges of the waffle mimic a dinosaur’s textured skin. By adding a scoop of vibrant pink strawberry ice cream or thick mousse, we create the plump belly of our creature. But the true magic lies in the details: the carefully sliced strawberries acting as Stegosaurus plates, the little chocolate details, and the tiny, expressive faces. Creating food like this isn’t just baking; it is an engaging craft that allows you to express your creativity while making something universally loved: dessert.
🍓 Why These Strawberry Dino Tacos Will Steal Your Heart
There are countless dessert recipes out there, but very few offer the interactive charm of these miniature dinosaurs. Here is why this recipe deserves a permanent spot in your culinary repertoire:
First, the texture profile is phenomenal. You have the satisfying, buttery snap of a waffle cone, immediately followed by the rich, cooling sensation of strawberry ice cream, finishing with the bright, acidic burst of fresh, ripe strawberries. The tiny hints of dark chocolate not only add visual definition but also provide a slight bitterness that perfectly balances the sweetness of the dish.
Second, they are highly customizable. While we are focusing on a strawberry and pink aesthetic, the blueprint of this recipe allows for endless imagination. You can swap out the pink ice cream for mint chocolate chip to make green T-Rexes, or use blueberry mousse for a blue Triceratops.
Finally, they are portion-controlled. Because they are built in miniature waffle shells, they offer just the right amount of indulgence without being overly heavy. They are the perfect finger-food dessert, allowing guests to mingle and enjoy their treat without needing plates or silverware.
🛒 Ingredients – Everything You Need for Your Prehistoric Treat
To bring these little dinosaurs to life, you will need a mix of store-bought conveniences and fresh ingredients. Here is your shopping list:
- – 12 mini waffle taco shells (or mini waffle bowls folded gently while warm)
- – 2 cups premium strawberry ice cream (or thick strawberry mousse), slightly softened
- – 1 pint fresh, bright red strawberries (washed and dried thoroughly)
- – 1/4 cup dark chocolate chips or candy melts
- – 12 small pink cake pop balls, pink mochi bites, or large pink marshmallows (for the heads)
- – 1/4 cup white chocolate chips (optional, for securing the heads)
- – 1 tablespoon coconut oil (for thinning the chocolate, if needed)
- – Pink food coloring (optional, to enhance the head color if making cake pops from scratch)
👩🍳 Instructions – Bringing Your Cute Dinosaurs to Life
Follow these steps carefully to ensure your dinosaurs are sturdy, adorable, and delicious. Speed is key when working with ice cream, so have all your decorations prepped before you begin assembly!
- Prep the Dinosaur Plates (Spikes): Take your fresh strawberries and slice them thinly to create half-moon shapes. Melt the dark chocolate in the microwave in 15-second intervals. Dip the flat edge of each strawberry slice slightly into the chocolate, or pipe a thin line of chocolate along the edge to define the spikes. Place these on a wax paper-lined tray and chill until the chocolate sets.
- Create the Faces: Take your pink cake pop balls or mochi bites. Using a toothpick dipped in the remaining melted dark chocolate, carefully dot two eyes and two tiny nostrils onto each ball to create the dinosaur face. Let them dry completely.
- Fill the Taco Shells: Working quickly, take a mini waffle shell and fill it generously with the slightly softened strawberry ice cream. You want the ice cream to mound slightly at the top to give the dinosaur a rounded back. Use a small spatula or the back of a spoon to smooth it out.
- Attach the Head and Tail: Gently press the decorated face ball into the front opening of the ice cream-filled taco. For the tail, cut a small, pointy tip from a fresh strawberry and press it into the back end of the ice cream. If the ice cream is melting, place the tacos in the freezer for 5 minutes to firm up.
- Plant the Spikes: Take your chilled chocolate-edged strawberry slices and gently press them in a row along the top ridge of the exposed ice cream, making them look like the plates on a Stegosaurus’s back.
- Final Freeze: Once fully assembled, immediately transfer the dinosaur tacos to a baking sheet lined with parchment paper and place them in the freezer for at least 30 minutes to ensure everything is locked into place before serving.
🍫 The Art of Chocolate Detailing – Pro Tips
The difference between a messy dessert and a perfectly kawaii one often comes down to the chocolate detailing. When creating the eyes and nostrils, you do not want large, globby drops of chocolate. The cuteness factor relies on delicate, tiny features spaced appropriately apart.
To achieve this, ditch the piping bag. Instead, use a wooden toothpick or a sterile sewing needle for the finest details. Dip the very tip of the toothpick into melted chocolate (ensure the chocolate is fluid and smooth, not thick and clumpy. Add a tiny drop of coconut oil if it needs thinning). Touch the toothpick lightly to the cake pop head. For the eyes, you can do simple dots, or if you are feeling adventurous, create tiny little “U” shapes for happy, closed eyes.
When edging the strawberry slices for the back plates, wiping the excess chocolate off is vital. You only want a thin, defining outline, not a thick chocolate shell that will overpower the delicate fruit flavor. Using a fine-tipped food-safe brush can give you the ultimate control over painting the edges of your fruit.
🌮 Mastering the Mini Waffle Taco Shell
Finding miniature waffle taco shells can sometimes be a challenge, depending on your local grocery stores. If you cannot find pre-made dessert taco shells, do not panic! You have a few fantastic alternatives.
One method is to buy standard-sized waffle bowls or waffle cones. If using bowls, you can place a damp paper towel over them and microwave them for about 10-15 seconds until they are pliable. Gently fold them in half over the handle of a thick wooden spoon to create a taco shape, and hold them there until they cool and harden again (about 30 seconds).
Another option is to make your own batter using a pizzelle maker or a mini waffle cone iron. This allows you to flavor the shells with vanilla bean or a dash of cinnamon, and you can mold them to the exact perfect size for your tiny dinosaurs. Just remember that homemade shells are incredibly delicate, so handle them with care when stuffing them with ice cream!
🦖 Creative Flavor Variations for Your Dessert Herd
While the strawberry version is undeniably photogenic and delicious, creating a whole herd of different colored and flavored dinosaurs will make your dessert table unforgettable.
The Choco-Saurus: Use chocolate ice cream for the filling. For the back spikes, use banana slices dipped in peanut butter. Make the head out of a chocolate truffle, and use white chocolate for the eyes.
The Tropical Pterodactyl: Fill the shells with mango sorbet. Use kiwi slices for the back plates. For the head, use a small cube of fresh pineapple, dried slightly so the chocolate eyes will stick.
The Vanilla Triceratops: Fill the shells with classic vanilla bean ice cream. Instead of a row of spikes down the back, press three small white chocolate chips into the “head” area to mimic the horns of a Triceratops. Use white cake pops for the heads.
The beauty of this recipe is that the taco shell acts as a blank canvas. By altering the ice cream flavor and the fruit garnishes, you can cater to any palate or party color scheme.
🧊 Storage and Make-Ahead Secrets
One of the best things about these Kawaii Strawberry Dinosaur Dessert Tacos is that they are an excellent make-ahead dessert. In fact, they require freezer time to set properly, making them perfect for stress-free party planning.
You can assemble these entirely up to a week in advance. However, you must store them correctly to prevent the waffle shell from getting soggy and the fresh strawberries from developing freezer burn. Once the assembled dinosaurs have completed their initial 30-minute freeze and are completely solid, transfer them carefully to a deep, airtight container.
Do not stack them on top of one another! Keep them in a single layer. If you must stack them, place a stiff piece of cardboard covered in wax paper between the layers, ensuring the cardboard rests on the edges of the container, not on the fragile strawberry spikes of the dinosaurs below.
When you are ready to serve, take them out of the freezer and let them sit at room temperature for about 3 to 5 minutes. This takes the harsh chill off the fresh fruit and allows the ice cream to soften just enough to be wonderfully creamy upon the first bite.
✨ Conclusion: A Roaring Success at Any Party
Creating these Kawaii Strawberry Dinosaur Dessert Tacos is an adventure in culinary creativity. They require a bit of patience, a steady hand for the chocolate details, and a lot of love, but the payoff is absolutely immense. The moment you bring a tray of these colorful, smiling little creatures into a room, the reactions will make every minute of preparation worth it.
They are more than just a sweet treat; they are an experience, a conversation starter, and a perfect example of how food can bring pure joy. So gather your ingredients, channel your inner food artist, and get ready to serve up the cutest, most delicious dinosaurs that have ever roamed the earth. Your family, friends, and party guests will be roaring for more!
Kawaii Strawberry Dinosaur Dessert Tacos
Ingredients
Equipment
Method
- Slice strawberries into half-moons. Melt dark chocolate and lightly dip or pipe the edges of the strawberries to create dinosaur spikes. Chill until set.
- Using a toothpick dipped in melted chocolate, dot two eyes and two nostrils onto each pink cake pop ball to create the faces. Let dry.
- Quickly fill the mini waffle shells with softened strawberry ice cream, rounding the top slightly.
- Press a decorated head onto the front of the taco and a small strawberry tip into the back for the tail.
- Press the chilled, chocolate-edged strawberry slices into the top of the ice cream to form the back plates.
- Place immediately on a parchment-lined baking sheet and freeze for at least 30 minutes before serving.