Welcome to dessert heaven! If you have ever found yourself standing in the kitchen, torn between the rich, salty-sweet allure of peanut butter and the dark, chocolatey crunch of a classic sandwich cookie, your ultimate culinary solution has arrived. This Decadent No-Bake Peanut Butter Oreo Pie is not just a dessert; it is a full-blown experience. It captures the nostalgic, universally beloved flavor profile of a peanut butter cup but elevates it into an elegant, show-stopping pie that requires absolutely zero oven time. Whether you are prepping for a summer barbecue where it’s simply too hot to bake, or you need a reliable, crowd-pleasing dessert for a holiday dinner, this recipe is guaranteed to make you the star of the show.
In this extensive, detail-oriented guide, we are going to walk through every single layer of this magnificent creation. We will dive deep into the science and art of the perfect no-bake cookie crust, the secrets to achieving a filling that is both dense with peanut butter flavor and incredibly light and airy in texture, and the best ways to garnish and serve your masterpiece. Prepare to unleash your inner pastry chef—without ever having to turn a dial on your stove. Let’s embark on this delicious, creamy, chocolatey journey together!
The Ultimate Flavor Duo: Peanut Butter and Chocolate 🤝
There is a reason why the combination of peanut butter and chocolate has dominated the candy aisles and dessert menus for over a century. It is a culinary match made in absolute heaven, relying on the scientific principle of flavor contrast to tantalize your taste buds. Chocolate, especially the dark, slightly bitter cocoa found in the cookie crust of this pie, provides a deep, rich, and intensely sweet base. Peanut butter, on the other hand, brings a robust, earthy nuttiness and a crucial element of saltiness.
When these two forces collide, they balance each other perfectly. The salt in the peanut butter cuts right through the heavy sweetness of the chocolate and the powdered sugar, preventing the dessert from becoming cloying or overwhelming. Instead of taking one bite and feeling “done,” this contrast of sweet and salty keeps your palate engaged, making you want to go back for forkful after forkful. Furthermore, the textural contrast is just as important as the flavor. The gritty, satisfying crunch of the cookie crust and the crushed cookie garnishes provide the perfect counterpoint to the silky, melt-in-your-mouth smoothness of the peanut butter filling and the cloud-like whipped cream.
This pie takes that classic flavor profile and turns it up to eleven by incorporating the cookies directly into the peanut butter filling itself. Every single bite ensures you get a little bit of everything: the buttery crust, the creamy center, the crunchy cookie bits, and the sweet topping. It is a masterclass in dessert architecture.
No-Bake Magic: Why This Dessert is a Weeknight Hero 🦸♀️
Let’s face it: baking a traditional pie from scratch can be a daunting and time-consuming task. Rolling out pie dough, blind baking crusts, monitoring oven temperatures, and praying that the center sets properly can induce anxiety in even the most seasoned home cooks. That is where the pure, unadulterated magic of the no-bake dessert comes into play.
This Peanut Butter Oreo Pie relies on chilling, rather than baking, to achieve its perfect structure. The crust is held together by melted butter, which solidifies in the refrigerator. The filling gets its stability from cream cheese and the natural thickening properties of whipped heavy cream folded into the heavy peanut butter. This means you can easily whip this dessert up in about 20 to 30 minutes of active kitchen time, and then let the refrigerator do the rest of the hard work for you.
This makes it the absolute perfect make-ahead dessert. In fact, no-bake pies often taste better on the second day, once the flavors have had a full 24 hours to meld and the cookie crust has softened just slightly from the moisture of the filling. It is the ideal stress-free recipe for busy weeknights, potlucks, Thanksgiving, or hot summer days when turning on the oven is simply out of the question.
Anatomy of the Perfect Pie Layering 🍰
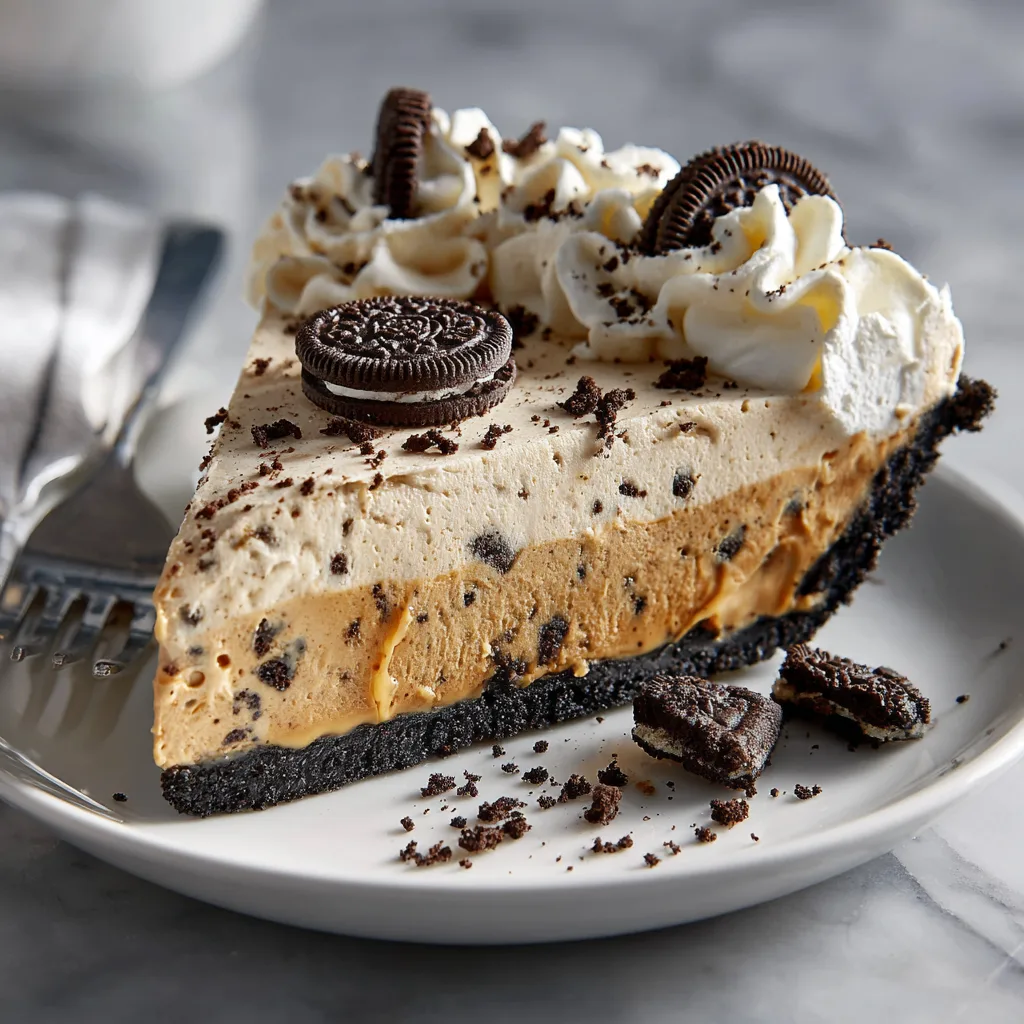
To truly appreciate this pie, we must break down its three distinct and glorious layers. Each component plays a vital role in the final texture and taste of the dessert.
Layer One: The Dark Cookie Crust
The foundation of this pie is built on classic chocolate sandwich cookies (like Oreos). The trick here is to crush the cookies whole—do not remove the creamy vanilla filling! That cream center actually acts as a fantastic binder, working alongside the melted butter to hold the crust together when chilled. When pressed firmly into the pie dish, it creates a sturdy, intensely chocolatey base that perfectly supports the heavy filling above it.
Layer Two: The Mousse-Like Peanut Butter Center
This is where the magic happens. The base of the filling is made by beating softened cream cheese and creamy peanut butter together. The cream cheese provides tanginess and structure. It is crucial to use standard, commercial creamy peanut butter (like Jif or Skippy) rather than natural peanut butter, as the oils in natural peanut butter can separate and cause your filling to split or become grainy. Once the peanut butter and cream cheese are whipped with powdered sugar and vanilla, freshly whipped heavy cream is gently folded in. This aeration transforms the heavy mixture into a light, velvety mousse. Finally, chopped cookie pieces are folded in for bursts of texture.
Layer Three: The Fluffy Whipped Topping
To crown this masterpiece, a generous layer of freshly whipped cream is swooped, swirled, or piped over the top. The light, unsweetened (or barely sweetened) whipped cream provides a refreshing, milky contrast to the dense richness of the peanut butter below. Garnishing with more crushed cookies and whole mini cookies not only makes it look like it came straight from a fancy bakery, but hints at the delicious flavors hiding inside.
Ingredients – Your Blueprint to Sweet Success 📝
Gathering the right ingredients is essential. Make sure your cream cheese is fully softened to room temperature before you begin to avoid any lumps in your filling!
- – 24 classic chocolate sandwich cookies (like Oreos), finely crushed for the crust
- – 5 tablespoons unsalted butter, melted
- – 1 block (8 oz) full-fat cream cheese, softened to room temperature
- – 1 cup creamy peanut butter (do not use natural, oil-separated peanut butter)
- – 1 cup powdered sugar (confectioners’ sugar), sifted
- – 1 teaspoon pure vanilla extract
- – 1 1/2 cups heavy whipping cream, very cold (for the filling)
- – 1 cup heavy whipping cream, very cold (for the topping)
- – 2 tablespoons powdered sugar (for the topping)
- – 10-12 additional chocolate sandwich cookies, roughly chopped for filling and garnish
Instructions – Step-by-Step to Peanut Butter Heaven 👩🍳
Follow these numbered steps to build your magnificent, towering pie. Remember, patience during the chilling phase is key to a clean slice!
- Create the Crust: Place the 24 whole sandwich cookies into a food processor and pulse until they become fine crumbs. (Alternatively, place them in a heavy-duty zip-top bag and crush them with a rolling pin). Pour the crumbs into a medium mixing bowl and stir in the melted butter until the mixture resembles wet sand.
- Press and Chill: Pour the crumb mixture into a 9-inch pie dish. Using the back of a measuring cup or your fingers, press the crumbs very firmly into the bottom and up the sides of the dish. Place the crust in the refrigerator to set while you make the filling.
- Whip the Heavy Cream (For the Filling): In a clean, chilled bowl, use an electric mixer to beat the 1 1/2 cups of cold heavy cream until stiff peaks form. Be careful not to over-beat and turn it into butter! Set this whipped cream aside in the fridge.
- Make the Peanut Butter Base: In a separate large mixing bowl, beat the softened cream cheese and the creamy peanut butter together until completely smooth and blended. Add the sifted 1 cup of powdered sugar and the vanilla extract, and beat again until the mixture is light and fluffy.
- Fold it Together: Take your bowl of whipped cream from the fridge. Using a rubber spatula, gently fold the whipped cream into the peanut butter mixture in three separate additions. Fold gently from the bottom to the top to keep the mixture light and airy. Once mostly combined, gently fold in about half of your roughly chopped extra cookies.
- Fill the Pie: Remove your chilled crust from the refrigerator. Spoon the fluffy peanut butter filling into the crust, spreading it out into an even layer with an offset spatula or the back of a spoon.
- The Crucial Chill: Cover the pie loosely with plastic wrap and place it in the refrigerator. Chill for a minimum of 4 hours, or preferably overnight, to allow the filling to set completely.
- Prepare the Topping: Right before serving, whip the remaining 1 cup of cold heavy cream with the 2 tablespoons of powdered sugar until stiff peaks form. You can either pipe this decoratively around the edges of the pie or spread it in a fluffy layer over the top.
- Garnish and Serve: Garnish the top of the pie with the remaining chopped cookies, whole mini cookies, or a sprinkle of cookie crumbs. Slice carefully, serve cold, and enjoy!
Pro-Tips for the Perfect Slice and Storage Tricks 🔪
Because this pie is soft and creamy, getting that perfect, Instagram-worthy, photogenic slice (just like the one in the picture!) requires a little bit of technique.
The Hot Knife Trick: When you are ready to serve, run a sharp, thin-bladed chef’s knife under very hot water for a few seconds. Wipe the blade completely dry with a clean towel, and immediately make your first cut. The hot metal will melt cleanly through the peanut butter layer and the dense cookie crust. Wipe the blade clean, heat it again under hot water, dry it, and make your second cut. Repeating this process for every single slice ensures perfectly clean, sharp edges that showcase the beautiful layers of your pie.
Storage Solutions: This pie must be kept cold. Store any leftovers in the refrigerator, loosely covered, for up to 5 days. However, this pie is also an exceptional candidate for freezing! If you want a firmer texture—almost like an ice cream pie—you can store it in the freezer. Wrap the pie dish tightly in two layers of plastic wrap and one layer of aluminum foil. It will keep in the freezer for up to 2 months. When you are ready to eat it, let it sit at room temperature for about 10-15 minutes to soften slightly before slicing.
Conclusion: Your New Go-To Dessert Masterpiece 🎉
In conclusion, this Decadent No-Bake Peanut Butter Oreo Pie is proof that you do not need an oven to create a spectacular, bakery-quality dessert. By combining the rich, contrasting flavors of salty peanut butter and dark chocolate cookies, and utilizing the aerating power of whipped cream, you create a dessert that is incredibly complex in texture but astonishingly simple to prepare.
Whether you are a novice baker looking to impress your friends or a seasoned pro needing a quick and reliable dessert fix, this recipe will not disappoint. It is a visual stunner, a textural delight, and a flavor explosion that celebrates one of the greatest food pairings in history. So grab your mixing bowls, crush up some cookies, and prepare to indulge in the ultimate peanut butter fantasy. Happy making, and even happier eating!
No-Bake Peanut Butter Oreo Pie
Ingredients
Equipment
Method
- Crush 24 whole cookies into fine crumbs. Mix thoroughly with melted butter. Press firmly into the bottom and sides of a 9-inch pie dish. Chill in the refrigerator.
- In a chilled bowl, whip 1.5 cups of cold heavy cream until stiff peaks form. Set aside.
- In a large bowl, beat the softened cream cheese and creamy peanut butter until smooth. Add 1 cup powdered sugar and vanilla, beating until fluffy.
- Gently fold the whipped cream into the peanut butter mixture in three additions until light and airy. Fold in the chopped cookies.
- Pour the filling into the chilled cookie crust and smooth the top. Refrigerate for at least 4 hours, or overnight, until firm.
- Before serving, whip the remaining 1 cup of heavy cream with 2 tablespoons of powdered sugar until stiff peaks form. Pipe or spread over the pie.
- Garnish with additional chopped or whole mini cookies. Slice with a hot, clean knife for perfect edges. Serve cold.