
🍮 Tiny Treats, Huge Flavor: Decadent Mini Crème Brûlée Cheesecakes
There are some desserts that just scream “special occasion.” And then there are desserts that whisper “special occasion,” but are secretly so easy, you can make them any time you crave a little elegance. These Mini Crème Brûlée Cheesecakes fall squarely into the latter category.
Imagine the rich, velvety texture of a classic cheesecake, perfectly portioned into individual servings, then topped with that signature, crackly caramelized sugar crust we all adore in a crème brûlée. It’s two iconic desserts, perfectly married into one utterly irresistible bite.
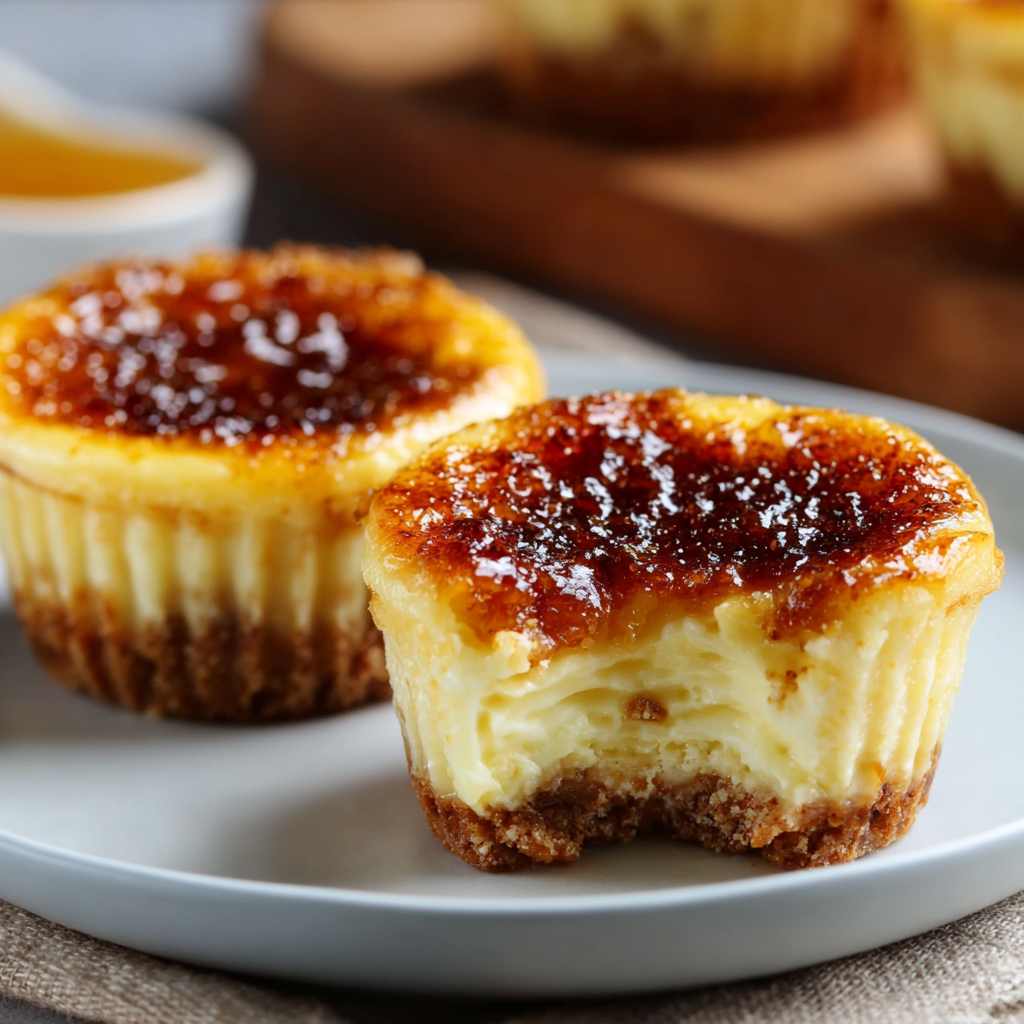
I first developed this recipe for a holiday party where I wanted something impressive but also easy to serve to a crowd. Traditional cheesecakes can be a commitment, with water baths and long bake times. These mini versions skip the fussy water bath, bake up quickly, and are ridiculously simple to manage. The best part? Each one gets its own beautiful, thick, gooey, viscous cheesecake filling, topped with a glass-like sugar shell that breaks with a satisfying “tap.”
The secret to their success lies in a simple, creamy cheesecake batter that bakes beautifully in muffin tins, and then a quick sprinkle of sugar and a blast from a kitchen torch for that signature brûlée finish. They look incredibly fancy, but they’re actually a breeze to make. Get ready to impress everyone, including yourself, with these decadent little delights.
🌟 Why These Mini Cheesecakes Are a Showstopper
These individual cheesecakes combine the best of both worlds:
- No Water Bath Required! Seriously. These mini wonders bake perfectly without the fuss of a water bath.
- Perfect Portions: Individual servings mean no slicing, no mess, and everyone gets their own beautiful dessert.
- The Signature Brûlée Crunch: That crisp, caramelized sugar crust is irresistible and adds an amazing textural contrast to the creamy, gooey cheesecake interior.
- Rich & Creamy Texture: Made with full-fat cream cheese and sour cream, the cheesecake itself is incredibly dense, smooth, and boasts a heavy, viscous consistency.
- Make-Ahead Dream: You can bake the cheesecakes in advance and brûlée them right before serving.

🛒 Your Simple Shopping List (Ingredients)
You’ll find these ingredients easily at any grocery store.
For the Graham Cracker Crust:
- 1 1/2 cups graham cracker crumbs (about 10-12 full sheets)
- 1/4 cup granulated sugar
- 6 tbsp unsalted butter, melted
For the Cheesecake Filling:
- 2 (8 oz) packages full-fat cream cheese, softened
- 1/2 cup granulated sugar
- 2 large eggs
- 1/4 cup sour cream (full-fat for best results)
- 1 tsp pure vanilla extract
- Pinch of salt
For the Crème Brûlée Topping:
- 1/4 cup granulated sugar (for sprinkling)
🧑🍳 Let’s Bake! Step-by-Step Instructions
- Prep for Baking: Preheat your oven to 325°F (160°C). Line a 12-cup muffin tin with paper liners.
- Make the Crust: In a medium bowl, combine the graham cracker crumbs and 1/4 cup granulated sugar. Pour in the melted butter and mix until the crumbs are thoroughly moistened and resemble wet sand.
- Press the Crusts: Divide the crumb mixture evenly among the 12 muffin cups. Press firmly into the bottom of each liner using the back of a spoon or a small glass. Bake for 5-7 minutes, then remove from the oven and let cool slightly while you prepare the filling.
- Prepare the Cheesecake Filling: In a large bowl, using a hand mixer or stand mixer, beat the softened cream cheese on medium speed until completely smooth and creamy, about 2-3 minutes. Scrape down the sides of the bowl. The mixture should have a heavy, gooey consistency.
- Add Sugar & Eggs: Add the 1/2 cup granulated sugar to the cream cheese and beat until just combined. Add the eggs one at a time, beating on low speed until just incorporated after each addition. Do not overmix after adding the eggs, as this can lead to cracks.
- Fold in Wet Ingredients: Stir in the sour cream, vanilla extract, and pinch of salt until just combined. The filling should be incredibly smooth, thick, and viscous.
- Fill the Cups: Pour or scoop the cheesecake filling evenly over the cooled crusts, filling each liner about two-thirds full.
- Bake the Cheesecakes: Bake for 20-25 minutes, or until the edges are set and slightly puffed, but the centers still have a slight jiggle.
- Cool & Chill: Remove the muffin tin from the oven and let the cheesecakes cool completely in the tin on a wire rack. Once cooled, transfer the muffin tin to the refrigerator and chill for at least 4 hours, or preferably overnight, until thoroughly cold and firm. This is essential for the heavy, gooey cheesecake to set properly.
- Brûlée Right Before Serving: Once thoroughly chilled, remove the cheesecakes from their liners. Sprinkle about 1/2 teaspoon of granulated sugar evenly over the top of each cheesecake. Using a kitchen torch, carefully caramelize the sugar until it melts, bubbles, and turns a rich amber color, forming a hard, glossy shell.
- Serve Immediately: Serve the Mini Crème Brûlée Cheesecakes right after brûléeing, so the sugar crust is still crisp.
💡 Crème Brûlée Perfection: Tips for a Flawless Top
The crackly sugar crust is what makes these so special. Here’s how to get it right:
- Chill Completely: The cheesecakes must be fully chilled and firm before you brûlée them. If they are warm, the sugar will melt the cheesecake and become a soggy mess.
- Even Sugar Layer: Sprinkle a thin, even layer of granulated sugar (not powdered sugar!) over the top of each cheesecake. Too much sugar can be difficult to melt evenly.
- The Kitchen Torch is Key: A kitchen torch (butane torch) is essential for achieving the perfect crème brûlée crust. Do not try to use your oven broiler—it will melt the cheesecake before the sugar can caramelize.
- Keep Moving: When using the torch, keep the flame moving constantly in small circles over the sugar. This ensures even caramelization and prevents burning.
- Listen for the Crack: The sugar will melt, bubble, and then cool quickly to form a hard, glass-like shell. You should hear a satisfying crack when you tap it with a spoon!
🍓 Decadent Variations & Toppings
While perfect as is, these cheesecakes are also a fantastic canvas for other flavors.
- Berry Burst: Top the finished (brûléed) cheesecakes with a single fresh raspberry or a few blueberries for a pop of color and tartness.
- Chocolate Drizzle: A swirl of melted dark chocolate over the brûléed top adds another layer of decadence.
- Espresso Kick: Add 1 teaspoon of espresso powder to the cream cheese mixture for a subtle coffee flavor.
- Lemon Zest: Grate the zest of one lemon into the cheesecake batter for a bright, citrusy lift that complements the heavy, gooey texture.
📦 Storage & Make-Ahead Magic
These cheesecakes are perfect for planning ahead!
- To Store (Un-brûléed): Store the baked and chilled (but not yet brûléed) cheesecakes in an airtight container in the refrigerator for up to 3-4 days.
- To Store (Brûléed): Once brûléed, the sugar crust is best enjoyed within a few hours. After that, it will start to soften due to moisture from the cheesecake. If you have leftovers with the crust, they are still delicious, just not as crisp.
- Make-Ahead: You can bake the cheesecakes up to 2-3 days in advance and keep them chilled. Brûlée just before serving for maximum crunch.
- Freezing: The un-brûléed cheesecakes (without liners) can be frozen for up to 1 month. Thaw in the refrigerator overnight before brûléeing and serving. The heavy, viscous cheesecake freezes and thaws beautifully.
🎉 Conclusion: Your New Dessert Obsession
These Mini Crème Brûlée Cheesecakes are an absolute triumph of flavor and texture. The buttery graham cracker crust, the rich, thick, gooey, viscous vanilla cheesecake, and that utterly satisfying crack of caramelized sugar on top create a symphony of deliciousness. They are elegant enough for a formal gathering, yet simple enough for a weeknight treat. So skip the store-bought desserts and treat yourself (and your loved ones!) to these homemade beauties. They’re guaranteed to be a crowd-pleaser and a recipe you’ll revisit again and again.
Happy baking, and enjoy that amazing crunch!


