Ultimate Glazed Vanilla Bean Belgian Waffles: A Weekend Masterpiece 🧇✨
There is something undeniably magical about a slow Sunday morning. The house is quiet, the sun is just beginning to stream through the blinds, and the promise of a delicious breakfast hangs in the air. While pancakes often get the glory for quick weekday treats, the waffle—specifically the Glazed Vanilla Bean Belgian Waffle—is the undisputed king of the weekend brunch. If you have been searching for that perfect balance of a crispy, golden exterior and a light-as-air, fluffy interior, topped with a glaze that rivals your favorite donut shop, you have arrived at the right destination.
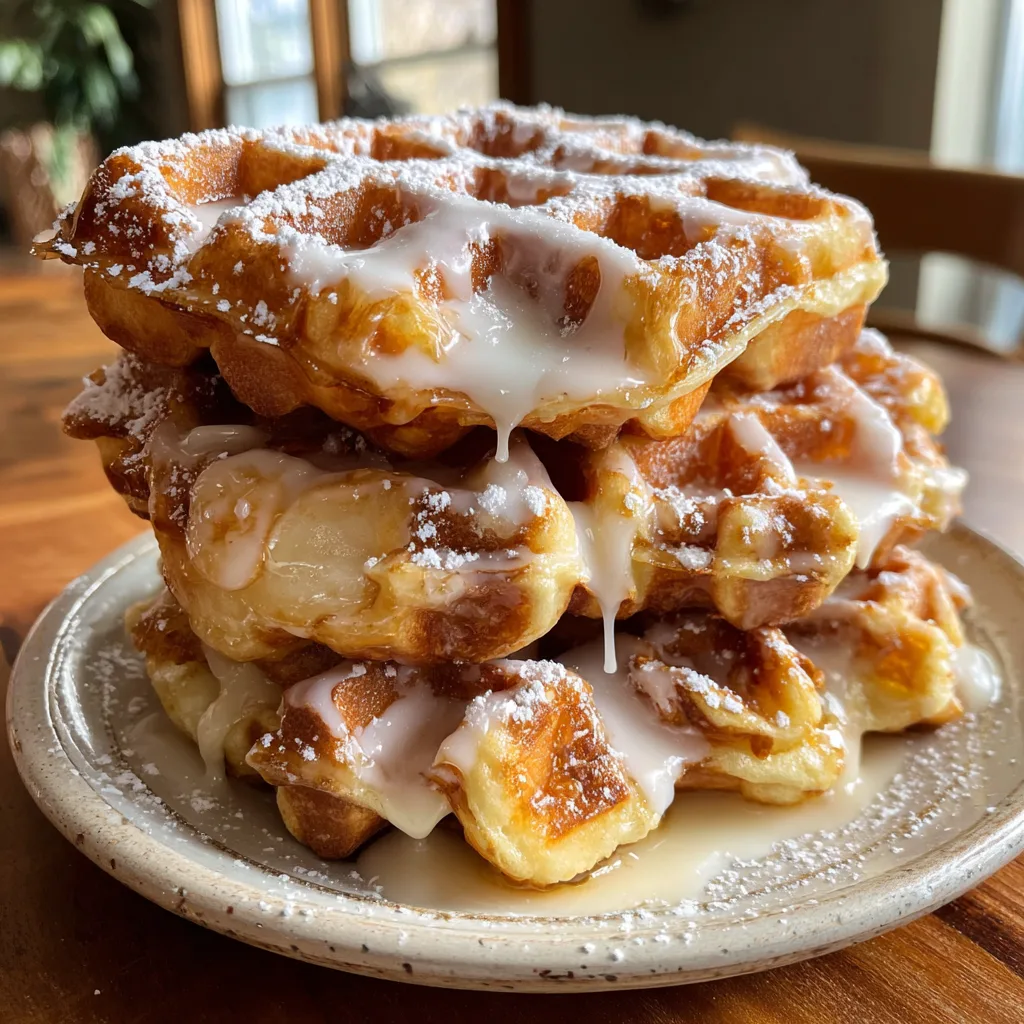
This isn’t just a recipe; it is a comprehensive guide to mastering the art of the waffle. We aren’t making soggy, limp waffles here. We are making architectural marvels of breakfast cuisine: tall, deep-pocketed Belgian waffles that hold pools of sweet, creamy glaze. The image of these stacked beauties, dripping with white icing and dusted with snowy powdered sugar, is enough to get anyone out of bed. But the taste? The taste is where the real memory is made.
Why This Recipe Works Every Single Time 🏆
You might be wondering, “Why do I need a 2,500-word guide for waffles?” The answer lies in the chemistry. Baking is a science, and waffles are a delicious experiment in thermodynamics and structure. Many recipes fail because they result in dense, heavy pucks or floppy waffles that tear when you lift the iron lid.
This recipe uses a specific ratio of fat to flour, ensuring a crumb that is tender but sturdy. We utilize double-acting baking powder to give lift both when the ingredients mix and when they hit the hot iron. Furthermore, the glaze isn’t just sugar and water; it uses melted butter and cream to create a rich, opaque coating that clings to the waffle rather than soaking in and making it soggy immediately. Whether you are hosting a brunch party or simply treating yourself, this recipe is engineered for success.
The History of the Waffle: A Culinary Journey 🌍
Before we fire up the waffle iron, let’s appreciate the heritage of this dish. The concept of cooking batter between two hot metal plates dates back to ancient Greece, where they made flat cakes called obelios. However, the waffle as we know it began to take shape in the Middle Ages in Europe. The honeycomb pattern, which is essential for trapping butter and syrup (or in our case, glaze), emerged around the 13th century.
The “Belgian” waffle, characterized by its larger size, lighter batter, and deeper grid pattern, was actually introduced to America at the 1964 New York World’s Fair by Maurice Vermersch. Originally called the Brussels Waffle, it was yeast-leavened. Today, we often use baking powder for ease and speed, but the goal remains the same: maximum fluffiness and deep pockets for toppings.
Ingredients
To recreate the mouthwatering stack of waffles shown in the picture, you need quality ingredients. Here is what you will need for the batter and the signature glaze:
Glazed Vanilla Bean Belgian Waffles
Ingredients
Equipment
Method
- Preheat your waffle iron. Preheat oven to 200°F (95°C) to keep cooked waffles warm.
- In a large bowl, whisk together flour, sugar, baking powder, and salt.
- Separate eggs. Whisk yolks with milk, melted butter, and vanilla. Pour into dry ingredients and mix gently.
- Beat egg whites until stiff peaks form. Gently fold into the batter.
- Pour batter onto hot waffle iron and cook until golden brown and crisp (about 4-5 minutes).
- While waffles cook, whisk glaze ingredients until smooth.
- Serve waffles warm, drizzled generously with glaze and dusted with powdered sugar.
Notes
For the Waffles:
– 2 cups All-Purpose Flour (scooped and leveled)
– 2 tablespoons Granulated Sugar
– 1 tablespoon Baking Powder (ensure it is fresh)
– 1/2 teaspoon Fine Sea Salt
– 2 Large Eggs (separated, see tips below)
– 1 1/2 cups Whole Milk (room temperature)
– 1/2 cup Unsalted Butter (melted and slightly cooled)
– 1 teaspoon Pure Vanilla Extract
For the Vanilla Bean Glaze:
– 1 1/2 cups Powdered Sugar (sifted)
– 2 tablespoons Unsalted Butter (melted)
– 3-4 tablespoons Heavy Cream or Whole Milk
– 1 teaspoon Vanilla Bean Paste (or clear vanilla extract)
– Pinch of Salt
– Additional Powdered Sugar for dusting
Instructions
Follow these steps precisely to achieve that picture-perfect golden stack.
1. Preheat the Waffle Iron: Plug in your waffle iron and let it heat up. If it has temperature settings, aim for medium-high. You want a hot iron to create that immediate crispy crust. Preheat your oven to 200°F (95°C) to keep cooked waffles warm.
2. Mix Dry Ingredients: In a large mixing bowl, whisk together the flour, granulated sugar, baking powder, and salt. Whisking aerates the flour, which helps with fluffiness.
3. Separate the Eggs (The Secret Step): Carefully separate the egg whites from the yolks. Place the whites in a clean, dry medium bowl and the yolks in a separate small bowl.
4. Mix Wet Ingredients: Whisk the milk, melted butter, and vanilla extract into the bowl with the egg yolks. Pour this wet mixture into the dry ingredients. Stir gently with a spatula just until combined—do not overmix! A few lumps are perfectly fine.
5. Whip the Egg Whites: Using a hand mixer, beat the egg whites on high speed until stiff peaks form. This means when you lift the beaters, the egg whites stand straight up. This takes about 2-3 minutes.
6. Fold in the Whites: Gently fold the beaten egg whites into the batter. Use a rubber spatula to cut through the center and fold over. Do this carefully to keep the air bubbles intact. This makes the waffles incredibly light.
7. Cook the Waffles: Lightly grease the waffle iron with cooking spray or brushed butter. Pour the recommended amount of batter (usually 1/2 to 3/4 cup depending on your iron size) onto the center of the grid. Close the lid gently.
8. Wait for the Steam: Cook until the steam stops coming out of the sides of the iron and the waffles are deep golden brown, usually 4-6 minutes. Do not open the lid too early, or you will rip the waffle.
9. Prepare the Glaze: While the waffles cook, whisk together the powdered sugar, melted butter, milk (1 tablespoon at a time), vanilla bean paste, and salt in a small bowl until smooth. It should be thick but pourable.
10. Assembly: Stack the warm waffles on a plate. Generously pour the glaze over the top, letting it drip down the sides. Finish with a dusting of powdered sugar using a fine-mesh sieve. Serve immediately.
The Science of the Perfect Waffle 🔬
Leavening Agents: Baking Powder vs. Yeast
Authentic Liège waffles use yeast and pearl sugar, resulting in a dense, brioche-like texture. However, the waffles pictured are American-style Belgian waffles, which rely on chemical leavening. We use a significant amount of baking powder (1 tablespoon) to ensure a rapid rise. The separation of eggs acts as a mechanical leavener; the trapped air in the egg whites expands in the heat, giving the waffle its cloud-like texture.
The Role of Fat
We use butter in two places: the batter and the glaze. In the batter, butter inhibits gluten formation slightly, ensuring the waffle is tender rather than chewy like bread. It also adds flavor that oil simply cannot replicate. In the glaze, the melted butter adds a glossy sheen and a rich mouthfeel.
Maillard Reaction
That beautiful golden-brown color you see in the photo? That is the Maillard reaction—a chemical reaction between amino acids and reducing sugars that gives browned food its distinctive flavor. To maximize this, ensure your iron is fully preheated before the first pour. A cold iron results in pale, sad waffles.
Equipment: Choosing the Right Iron ⚙️
Not all waffle irons are created equal. To get the result in the photo, you need a Belgian Waffle Maker. These have deeper grids (usually 1 inch deep) compared to a standard “classic” waffle maker.
- Flip vs. Static: Flip waffle makers (the ones that rotate 180 degrees) are excellent because they help the batter distribute evenly into both the top and bottom plates, resulting in a perfectly shaped waffle.
- Shape: Square or round doesn’t matter for taste, but square waffles (as seen in the image) often yield more surface area for toppings.
- Material: Non-stick is standard, but ceramic-coated irons are becoming popular as they are PTFE and PFOA free.
Variations to Spice Up Your Brunch 🍓
Once you have mastered the base recipe, the sky is the limit. Here are creative twists to keep your breakfast exciting:
1. Churro Waffles
After cooking, brush the hot waffles with melted butter and toss them immediately in a mixture of cinnamon and sugar before drizzling with the glaze. This mimics the taste of a fried churro.
2. Lemon Blueberry
Add 1 tablespoon of lemon zest and 1/2 cup of fresh blueberries to the batter. Change the glaze by swapping the milk for fresh lemon juice for a zesty kick.
3. Savory Cheddar & Chive
Omit the sugar and vanilla from the batter. Fold in 1 cup of shredded sharp cheddar cheese and 2 tablespoons of chopped chives. Serve these with fried chicken or a poached egg instead of the glaze.
4. Chocolate Chip
Fold 1/2 cup of mini chocolate chips into the batter. Mini chips are better than regular ones because they disperse more evenly and don’t weigh down the batter.
Troubleshooting Common Waffle Woes 🛠️
Even the best chefs encounter issues. Here is how to fix them:
The Waffles are sticking to the iron:
This usually means the iron wasn’t hot enough, or there wasn’t enough fat in the batter (don’t reduce the butter!). Also, try brushing the iron with melted butter or oil between every second waffle.
The Waffles are heavy and dense:
You likely overmixed the batter. Remember, once you add the wet ingredients to the dry, gluten starts to develop. Stir gently. Alternatively, your baking powder might be expired.
The Glaze is too runny:
Add more powdered sugar, a tablespoon at a time. The glaze should move slowly like lava, not like water.
The Waffles are soft, not crispy:
Humidity is the enemy. Do not stack them immediately if you aren’t serving them right away. Place them in a single layer on a wire rack in a warm oven. Stacking them traps steam and softens the crust.
Storage and Freezing Guide ❄️
This recipe makes a generous batch, and leftovers are a gift to your future self. Waffles freeze beautifully.
To Freeze:
Let the waffles cool completely on a wire rack. This is crucial to prevent ice crystals. Place them in a single layer on a baking sheet and freeze for 1 hour (flash freezing). Once solid, transfer them to a heavy-duty freezer bag. They will keep for up to 3 months.
To Reheat:
Do not use the microwave! The microwave will turn them into rubbery sponges. Instead, pop the frozen waffle directly into your toaster or toaster oven. This revives the crispy exterior while warming the inside.
Serving Suggestions ☕
While these glazed waffles are a meal in themselves, a balanced brunch needs sides.
- Beverages: A hot latte, cold brew coffee, or a mimosa pairs perfectly with the sweetness of the glaze.
- Protein: Crisp bacon or savory sausage links provide a salty contrast that cuts through the sugar.
- Fruit: Fresh berries (strawberries, raspberries) or sliced bananas add freshness and color.
Conclusion: The Sunday Ritual
Making waffles from scratch is more than just cooking; it is a ritual of care. It says to your family or guests, “I value our time together enough to separate eggs and melt butter.” The result is a breakfast that feels like a hug on a plate. The crunch of the waffle, the soft, steaming interior, and the sweet, creamy glaze create a symphony of textures and flavors that store-bought frozen waffles can never hope to achieve.
So, grab your whisk, heat up that iron, and prepare to make the best batch of glazed waffles you have ever tasted. Your Sunday morning just got a major upgrade.